Advertisement
Quick Links
Manual Contents
Safety Instructions
Caution: Carefully read all Rules and Instructions for Safe Operation.
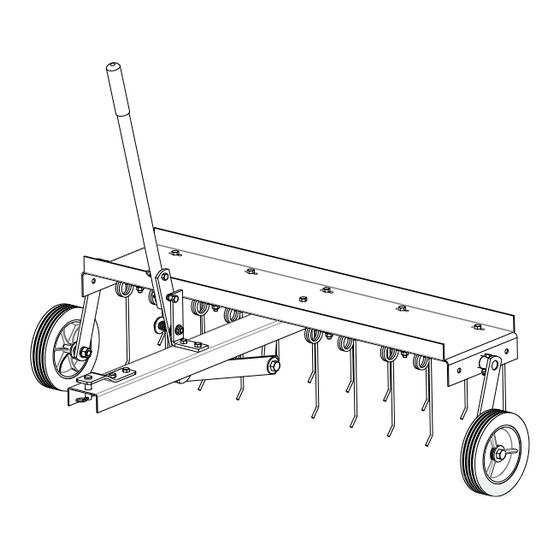
Owner's Manual | TT500 | 40" Tow Behind Dethatcher
Your New Dethatcher
2
Congratulations on your purchase of a new
4-9
Precision Products Inc. dethatcher. Your dethatcher
10
has been engineered and built to give you the most
10
dependable and best performing product possible.
2-3
12
If you experience any problem you can not easily
resolve,
knowledgeable
department toll-free at 1 (800) 225-5891.
please
feel
free
and
helpful
customer
Form No. 5570 (Rev. 10/11)
to
contact
our
service
Advertisement

Related Manuals for Precision TT500

Summary of Contents for Precision TT500
-
Page 1: Table Of Contents
Owner’s Manual | TT500 | 40” Tow Behind Dethatcher Manual Contents Your New Dethatcher Safety Instructions Congratulations on your purchase of a new Assembly Precision Products Inc. dethatcher. Your dethatcher Operation has been engineered and built to give you the most Maintenance dependable and best performing product possible. - Page 2 Rules for Safe Operation All power equipment can cause injury or property damage if operated improperly. Please read and observe the following safety rules and exercise caution at all times when operating equipment. Read and understand your tractor owner’s manual and towing safety rules. ...
-
Page 3: Assembly
Hardware Package Contents Ref. Qty. Description Ref. Qty. Description 1/2” x 1-3/4” Shoulder Bolt Base Plate 1/2” x 1-3/4” Clevis Pin Tow Bar Compression Spring Clevis Plate 1/2” Flat Washer Handle 1/2” Nylon Washer Axle Assembly 3/8” Flat Washer Wheel Bracket 5/16”... - Page 4 Assembly Instructions (2) 1/2” Wrenches (2) 3/4” Wrenches (2) 9/16” Wrenches (1) 1/4” Allen Wrench Remove from Carton Remove and layout all parts and hardware packages from the carton. Identify them using the illustrations on pages 2 and 3. 1. Place the Base Plate on a flat surface with the front facing away for you (the front will have three bolt holes in the center).
- Page 5 2. Align the three rear holes in the Tow Bar with the corresponding hole in the Base Plate. Insert a 5/16” x 3/4” Hex Head Bolt into one of the holes in the Base Plate then through the corresponding hole in the Tow Bar. Insert a 5/16” Flat Washer onto the bolt followed by a 5/16” Lock Washer, then secure with a 5/16”...
- Page 6 4. Place a 1” x 1/2” Spacer onto the Axle, followed by a Wheel Bracket. Align the hole of the Wheel Bracket with the hole in the Axle. Insert a 5/16” x 1-1/2” Hex Head Bolt into the hole in the Wheel Bracket and Axle.
- Page 7 6. Align the two holes of the Tow Bar and Handle Brace as shown. Insert a 5/16” x 1” Hex Head Bolt into one of the holes in the Handle Stop and then through the corresponding hole in the Tow Bar, place a 5/16”...
- Page 8 7. Place the 1/2” Nylon Washer onto the threaded stud on the Lever Link, insert the stud into one of the holes of the Linkage Bar, and secure with a 1/2” Nylock Nut (Tighten all the way until snug then back off 1/2 a turn).
- Page 9 8. Attach the Handle Grip to the Handle. Insert the 5/16” x 1-3/4” Hex Head Bolt in to the top hole in the Handle (from the right side as us are facing the unit), then through the top hole of the Lever Link and secure with a 5/16”...
-
Page 10: Operation
Please do not return this product to the STOP store prior to contacting Precision. 3. When in use, all tines on the dethatcher should bend to the back and “flip” the thatch forward Precision Products Inc. -
Page 11: Parts
Ref. Qty. Part# Description Ref. Qty. Part# Description 1248 5/16” x 3/4” Hex Head Bolt 5592GY Base Plate 4011 1/2” x 1-3/4” Shoulder Bolt 5561GY Tow Bar 1840 1/2” x 1-3/4” Clevis Pin 1243GY Clevis Plate 4272 Compression Spring 5576GY Handle 1506 1/2”... -
Page 12: Warranty
Manufacture’s Limited Warranty Pull Behind Accessories the product as set forth above. The provisions as set The limited warranty set forth below is given by Precision forth in this warranty provide the sole and exclusive Products Inc. with respect merchandise...
Need help?
Do you have a question about the TT500 and is the answer not in the manual?
Questions and answers