Table of Contents
Advertisement
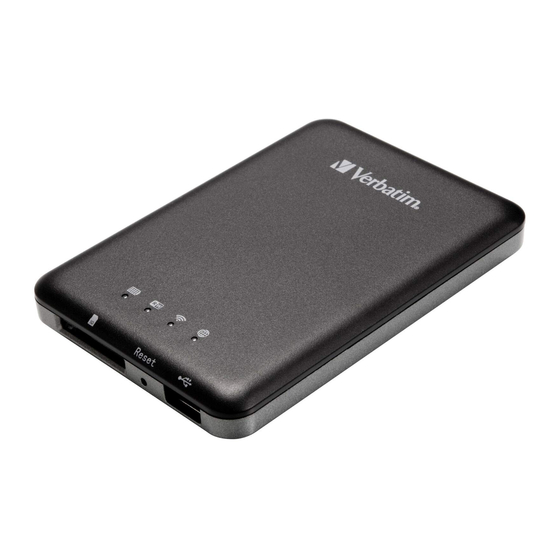
The portable Wi-Fi SD/USB (code name: Verbatim) device allows you to convert any SD memory cards
and USB external storage devices into a Wi-Fi accessible media.
Simply insert your SD memory card into the SD slot or connect your USB external storage into the built-in
USB port. Switch the unit on and you can now wirelessly access your videos, music, photos, data and
stream it to your iPad®, iPhone®, tablets, smartphones, and notebooks. There is no need to worry about
running out of space on your mobile devices
For maximum portability, the Wi-Fi SD/USB device has a built-in rechargeable battery. Simply plug it into
any available USB port on your computer to charge. As simple as 1-2-3, you are ready to enjoy your
device and no waiting needed. With the SD or External USB connected, the portable Wi-Fi SD/USB can
be accessed while the battery is charging.
Product Features
•
Supports SDXC, SDHC and SD memory cards. SD adapter is needed for Micro SD and Mini SD.
•
Supports USB 1.1, 2.0 External Storage devices
•
Stream media over WiFi enabled devices up to 5 users simultaneously
•
Access and stream your music, videos, photos and data from the SD memory cards or from USB
external storage using the free custom mobile app supporting iOS and Android operating systems
•
Built-in micro USB port for charging and data sync function
•
Up to 7 Hours of continuous battery life*
•
Supports Hot-Plug
•
Search function to locate and access your file much faster
•
Internet access capability via wireless, supporting 802.11 b/g/n speeds
•
Supports LAN data-shares and cross-platforms including Windows, Mac, Linux, iOS and Android.
Power 7 Technology Corporation – Wi-Fi SD/USB Users Manuals v1.0
PRODUCT OVERVIEW
1
Advertisement
Table of Contents

Related Manuals for Verbatim 98243

Summary of Contents for Verbatim 98243
-
Page 1: Product Overview
PRODUCT OVERVIEW The portable Wi-Fi SD/USB (code name: Verbatim) device allows you to convert any SD memory cards and USB external storage devices into a Wi-Fi accessible media. Simply insert your SD memory card into the SD slot or connect your USB external storage into the built-in USB port. - Page 2 • Support multiple NSA, including Samba / WebDAV • Support multiple platform client tools, including Windows, Mac, Linux, iOS, and Android *Battery life subject to normal usage conditions and configurations. *Minimum Hardware Requirement :1GB Storage Space for SD Memory Card or Flash Drive (100MB capacity will be used for temporary files) A.
-
Page 3: Hardware And Accessories
1. Hardware and Accessories The Power 7 Wi-Fi SD/USB Storage kit includes the following: 2 Product Parameters 2.1 Product Dimensions Dimension:112mm (L) X 78mm (W) X 14mm (H) 2.2. Product Specification CPU: Model: Ralink RT5350 Frequency: MIPS24KEc 360MHZ Wi-Fi: Standard: 802.11 b/g/n, Frequency: 2.4 GHZ... -
Page 4: Minimum Hardware Requirements
The operating humidity (non-condensing) is between 5% to 90% and non-operating humidity is 5% ~ 90% (non-condensing). 3. Minimum Hardware Requirements • Internet Connection • PC Operating System Requirements o Windows: XP/Vista/Windows 7 o Mac: OS X 10.6.0 and later o Others: Fedora 12 (Linux) and late •... -
Page 5: Device Interface
5. Device Interface 5.1 USB Interface : The built-in Micro USB 2.0 is for data transfer and charging the internal battery when connected directly into the computer’s USB port or wall chargers. 5.2 USB Host Interface : The built-in USB 2.0 Host Interface for connecting any USB Mass Storage device and for charging mobile devices such as smartphones, MP3 Players, and tablets. -
Page 6: Storage Installation
Internet LED: Blue Color: Good signal No LED: No connection established SD Read/Write LED: Blue Color: Flashing: Reading/Writing Data Steady Light: Initialization process completed Ready to use 6. Storage Installation 6.1 SD Memory Card Note: Do not touch the exposed connectors on your SD memory card. Installing the SD memory card is very simple. -
Page 7: Using Personal Computer
Press the power button to switch on the device. Wait for few seconds to complete the initialization process and your USB external storage is ready to use. 7. PC Client Software Installation Our included Client Utility software is the only software that you will need to copy on your computer. This software utility allows you to easily search and look for your Wi-Fi SD/USB that is connected from your home network. - Page 8 8.1. Connecting Wirelessly to PC Switch-on the Wi-Fi SD/USB by pressing the power button at the front panel. Wait for few minutes until the Wireless LED remain lit. Enable the Wi-Fi feature on your PC and open the Wireless Network Connection.
- Page 9 Type the default User Name as admin and leave the User Password as blank. Click on the “Log In” button to access the Web Management Interface. If you choose to click on the “My Storage” button, enter the admin login name and password to gain access to the Wi-Fi SD/USB.
- Page 10 Wireless Access. Connecting the Wi-Fi SD/USB to another wireless device to have the internet access. Selecting the Wireless Access 1. SSID. Enter the SSID name or click on the “Rescan” button to automatically search for the available wireless network connections. 2.
- Page 11 3. Click on the “Next” button. The next step is to configure the Wi-Fi Disk. D) SSID: Enter the combination of letters and numbers only. 32 characters is the maximum allowable SSID length E) Channel: The default setting is set to Auto. There are 14 available channels to choose from.
- Page 12 H) Password: The default password is set to 11111111. IP Address: The default IP address is set to 10.10.10.254 with subnet mask of 255.255.255.0. The IP address can be changed. 4. Click on the “Next” button. The next step is to change the admin default password. Click on the “Next”...
-
Page 13: Using Mobile Devices
9. Using Mobile Devices 9.1. iOS Client App Installation 1. Click on the “App Store” icon on the iOS device as seen on the image below. Search and locate the free “AirStor” app and follow the on-screen installation instructions. 2. Once the installation process has been completed, the “AirStor” app can be found on the desktop as seen on the image below. -
Page 14: Wirelessly Connecting Your Iphone/Ipad
9.2. Wirelessly connecting your iPhone/iPad 1. Turn-on the Wi-Fi SD/USB. Wait for few minutes to complete the initialization process. The blue Wi-Fi LED on the device should remain solid indicating that the initialization process has been completed. 2. Click on the “Settings” icon on the iOS device as seen on the screenshot below. 3. -
Page 15: Ios User Login
Once the “WiFiSD-XXXX” is selected, a check mark will appear before the SSID and the Wi-Fi logo will appear after the device name on the top left of the display. 9.3. iOS User Login 1. Click on the “AirStor” icon to launch the app as seen on the image below. 2. - Page 16 3. Once the password has been entered correctly, you will be automatically connected into the “My WiDisk”. The “My WiDisk” is the Wi-Fi SD/USB Storage. As seen on the screenshot above, the SD Memory Card and the USB Flash Disk are both mounted on the desktop. Power 7 Technology Corporation –...
-
Page 17: Android Client App Installation
9.4. Android Client App Installation 1. Click on the “Play Store” icon on the desktop as seen on the image below. Search and locate the free “AirStor” app and follow the on-screen installation instructions. 2. Once the installation process has been completed, the “AirStor” app can be found on the desktop as seen on the image below. -
Page 18: Android User Login
3. Switch the Wi-Fi to ON position. Inside the Wi-Fi networks, the “WiFiSD-XXXX” should appear on the list. Click on the “WiFiSD-3932” as seen on the image below. The “3932” part of the SSID is the last 4 digits of the device MAC Address. Enter the default password (11111111) and click on the “Connect”... -
Page 19: Basic Functionality
no need to enter it again the second time you login. 3. Once the password has been entered correctly, you will be automatically connected into the “My WiDisk”. The “My WiDisk” is the Wi-Fi SD/USB Storage. As seen on the screenshot above, the SD Memory Card and the USB Flash Disk are both mounted on the desktop. 10. - Page 20 My WiDisk Main Screen View – the WiFiSD_Volume1 and USBDisk_Volume1 can be seen on the desktop. Home Button – back to the main screen. View Button - change to List or Thumbnail view. Power 7 Technology Corporation – Wi-Fi SD/USB Users Manuals v1.0...
-
Page 21: Android Device Client
Setting Button – change the Wi-Fi SD/USB configuration. Back Button – back to previous screen File Manager Button – to share, copy, delete, download, upload file functions Search Box – to search for specific file name and/or file extension. My WiDisk – the Wi-Fi SD/USB or the Remote Storage. My Device –... - Page 22 My WiDisk Main Screen View - the WiFiSD_Volume1 and USBDisk_Volume1 can be seen on the desktop. Home Button – back to the main screen. View Button - change to List or Thumbnail view. Setting Button – change the Wi-Fi SD/USB configuration. This button is only active when switched to the “My WiDisk”.
-
Page 23: Playing Music/Audio (Ios And Android)
File Manager button – to share, copy, edit, delete, download, upload file functions Search Box – to search for specific file name and/or extension. My WiDisk – the Wi-Fi SD/USB or the Remote Storage My Device – the device that you are using to access the Wi-Fi SD/USB or the Local Storage More Button –... -
Page 24: Playing Movie/Video (Ios Only)
Note: Please consult your device manual to check whether it will support the music/audio files that you would like to play. - When clicked, the current music that is playing will restart at 0.00. Clicked twice, it will play the previous music. - Page 25 Wi-Fi SD/USB for ease of use and file organization. The movie or video files can be played regardless if you are inside the “My WiDisk” or “My Device”. Simply locate the movie or video file that you would like to play. Click on the file name and your movie will automatically play as seen on the screenshot below.
-
Page 26: Playing Movie/Video (Android Only)
- When clicked, the movie that is currently playing will stop and will exit the Movie Player Interface. - When clicked, this will scale the movie automatically according to your preference. - Click, hold and slide the progress button to fast-forward or rewind the movie. - Click, hold and slide the volume control to increase or lower the volume. -
Page 27: Viewing/Playing Photos (Ios Only)
Note: The control panel will vary depending on the movie player installed on your Android devices. Please consult the movie player’s user guide on how to control the movie. 10.6. Viewing/playing photos (iOS only) Tip: It is highly recommended to create a folder or folders where to copy all your photos into the Wi-Fi SD/USB for ease of use and file organization. - Page 28 There are few available functions to control the slideshow. • Click the button to pause the slideshow from playing and press again to continue playing. • Click the button to restart or to replay the slideshow. • Click the button to play the slideshow once and it will stop at the last image or photo. •...
-
Page 29: Viewing/Playing Photos (Android Only)
• Select button - search and locate the file or files that you would like to play as the background music. Click on the button to return to the slideshow as seen on the screenshot below. • Repeat button – the background music will continue playing the same music when it is switched-on. - Page 30 swipe your finger across the screen to manually view the photos or click the button, to automatically play the photos as slideshow. There are few functions that are available to control the slideshow. • Click the button to pause the slideshow from playing and press again to continue playing....
-
Page 31: Sharing Photos/Images (Ios Only)
10.8. Sharing photos/images (iOS only) There are few available options to share photos to your friends and family; by email, saving to the device Photo Album and upload to Facebook. Note: Internet connection is required to share photos/images via email or accessing any social media network. -
Page 32: Sharing Photos/Images (Android Only)
2)Add to photo – when clicked, the selected photo will be saved into the Photo Album of the device. 3)Upload to Facebook – when clicked, you will be directed to the Facebook login screen. The Facebook app must be installed on your device. Facebook login and password is required. 10.9. -
Page 33: Opening/Viewing Documents (Ios Only)
2) Save Photo button - when clicked, the selected photo will be saved into the device Photo Gallery. 10.10. Opening/viewing documents (iOS only) The device client app supports keynote, numbers, page, Excel, Word, .pdf, .txt and ppt files. To open or view any documents, simply click on the file name or the icon. This will automatically open the supported file. - Page 34 Note: Internet connection is required to send emails. Click the “E-Mail” button. The default email app will launch automatically and the selected document will be sent as an attachment. Once the email is sent, there will be a “Mail Sent” message that will appear on the lower-left corner of the screen.
-
Page 35: Opening/Viewing Documents (Android Only)
“Mail Canceled” message will appear on the lower-left corner of the screen when the email is canceled. See the screen shot below. 10.11. Opening/viewing documents (Android only) To open/view a document using your Android device, simply click on the file name or icon that you wish to open/view. -
Page 36: Copy, Delete, Download, Upload Functions (Ios And Android)
Note: Internet connection is required to send emails. Due to the complexity of the Android OS, sending emails may vary depending on the app installed on your mobile device. Please consult your device manual if in doubt. To send the document as an attachment, click on the button at the top right of the screen. - Page 37 seen on the screenshots below, the button will appear at the top as part of the menu once the button is clicked. Screenshot from iOS Device Screenshot from Android Device At the bottom of the screen, there are few available functions. See below for their functions. - Once clicked, all files will be selected.
- Page 38 - From the My WiDisk, the file or files may be downloaded to the local drive or to the My Device. The down arrow indicates that you are currently in the My WiDisk. - From the My Device, the file or files may be uploaded to the remote storage or to the My WiDisk.
- Page 39 3. Click on the 4. Select and click the folder where you want the file or files to be copied or transferred. • A new folder may be created to copy/transfer the selected file or files. To create a new folder, simply click on the “Create Folder”...
-
Page 40: Copying/Transferring File To My Widisk (Ios And Android)
5. Click on the “Confirm” button to start copying/transferring files as seen on the screenshot below. Note: Successfully copied/transferred file or files will be listed below inside the “Recent” window as seen on the screenshot above. Click on the “Clear” button to remove or clear the list. 6. - Page 41 1. Click on the button. 2. Use your index finger to select a single or multiple files or you may use the button to select all files to be copied/transferred. 3. Click on the button. 4. Select and click the folder where you want the file or files to be copied or transferred. •...
- Page 42 characters and up to maximum of 26 characters in length. Click the “Cancel” button to exit. 5. Click on the “Select” button to start copying/transferring files as seen on the screenshot below into the “My WiDisk”. 6. Click anywhere on the screen and you will return to the previous screen. Once done, click on the to exit.
-
Page 43: Upload/Download History And Status
• To delete file or files, click on the button. • Use your index finger to select a single or multiple files. You may click on the button to Select All files to delete/erase. • Click on the to delete or erase the selected file or files. A warning message will appear on the screen to confirm file deletion as seen on the screenshot below. - Page 44 10.19. Exiting AirStor App (Android) To exit from using the AirStor Android mobile devices, simply click on the and select the “Exit” button. A warning “Are you sure you want to exit this applet?” message will appear. Click “OK” to continue existing or click “Cancel”.
- Page 45 10.21. Uninstall AirStor App (Android) To uninstall the AirStor app from your Android mobile devices, see the instructions below. Note: Uninstalling app on the Android devices will vary. Please consult your mobile device manual prior to removing any application. 1. Click on the Settings icon from your desktop. 2.
-
Page 46: Web Management Functions
5. A warning “AirStor. This application will be uninstalled.” Click the “OK” button to continue uninstalling the app or click on the “Cancel” button. 11. WEB Management Functions Our built-in Web Management software is a unique web-based utility stored inside our Wi-Fi SD/USB product. -
Page 47: Explorer Function
Allows the user to make changes on the admin password. Provides information of the Internal hard disk drive. Networking Settings allow the user to make modifications and changes to Host Name, Wi-Fi and LAN, DHCP Server, Internet and DDNS. Allows the users to enable and disable the Win File and Ext Net Services. Allows the user to make modifications and changes to the Time Settings, Create System Backup, Firmware Upgrade and Resetting to the factory default setup. -
Page 48: Context Menu
Refresh button - to refresh the display Upload button - to upload file or files into a specific folder. Create Folder - to create a new folder. Maximum folder name is 26 characters in length. Copy button - to copy file or files and paste them into another folder. Move button - to move a file or files from one location to another Download button - to download a file or files into a specific location. - Page 49 2. On the folder level, you can right-click using your mouse and a pop-up menu will appear. You may Open, Copy, Cut, Delete or Rename the folder as seen on the screenshot below. 3. Selecting multiple files and right-click on the mouse will allow the user to either Copy, Cut or Delete the files as seen on the screenshot below.
-
Page 50: Keyboard Shortcuts
view the contents or open the folder. ◆Copy Command - Select a folder or a file and then right-click. Inside the pop-up menu, select “Copy” to make a copy of the entire folder or a file and paste into another location or folder. ◆Cut Command- Select multiple files or folders and then right-click. -
Page 51: Drag And Drop
11.4. Drag and Drop A single file drag and drop is supported by our built-in Web Management Interface, simply click and hold on the file inside the main window and drag it to any folders available inside the Folders tree. 11.5. -
Page 52: Admin User
Provides detailed information regarding the current network settings such as the connection to access the internet, Wi-Fi SSID and IP Address as seen on the screenshot below. 11.6. Settings 11.6.1. Admin User Click on the “User” button. This window will allow you to modify the admin password as seen on the screenshot below. -
Page 53: Network Settings
As seen on the screenshot below, the Volume screen provides information regarding the File System used to format the internal hard disk drive, total and available capacity. Click on the “X” to exit. 11.7. Network Settings 11.7.1 Hostname The Host Name is a name that is assigned to certain device that is connected to a computer network. The Host Name can be modified to whatever name that will fit your needs. - Page 54 Click on the “Save” button after making any changes. Click on the “X” to exit and cancel. 11.7.2. Wi-Fi & LAN The settings inside the Wi-Fi & LAN can be modified based on your needs. See the screenshot below for the available options.
-
Page 55: Dhcp Server
Click on the “Save” button after making any changes. Click on the “X” to exit and cancel. 11.7.3. DHCP Server The DHCP or Dynamic Host Configuration Protocol is a network protocol that enables a server to automatically assign an IP address to a computer connected into a network. By default, the DHCP Server option is enabled. -
Page 56: Ddns Settings
4. SSID. Type-in the SSID name or click on the “Rescan” button to automatically search for the available wireless network connections. 5. Password. Type-in the correct password to join the wireless network connection selected. 6. IP Address. Select either DHCP or Manually assign an IP address a. - Page 57 Step 5:Enter your DDNS application's password in the text box of password Step 6: Click the "save" button If the "Status" appear "Connection successful," the words said setting successful, as below. If appear "Connection failure" said set failed, please check your domain, user name and password. If device mode is Wired Access,we should set DMZ on routers directly ,but if device mode is Wireless Access mode, we should not only set up the DDNS, but also set up the router port forwarding .
- Page 58 Let’s take dyndns.org as an example. Register an account in https://www.dyndns.com free of charge, shown as follows An account and password are acquired once the registration succeeds, and then apply for an DDNS domain name. Enter “my account”, click “add host services” to enter the application window of domain name Power 7 Technology Corporation –...
- Page 59 Fill hostname/IP address and IP address as well as IP address of LAN where the nase is located to the Wlan network (if your PC and nas are within the same LAN, log in http://whatismyipaddress.com/ to check IP address also the DynDNS below show your LAN IP address) Meanwhile select the purpose of application;...
-
Page 60: Network Services
11.8 Network Services Windows sharing and network services are available to access the Wi-Fi SD/USB 11.8.1. Windows Sharing Services Data sharing and accessing the Wi-Fi SD/USB product makes it simple by enabling the Windows File Services. By default, this feature is already enabled as seen on the screenshot below. 11.9. -
Page 61: Back Up Settings
Click on the drop-down list and select the region you are located and switch-on the “Automatically synchronize with an Internet Time Server”. This will automatically update the time when the Wi-Fi SD/USB is connected to the internet. The “Time Sync Frequency” can be set to everyday, every 2 days, every 3 days, up to every 7 days. The automatic time synchronization can be switched-off and apply the PC time instead. - Page 62 Simply click on the “Save” button create the backup. This process will create a .bin.gz or .bin file of which can be used to restore the current settings of the Wi-Fi SD/USB. Click the “Save” button to save the backup file on your computer as seen on the screenshot below. To restore the backup, click the folder icon.
-
Page 63: Firmware Upgrade
A warning message will appear as seen on the screenshot below. The device will reboot automatically once the restore process has been completed and will return to login screen. 11.9.3. Firmware Upgrade The device firmware can be upgraded by following the simple steps below. 1. - Page 64 3. The latest firmware update file will appear at the bottom of the folder. Click on the “Save” button to continue updating the firmware. 4. Once the firmware has been installed, the warning message as seen on the screenshot below will appear and the device will automatically reboot and will go back into the login screen.
-
Page 65: Resetting To Factory Defaults
11.9.4. Resetting to factory defaults Resetting to factory defaults will reset all your customized settings or whatever changes you made back to its original settings. Simply click on the radio button after the “Restore to Factory Default Settings:” Click on the “Save” button to continue. - Page 66 FCC Statement This equipment has been tested and found to comply with the limits for a Class B digital device, pursuant to part 15 of the FCC Rules. These limits are designed to provide reasonable protection against harmful interference in a residential installation. This equipment generates, uses and can radiate radio frequency energy and, if not installed and used in accordance with the instructions, may cause harmful interference to radio communications.
Need help?
Do you have a question about the 98243 and is the answer not in the manual?
Questions and answers