Table of Contents
Advertisement
Quick Links
Advertisement
Table of Contents

Subscribe to Our Youtube Channel
Summary of Contents for Expressive SAS Expressive E Touché
- Page 1 U S E R M A N U A L ...
- Page 2 The information in this document is subject to change without notice and does not represent a commitment on the part of Expressive SAS. “Expressive E”, “Touché”, "Lié" and associated logos are registered trademarks of Expressive SAS. Ableton is a trademark of Ableton AG.
-
Page 3: Table Of Contents
1. Introduction 1.1. Downloads & Updates 1.2. Installation 2. Touché 2.1. Overview 2.1.1. What is Touché ? 2.1.2. Slave and Standalone 2.1.3. Default Behaviour 2.2. Mechanism 2.2.1. Concept 2.2.2. Shiftings 2.2.3. Skin 2.2.4. Cylinders 2.2.5. Slider 2.3. Controls 2.3.1. Buttons 2.3.2. - Page 4 4. Workflow 4.1. DAW Setup 4.1.1. Ableton Live 4.1.2. Logic Pro 4.1.3. Cubase 4.2. Creating a sound 4.3. Adjusting your sensitivity 4.3.1. By Parameter 4.3.2. For the Top and Bottom Shiftings 4.3.3. For the Left and Right Shiftings Expressive E Touché...
-
Page 5: Introduction
1. Introduction 1.1. Downloads & Updates Touché comes with Lié, its companion software. When you receive Touché, you need to update its firmware to make it work properly with Lié. You can find the latest versions of Lié and Touché's firmware here : https://www.expressivee.com/downloads 1.2. -
Page 6: Touché
2. Touché 2.1. Overview 2.1.1. What is Touché ? Touché is an instrument that gives you a unique tactile approach of both software and hardware synthesisers. Shaping and controlling their sound with a simple pressure of your hands, Touché gives you a powerful and natural connection with music. -
Page 7: Mechanism
2.2. Mechanism 2.2.1. Concept Touché reacts to the pressure and gestures you apply to the wooden part, which is called the Skin. It possesses two pairs of complementary Shiftings : Top and bottom / left and right. Those need to be calibrated before you play, it is automatically done when you plug Touché. Plug your Touché to your computer, and make sure that it is in a stable position (not moving, on a horizontal surface, and without touching the Skin), because it will be calibrated from this position. -
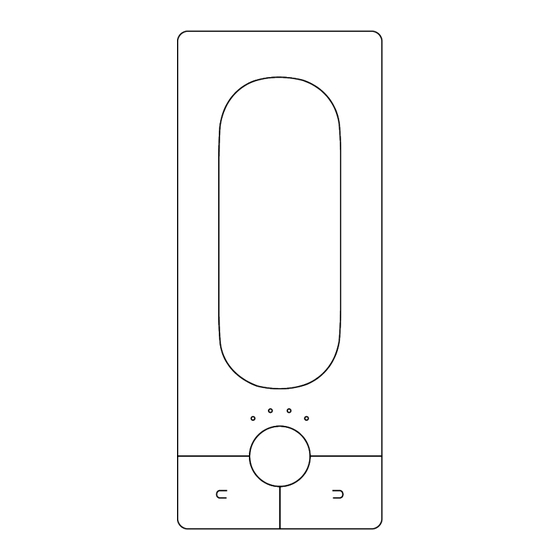
Page 8: Skin
2.2.3. Skin The wooden surface at the top of Touché is conceived to give you a great, smooth instrumental touch. This skin is magnetised in order to be removed and locked easily, making an easy access to the Cylinder and the Slider underneath. -
Page 9: Controls
2.3. Controls 2.3.1. Buttons In Standalone mode, you can select a preset from Touché’s internal memory by using the left and right buttons. Touché has an internal memory of 6 banks of 4 presets each, for a total of 24 presets. Each bank has its own colour (learn more in the Memory View section). -
Page 10: Connectivity
2.4. Connectivity 2.4.1. Ports Touché is USB powered. You can power it by plugging it to a computer, but also by using a standard USB smartphone charger. 0.5A from your USB port is required to power Touché. In order to connect Touché, we recommend to use the USB cable supplied. You can use any suitable USB cable but we strongly recommend to use short USB cables (less than 2 meters), labeled with an identification code that ends with "24/2C", "24AWGX2C"... -
Page 11: Data
2.4.2. Data Input Touché has two sources of MIDI inputs : All datas received in MIDI IN or USB IN are sent to both MIDI Out ( MIDI Merge ) and USB out. Output When Touché is in Slave mode, its USB output always sends the following CCs to control Lié : •... -
Page 12: Lié
3. Lié 3.1. Overview 3.1.1. What is Lié ? Lié is a powerful software with a simple design. Lié works hand in hand with Touché in a clear, simple workflow. Lié is a host of plug-ins and is available in both VST and AU flavours, making it compatible with all major DAWs. ... -
Page 13: Interface
3.2. Interface Lié is divided into four main parts : 1. Menu : Allows you to create and save presets, and access to Settings. 2. Browser : Displays access your library of presets. 3. Slot Center : Allows to link a parameter of your synth to a Shifting of Touché. 4. -
Page 14: Settings
3.2.2. Settings You can access the Settings from the Menu. In the Settings window you can see five different sections : • Plug-In Folder : Displays the plug-in folder. This is the place where you scan your VST Plug-ins in order to use them in Lié. -
Page 15: Browser
3.2.3. Browser 1. Preset List All the presets from your Preset folder are visible on this preset list. By default, they are sorted by alphabetical order. Clicking on “NAME” on the top of the list will rank them either by increasing or decreasing alphabetical order. Right clicking on any of the presets in the list shows the option to rename it or delete it. -
Page 16: Slot Center
3.2.4. Slot Center In this area, you can control all the parameters of your instrument, by assigning Shiftings and designing curves. Slots 1. Parameter Selection : A drop-down list above each slot makes it possible to choose the parameter you want to attribute to this slot. -
Page 17: Plug-In Preset Specificities
Toolbar 1. Instrument View : Displays the interface of the hosted plug-in. In the case of a Hardware Preset, displays MIDI options like MIDI Channel. 2. Random : Sets random assignations for each Slot. If you wish to keep the current assignations, please save your configuration as a preset before proceeding. -
Page 18: Hardware Preset Specificities
3. Instrument View You can also select parameters by opening your plug-in interface. For that you need to click on the button. Above your plug-in interface, you can see 8 numbers. Each number corresponds to a Slot. Click on a number then move one of the parameters from your plug-in (a knob, a slider …). - Page 19 2. MIDI Instrument View You can access the MIDI Instrument View of the MIDI page by clicking on the button. This panel allows you to select the MIDI Channel output of Touché for the current preset. MIDI data from Touché will only be sent via the selected channel.
-
Page 20: Memory View
3.2.7. Memory View The Memory View allows you to save Hardware Presets in Touché, so you can use Touché with your gear in Standalone mode, without a computer. Click on “MEMORY VIEW” button in the Menu to open it. You can see 24 different slots, sorted in 6 banks. Each bank has its own colour, and the number of dots represent the preset number. -
Page 21: Scope
3.2.8. Scope The Scope is a visual display of Touché’s Shiftings. Whenever you press on Touché, the Scope will display the amount of force you’re applying. You can also monitor useful things like the influence of different sensitivity levels. The scope can also be hidden in favour of the Sensitivity Curve Editor. ... -
Page 22: Sensitivity Curve Editor
3.2.9. Sensitivity Curve Editor You can access the Sensitivity Curve Editor by clicking on the little curve icon just below each Slot, and then clicking on the curve displayed.. The Sensitivity Curve Editor lets you change Touché’s sensitivity by changing each Slot’s sensitivity curve. This curve show you how the parameter will vary depending on your movement. -
Page 23: Workflow
4. Workflow 4.1. DAW Setup 4.1.1. Ableton Live To use Lié within Ableton Live, you must load Lié on a new MIDI Track. Make sure that your track is armed, and set the MIDI IN of your Track to "All MIDI Input". You can now play with Touché and Lié. If Touché... -
Page 24: Logic Pro
4.1.2. Logic Pro To use Lié in Logic Pro, you must load Lié on a new MIDI Track. Make sure your track is armed and the MIDI IN of your Track is on "All MIDI Input". You can know play with Touché and Lié. If you can't find Lié... -
Page 25: Cubase
4.1.3. Cubase To load Lié in Cubase , you must add a new MIDI track or click on the instrument selection from an existing track. Choose the synth part layer and select Lié. Make sure that your track is armed and that the MIDI IN of your Track is on "All MIDI Input". Expressive E Touché... - Page 26 If you can't find Lié in the instrument selection, make sure Cubase has the right plug-in path ( Devices > Plug-in Manager > VST Instruments > Settings ). If Touché is not communicating with Lié, check that your track is armed, and make sure that the MIDI IN of Touché is active in Device >...
-
Page 27: Creating A Sound
4.2. Creating a sound 1. Click on “NEW PLUGIN PRESET” in the Menu 2. Select your Plugin Expressive E Touché User Manual v.1.1 Page... - Page 28 3. Map the parameters you wish to control either by selecting them from the drop-down list above one Slot 4. Or by clicking on the Instrument View in the Toolbar to use our mapping features 5. Assign parameters to Shiftings for each Slot you wish to use. Expressive E Touché...
-
Page 29: Adjusting Your Sensitivity
6. Play with your newly created preset, and adjust the min/max values and curve of each Slot if needed. Once you’re happy with your sound, you can save your new preset by clicking on “SAVE AS PRESET” in the Menu. 4.3.
Need help?
Do you have a question about the Expressive E Touché and is the answer not in the manual?
Questions and answers