Table of Contents
Advertisement
Advertisement
Table of Contents

Related Manuals for ChatterBox xbi2

Summary of Contents for ChatterBox xbi2
- Page 1 xbi2_maual.indd 2 4/15/09 3:40:36 PM...
- Page 2 xbi2_maual.indd 3 4/15/09 3:40:38 PM...
- Page 3 Every communica- tion system in the ChatterBox! product line provides unique features and benefi ts along with communication compatibility within the entire product range. Each ChatterBox! system is...
-
Page 4: Table Of Contents
2.2.7 HEADSET PORT 5 2.2.8 LED 5 3. INSTALLATION 6 3.1 GENERAL INSTALLATION 6-7 3.2 ALTERNATIVE FULL FACE XBI2 UNIT HEADSET INSTALLATION 7 4. BASIC OPERATION 7 4.1 CHARGING XBI2 UNIT 7-8 4.2 TURNING XBI2 UNIT ON / OFF 8 4.2.1 Turning on 8... -
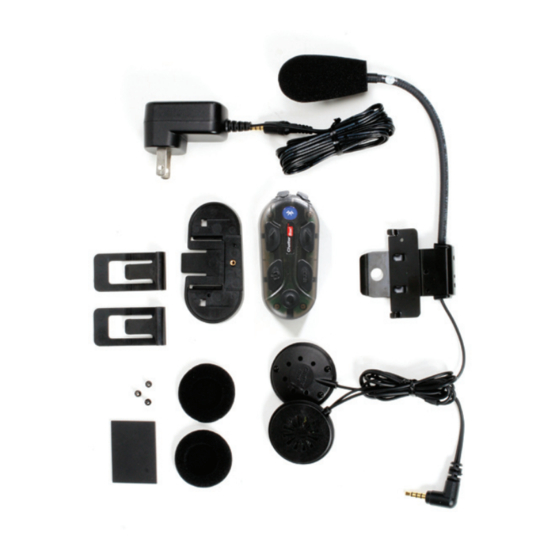
Page 5: Kit Includes
1. KIT INCLUDES 1.1 OPEN FACE KIT DESCRIPTION Q’TY XBi2 Main Unit AC Home Charger Open Face Headset Pre-Installed Lithium-Polymer Battery Plastic Base Plate Metal Mounting Bracket Rubber Pad Foam Speaker Covers Popsicle Stick Phillips Screws Double Sided Mounting Tape... -
Page 6: Xbi2 Description
*Audio volume increase 2.2.4 VOLUME DOWN BUTTON *Audio volume decrease 2.2.5 INTERCOM BUTTON *GROUP INTERCOM select – voice communication with other XBi2 *MP3 mode 2.2.6 CHARGE PORT *Primary Function = charge cord port *Secondary Function = optional auxiliary audio cord input 2.2.7 HEADSET PORT... -
Page 7: Installation
5. Attach the RIGHT speaker (the long wire) to the inside of the helmet. Attach the LEFT (the short wire) to the inside of the helmet. 6. Slide XBi2 unit onto the plastic base plate and plug the headset into the headset port. Use the popsicle stick to gently tuck the speaker wires between the inner liner and the outer shell of the helmet. -
Page 8: Alternative Full Face Xbi2 Unit Headset Installation
Use the popsicle stick to gently tuck the mi- crophone wire between the inner liner and the outer shell of the helmet. 4.Slide XBi2 unit onto the plastic base plate and plug the headset into the headset port. Use the popsicle stick to gently tuck the speaker wires between the inner liner and the outer shell of the helmet. -
Page 9: Turning Xbi2 Unit On / Off
2. After the fi rst beep, if the voltage is entering +3.1V ±0.1V, the power will turn OFF automatically. 4.5 ADJUSTING UNIT VOLUME 1. XBi2 unit will be at middle volume level whenever unit is turned on 2. Momentarily press (approximately 1 second) and release the volume button 3. -
Page 10: Adjusting Xbi2 Unit Volume
9. XBi2 units are now paired and will connect to each other automatically when both units are on and within range of each other * Do not delay the process or the XBi2 units will go on timeout mode and need to start the pairing process over xbi2_maual.indd 11... -
Page 11: Function Operation
3. Select “XBi2” from phone device list 4. Enter pass code in phone (pass code will be “0000”) 5. Press connect to “XBi2” on phone 6. XBi2 unit is now paired to the phone. (Pairing process will no longer be needed to connect) xbi2_maual.indd 12... -
Page 12: Pairing A Bluetooth® Compatible Phone
5. Stereo audio source and/or intercom communication will be restored * We do not recommend placing a phone call while riding* ** ALWAYS CONNECT STEREO AUDIO SOURCE TO XBI2 BEFORE CONNECTING PHONE ** *AUDIO SOURCES WITH BUILT-IN BLUETOOTH® WILL CONNECT SIMILAR TO PHONES* 7. -
Page 13: Specification
2. Turn on audio source and turn on or plug in stereo Bluetooth® adaptor 3. Audio source will automatically start playing through the XBi2 unit when connection is complete 4. Momentarily press (approximately 1 second) and release the Power button * 5. -
Page 14: Button Function Summary
fi tness for a particular use. In no event will ChatterBox! USA be liable to the buyer for any damages, including special, incidental, indirect, or consequential. -
Page 15: License Information
10. LICENSE INFORMATION 10.1 FCC ID# KA9HJC-XBi2 * This device has been tested and found to comply with the limits for a class b digital device pursuant to part 15 of the FCC rules * Operation is subject to the following two conditions... -
Page 16: Frequently Asked Questions
11. FREQUENTLY ASKED QUESTIONS QUESTIONS ANSWERS 1) How many XBi2 units can communi- 1) You can have up to 3 XBi2 units to cate to each other? communicate to each other. 2) What is the range of the XBi2? 2) The XBi2 units can communicate up to 500 meters in optimum conditions.
Need help?
Do you have a question about the xbi2 and is the answer not in the manual?
Questions and answers