Table of Contents
Advertisement
Quick Links
Advertisement
Table of Contents

Summary of Contents for Uniclass RH144
- Page 1 User's Manual RH144 4 x 4 MultiView HDMI Matrix Version : 1.21...
-
Page 2: Table Of Contents
Introduction ............... 3 Features ................3 Specification ............... 3 Package contents ..............3 Connection diagram ............4 6 modes diagram ..............4 Operation ................5 1. Parts and push buttons ............ 5 2. Display mode menu ............6 3. Keyboard hotkeys ............. 7 4. -
Page 3: Introduction
Thanks for purchasing RH144 4 x 4 MultiView HDMI Matrix. With our highly reliable and quality product, you can enjoy countless benefits by using this device. Introduction RH144, 4 x 4 MultiView HDMI Matrix is the only complete independent HDMI system that arrange four HDMI multimedia sources and dynamically exhibit them on 4 displays in various mode. -
Page 4: Connection Diagram
Connection diagram The diagram illustrated here is an example, the actual application may vary. All illustrated computer, accessories and monitors are not included in the package, it is for reference only. Make sure all the devices and peripherals are connected appropriately before using this unit. Keyboard Power adapter Mouse... -
Page 5: Operation
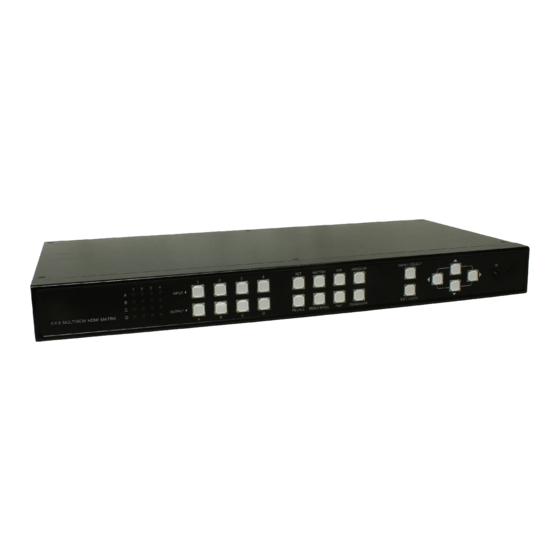
Operation Various operations are available from this unit, select your preferred operation as follows: 1. Push buttons. 2. Display mode menu. 3. Keyboard. 4. IR remote control. 5. RS-232 control. 1. Parts and push buttons Front panel 34 5 10 11 No. -
Page 6: Display Mode Menu
Rear panel No. Item Description 12 Power switch Press to power on/off the unit. 13 Power jack Connect to the power adapter (DC 12V). 14 USB Type A Connect to USB keyboard and mouse. receptacles 15 RS-232 connector Connect to a computer or RS-232 device. 16 USB Type B Connect to a computer for updating firmware*. -
Page 7: Keyboard Hotkeys
3. Keyboard hotkeys Command Hotkeys Description Menu/Select Enter ■ Press to bring up the OSD menu. ■ Select a desired option on the menu. Up/Down/Left/Right Press to move the cursor up, down, left and right on the menu. (Cursor buttons) Exit Press to exit the OSD menu. -
Page 8: Ir Remote Control
4. IR remote control No. Item Description INPUT Press to select the desired source. Save the customized input and output up to 8 settings. 1. Select a desired mode by pressing MATRIX/ PIP/WINDOWS/VIDEO WALL/PAP/ QUADVIEW button. 2. Set a preferred input source(1~4 ) and output display(A~D). -
Page 9: Rs232 Control
5. RS232 Control 5. Enter the following data to each option, then 1. Connect RH144 to a PC using RS232 cable. press Apply > OK. Bits per second: 115200 2. Open Hyper Terminal and Date bits: 8 create a new connection. - Page 10 Command Description Parameter sw [n] Switch active port n: source 1~4 mode [n] Switch video display mode (1) Matrix (2) PIP (3) Windows, (4) Video wall (5)PAP (6) Quad as [n] Change video aspect ratio n: (1) Fill Screen (2) Keep Ratio output [id] [n] Set output resolution id: display A~D...
-
Page 11: Mode Descriptions
Mode descriptions Matrix mode: Viewing video sources up to 4 displays. ■ Press 1~4 to select the video source, press A~D to select the display. ■ To distinguish the input source or output display, refer to the LED indicators on the front panel of unit. PIP mode: Viewing main image with 1 subordinate image in smaller window. - Page 12 Video wall mode: Viewing the selected video source on multiple displays as one. The images can be configured in 2x2 or 1x3 mode. ■ Press 1~4 to select the desired video source. ■ Viewing angle may not the same when placing the display in portrait and landscape orientation due to different technology of display.
-
Page 13: Settings
Settings 1. To bring up the setting menu, press Enter button on the keyboard or MENU/SELECT button on the front OSD timeout panel of unit or remote control. Title bar timeout OSD output Shrink control Full screen 2. Press button to move the cursor, press Channel name Load factory default to select the desired option, and then press MENU/... -
Page 14: Title Bar Information
There is no source connected to this input. Resolution The tablets below show the input and output resolutions of RH144, if there is a problem of abnormal display or no video, suggest using a more standard display mode from the list. -
Page 15: Technical Support
Technical support Please contact with your local distributor for more information or technical support. FCC / CE Statements FCC Statement : This equipment has been tested and found to comply with the regulations for a Class B digital device, pursuant to Part 15 of the FCC Rules. These limits are designed to provide reasonable protection against harmful interference when the equipment is operated in a commercial environment.
Need help?
Do you have a question about the RH144 and is the answer not in the manual?
Questions and answers