Table of Contents
Advertisement
Advertisement
Table of Contents

Summary of Contents for Kannad Marine SafeLink EPIRB
- Page 1 SAFELINK EPIRB User Manual...
- Page 2 SafeLink Category 1...
- Page 3 SafeLink Category 2...
- Page 4 Disclaime Kannad Ma arine is a brand of M McMurdo L td. The inf formation a and illustrat tions conta ined in this publication are to the best of ou r knowledg ge correct a at the time of going to o print.
-
Page 5: Table Of Contents
CONTENTS INTRODUCTION ......................1 1.1. COSPAS-SARSAT system description ..............1 1.2. Immediate alerting and location calculation ............1 APPLICATION ......................1 REGISTRATION ......................2 DESCRIPTION ......................2 4.1. ... -
Page 6: Introduction
1. INTRODUCTION 1.1. COSPAS-SARSAT system description COSPAS-SARSAT is a global distress warning system operating in the 406.0 - 406.1 MHz frequency band. The 406 MHz frequency coded with the beacon ID, is used to determine the position of the beacon to alert the nearest Search and Rescue Services (S.A.R.). The system consists of: 1. -
Page 7: Registration
3. REGISTRATION This EPIRB must be registered with the appropriate national authority. Refer to Section 10. MANDATORY REGISTRATION page 12. The function of the EPIRB is to send an alert to the COSPAS-SARSAT satellites. How soon an alert is received depends on the positions of the satellites at the time, and can be influenced by overhead obstructions aboard the vessel. -
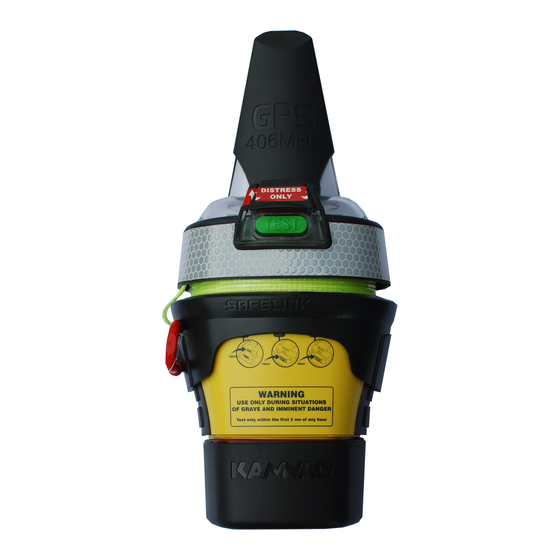
Page 8: Beacon Description
4.2. Beacon Description 1. Tamper proof seal to prove the beacon has been intentionally activated. 2. Locking system to avoid unintentional activation of the beacon. 3. TEST pushbutton: to perform a self-test; to stop the beacon transmission if manually activated by ON button if required by authorities. - Page 9 Page 4 of 25...
-
Page 10: Test Instructions
5. TEST INSTRUCTIONS Test of 406 / 121.5 MHz frequencies. It is recommended to perform a self-test once a month. The self-test may be performed with the beacon inside its bracket or container. NOTE: This check shall only be conducted during the first five minutes of any UTC hour. 1. -
Page 11: Activation By Water Switch Sensor
SafeLink Manual+ category 2 (Non Float Free) Remove the beacon from its mounting bracket: (1) Lift up the red locking pin; (2) Pull and remove the red locking pin to unlock the bracket; (3) Extract the beacon from the mounting bracket. 6.2.2. -
Page 12: False Alarms
7. FALSE ALARMS 7.1. False alarms prevention Important: before extracting the beacon, check there is neither salt nor moisture on the water switch sensor. Clean if necessary (risk of activation). False alarms caused by accidental activation of beacons result in unnecessary search and rescue services. -
Page 13: Beacon Installation
8. BEACON INSTALLATION 8.1. Mounting instructions plate The SafeLink beacons are supplied with an instructions plate. This is a rigid plate with basic visual instructions for how to operate the beacon in an emergency. The instruction plate should be mounted next to the beacon so that it is easily visible in an emergency. -
Page 14: Safelink Auto Category 1 (Float Free)
8.2. SafeLink Auto Category 1 (Float Free) 8.2.1. Installation of container The container should be installed outside on deck or wheelhouse, or against a bulkhead or any vertical and flat surface and comply with the following instructions: horizontal or vertical position; clear area to allow the beacon to rise the surface, should the vessel sink;... -
Page 15: Installation Of Beacon Into Container
8.2.2. Installation of beacon into container Caution: If a mounting bracket is installed on the beacon, remove it before installing the beacon into its container. (1) To remove the cover, lift the locking pin then extract it from the cover. (2) Put the beacon into the container by sliding the antenna below the HAMMAR release system. -
Page 16: Safelink Manual+ Category 2
8.3. SafeLink Manual+ Category 2 Note: the mounting bracket is fitted with a magnet to avoid beacon activation (water, moisture) when installed in its mounting bracket. 8.3.1. Mounting bracket installation The mounting bracket should be installed in a clear area, well known and identified so that it can be reached easily for emergency used. -
Page 17: Installation Of Beacon Into Its Mounting Bracket
8.3.2. Installation of beacon into its mounting bracket (1) Insert the beacon into its mounting bracket. (2) Insert the locking pin in the locking sleeve of the mounting bracket. (3) Turn downwards the locking pin up to hear a click that proves the bracket is locked. Page 12 of 25... -
Page 18: Technical Specifications
9. TECHNICAL SPECIFICATIONS Operating temperature range : -20°C to +55°C. Storage temperature : -30°C to +70°C. Lithium manganese batteries : High energy LiMnO2. : 6 years storage life. Battery life Operating life : 48 hours mini. at -20°C. Watertight at 1 bar. Dimensions Beacon Beacon + bracket... -
Page 19: How To Register
10.2. How to register Register on-line (were available) or complete the appropriate registration form with your EPIRB's identity; vessels details and emergency 24 hour contact numbers. Wherever possible the forms are also pre-printed with the correct mailing address and a faxback number. -
Page 20: Radio Licence
EPIRB must be re- programmed. For details of your nearest agent, either contact Kannad Marine using the details in the warranty section, or visit the service section of the web site: www.kannadmarine.com. -
Page 21: Maintenance
TRANSPORTATION Passenger Aircraft; This product contains small lithium metal batteries. The SafeLink EPIRB can normally be taken on board a passenger aircraft as a personal item in carry-on hand baggage. We recommend declaring the EPIRB to airline staff at check in, in the same way you would for a laptop PC or video camera. -
Page 22: Battery Replacement Procedure
BATTERY REPLACEMENT PROCEDURE DO NOT CHARGE THE BATTERY DO NOT THROW IN FIRE DO NOT EXPOSE TO TEMPERATURE OVER 90°C DO NOT SHORT CIRCUIT Important: The replacement of the battery pack may be performed by the user (if authorized by local authorities) who will only use factory replacement pack (P/N 1202368). -
Page 23: Battery Pack Reassembly
13.2. Battery pack reassembly (1) Replace the O-ring (d) of the housing then connect the 3 male connectors (c) of the new battery pack to the 3 female connectors of the connectors harness (b). CAUTION: to avoid reversal of polarity, the male connectors are fitted with a locking strap (e) and the female connectors are fitted with a positioning lug (f);... -
Page 24: Automatic Release System Replacement
AUTOMATIC RELEASE SYSTEM REPLACEMENT 14.1. Description The automatic release system assembly is composed of a HAMMAR release system (A) and a severable axis (B) fitted with a rubber washer (C). 14.2. Replacement Refer to drawing next page. Open the container and remove the beacon (see §... - Page 25 Page 20 of 25...
- Page 26 BEACON LOCATION LOG Vessel name ………………………………………………………………………………………………………….. □ MMSI □ Radio Code □ Serialised code …………………………………………………………………………………………………………... Owner’s name …………………………………………………………………………………………………………... ID CODE (HEX) …………………………………………………………………………………………………………... Vessel name ………………………………………………………………………………………………………….. □ MMSI □ Radio Code □ Serialised code …………………………………………………………………………………………………………... Owner’s name …………………………………………………………………………………………………………... ID CODE (HEX) …………………………………………………………………………………………………………...
- Page 27 SBM / BATTERY REPLACEMENT Date / Signature Next replacement - SBM Battery □ □……………………………………… SBM □ □……………………………………… Battery □ □……………………………………… SBM □ □……………………………………… Battery □ □……………………………………… SBM □ □……………………………………… Battery □ □……………………………………… SBM □ □……………………………………… Battery □ □……………………………………… SBM □ □………………………………………...
- Page 28 RELEASE SYSTEM REMPLACEMENT Date / Signature Next remplacement Page 23 of 25...
- Page 29 Warranty Statement Kannad Marine is a brand of McMurdo Limited. Subject to the provisions set out below McMurdo Ltd warrants that this product will be free of defects in materials and workmanship for a period of five years from the date of purchase..McMurdo Ltd will not be liable to the buyer under the above warranty:- ...
- Page 30 BEACON FIRST ASSIGNMENT Vessel Name ………………………………………………………………………………………………………….. □ MMSI □ Radio Code □ Serialized Code …………………………………………………………………………………………………………... Owner’s name …………………………………………………………………………………………………………... ID CODE (HEX) …………………………………………………………………………………………………………... Next release system replacement ………………………………………………………………………………………………………….. Next SBM date …………………………………………………………………………………………………………... Next battery replacement date …………………………………………………………………………………………………………... Cachet Date IDENTIFICATION OF CATEGORY Page 25 of 25...
- Page 32 Kannad Marine McMurdo Ltd Silver Point Airport Service Road Portsmouth PO3 5PB United Kingdom Phone:+44 (0)23 9262 3900 Fax:+44 (0)23 9262 3998 Email: customerservice@kannadmarine.com Website: www.kannadmarine.com DOC09028B 94-220 Iss 1...
Need help?
Do you have a question about the SafeLink EPIRB and is the answer not in the manual?
Questions and answers