Table of Contents
Advertisement
Quick Links
Advertisement
Table of Contents

Related Manuals for Label I Feed Good L

Summary of Contents for Label I Feed Good L
- Page 1 i•FeedGood Weighing System Technical Guide ...
- Page 2 ...
-
Page 3: Table Of Contents
Table of Contents 1. General Information Important safety standards ............. 7 Mechanical installation .............. 8 Connections ................... 9 Connection diagram base version .......... 1 1 Connection diagram with wired Remote Terminal and ... - Page 4 How to modify the Appetite of the Groups ........ 3 7 How to set the Jump Function ............ 3 8 How to modify the Recipe Totals .......... 3 8 How to view the Recipe Totals ............. 3 9 ...
- Page 5 Importing Recipes in wireless mode with FarmManager NETWORK ............ 5 7 Usage Files .................. 5 8 Loads Check ................ 5 9 Unloads Check ................ 5 9 ...
- Page 6 Daily Records File .............. 7 4 Send Daily Records Automatically .......... 7 4 CSV File Separator .............. 7 5 W-Link ID ................... 7 5 Modem Type for Data Transfer .......... 7 5 ...
- Page 7 Formatting the T-DATA Giga ............ 9 7 14. Statistics Reset Date ................... 9 9 Work Hours .................. 9 9 Power On Number ............... 9 9 ...
- Page 8 Recipes Execution by Animals .......... 1 18 Recipes Execution by Totals ........... 1 19 Target Weighing .............. 1 19 Manual Weighing - Net Weight .......... 1 20 ...
-
Page 9: General Information
General Information 1 Before using i•FeedGood L it is important to read the information provided in this Guide to avoid seriously harming yourself or damaging the scale. Note: for further information, contact your Distributor or send a support request to the address support@labelgroup.com. -
Page 10: Mechanical Installation
Disconnect the power cable in the following situations: • If the connection cables or connectors are worn or damaged. • If there is any liquid inside the scale, including condensation. • If the scale case is damaged or broken. •... -
Page 11: Connections
Connections i•FeedGood L is connected via two MS/MIL-C5015 series ® connectors, two M12 series connectors and a C16-3 series Amphenol connector. Note: before performing the connections, make sure that the scale and accessories are off. ... - Page 12 Female MS/MIL-C5015 connectors POWER/ALARM SENSOR Pin Function Pin Function A Power Supply + A (S-) Signal – B Alarm Output + B (E+) Power Supply + ...
-
Page 13: Connection Diagram Base Version
Connection diagram base version i•FeedGood L • Technical Guide | 11 ... -
Page 14: Connection Diagram With Wired Remote Terminal And Can-Bus Port
Connection diagram with wired Remote Terminal and CAN-Bus Port 12 | i•FeedGood L • Technical Guide ... -
Page 15: Connection Diagram With Wireless Remote Terminal
Connection diagram with wireless Remote Terminal i•FeedGood L • Technical Guide | 13 ... -
Page 16: Replacing The Fuse
Replacing the fuse Before replacing a fuse, it is recommended to find the probable causes which caused it to blow. We also recommend disconnecting all cables before opening the box. To replace the fuse, proceed as follows: 1. -
Page 17: Maintenance
Maintenance In order to prevent malfunctioning or failures, it is recommended to perform the following operations periodically: • Check that the external power supply system to the scale works properly, also checking that the connection points have no oxidization or humidity. -
Page 18: Ec Declaration Of Conformity
EC Declaration of Conformity i•FeedGood L complies with the essential requirements of the Directive 2004/108/EC on Electromagnetic Compatibility as it complies with standards EN61326-1:2013, EN14982:2009 (agricultural machinery), ISO13766:2006 (earth-moving machinery), EN50498:2010 (road vehicles), ISO7637-3:2007. ... -
Page 19: User Interface
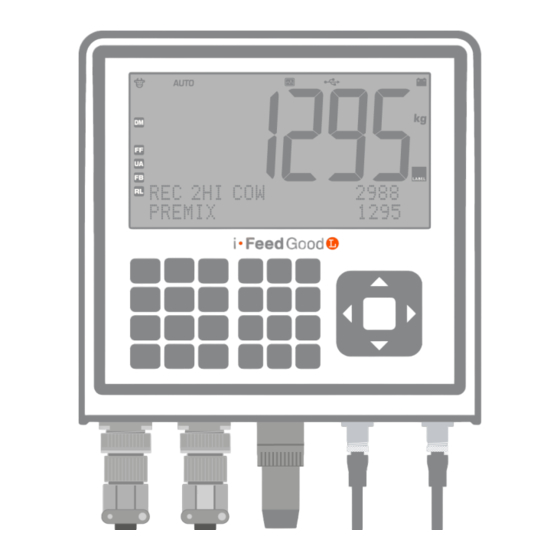
User Interface 2 Display i•FeedGood L is equipped with a brand-new 7.3” LCD screen with high contrast, large visual angle and white LED backlighting. Icons The display has 36 icons which guide you in using the scale. ... - Page 20 Indicates that the Group displayed has the Appetite programmed. Indicates that that Ingredient/Group displayed has the Tolerance programmed. Indicates that a Recipe by Animals is displayed. Indicates that the Recipe displayed has the ...
- Page 21 Indicates that a L-Link Remote Terminal or a CAN-Bus device is connected to L-LINK connector. Indicates that the connection with a W-Link Remote Terminal is active. Indicates the Quality of the GPRS modem signal. ...
-
Page 22: Keypad
Keypad The scale is supplied with 29 mechanical keys. Key Name Function ON/OFF Press to switch the scale on and off. RECIPES Press to select the Recipes. Press to select the Ingredients, Groups, ARCHIVES ... - Page 23 Press to cancel or to go back to the previous ESC screen. u Press to go to the next screen. t Press to go back to the previous screen. ...
- Page 24 Press to write W, X, Y, Z, 9. Key 9 Press to enable/disable counterknives actuation. Key 0 Press to write 0. Full stop Press to write “full stop”, “comma” or “minus sign”. Comma ...
-
Page 25: Programming Alphanumerical And Numerical Fields
Programming alphanumerical and numerical fields Use Alphanumerical Writing to program the alphanumerical and numerical fields. The display indicates activation of Alphanumerical Writing by switching on the icon . Shortcut: if you need to enter a number in an alphanumerical field, keep the key pressed until the display shows the number ... -
Page 26: How To Select An Item From A List
How to select an item from a list 1. Press p to select the previous item, then press u to confirm. 2. Press q to select the next item, then press u to confirm. 3. Press OK together with p to select the first item of the list. 4. -
Page 27: Power On
Power On 3 How to switch on i•FeedGood L 1. Press ON/OFF. The display shows the Home Screen and the Welcome Message, then the scale selects Manual Weighing viewing the Total Weight. i•FeedGood L is ready to execute the operations you ... -
Page 28: How To Shut Down I•Feedgood
Preference. Note: if in the “L-Link Port” or “CAN-Bus Port” System Preferences is set “Label 5 or Label 6” option, when ON/OFF is pressed the scale will not switch off, but go into “Standby” mode. To switch the scale off it is necessary to cut off the ... -
Page 29: Archives
Archives 4 Use Archives to program the Ingredients, Groups, Operators and Customers. Group means the stable/enclosure where the weighed food is unloaded with the mixing wagon. Operator means the user of the scale. Note: if the printer is enabled, the Archives can be printed. -
Page 30: How To Show The Archives List
How to show the Archives List 1. Press ARCHIVES. The display shows the icon , the text “FILE” and the Archives list. How to select an Archive 1. Press q or p in the Archive List to select the Archive you want to program, then press u. -
Page 31: How To Modify An Element/Code
How to modify an element/code 1. Select the element/code you want to modify, then press u. The display shows the Name and parameters of the element/code. 2. Press q or p to select the item you want to modify. 3. -
Page 32: How To Eliminate An Element/Code
How to eliminate an element/code 1. Select the element/code you want to eliminate. 2. Press MENU, select the item “DELETE archive_name”, then press u. The display shows the message “Do you want to delete the selected Name?”. Press OK to eliminate the selected Name. -
Page 33: How To Print An Archive
How to print an Archive 1. Select the Archive to be printed from the Archive List. 2. Press PRINT. 3. Press ESC if you want to cancel printing. The display shows the message “Do you want to cancel printing?”. -
Page 34: Recipe Programming
Recipe Programming 5 Use Recipe Programming to program the Recipes. Recipe Programming can be executed in two different modes: • For Animals. • For Totals. In Recipes by Animals, the Ingredients are programmed with the weight (normal or Dry) to be distributed to the individual animal ... -
Page 35: How To View The Recipes List
How to view the Recipes List 1. In Manual Weighing press RECIPES. The display shows the icon , the text “RECIPE” and, in alphabetical order, the names of the Recipes stored in the Archive and the relative Total Weight. Note: if you want to view the Recipes in the order they were ... -
Page 36: How To Modify The Name And Parameters Of The Recipe
How to modify the Name and Parameters of the Recipe 1. Select the Recipe you want to modify. 2. Press MENU, select the item “MODIFY RECIPE”, then press u. The display shows the Name and parameters of the Recipe. -
Page 37: How To Insert An Element In The Recipe
Note: the Daily Function allows you to execute the meals of the daily ration by programming just one Recipe. For the function to work properly, the Recipe must be executed on the same day as many times as there are Meals programmed. -
Page 38: How To Eliminate An Element From The Recipe
• If you select “INSERT TIMER” the display shows the icon . Enter the value (min:s), then press OK. The display shows the parameters of the inserted Timer. Complete the programming by setting the optional parameters. -
Page 39: How To Modify The Weight/Number Of Animals Of Groups
How to modify the weight/number of animals of Groups 1. Select the Group you want to modify. 2. Press u, select the item “WEIGHT” (in the Recipes by Totals) or the item “ANIMALS” (in the Recipes by Animals), then press u. -
Page 40: How To Set The Jump Function
How to set the Jump Function 1. Select the element you want to modify. 2. Press u, select the item “JUMP”, then press u. 3. Press q or p to modify the setting, then press OK. Note: the Jump Function allows you to set how to pass to the ... -
Page 41: How To View The Recipe Totals
Note: modifying the Total Weight Groups makes it possible to increase/decrease the programmed weight of the Groups proportionally to the variation made. How to view the Recipe Totals 1. Select the Recipe in the Recipes List, then press NET/TOTAL. -
Page 42: How To Eliminate A Recipe
How to eliminate a Recipe 1. Select the Recipe you want to eliminate. 2. Press MENU, select the item “DELETE RECIPE”, then press u. The display shows the message “Do you want to delete the selected Recipe?”. -
Page 43: Recipes Execution
Recipes Execution 6 Use Recipes Execution to execute a previously programmed Recipe. Note: if the "Daily Records File" System Preference is enabled, the weighing operations are stored in the Daily Records File. The Daily Records File can store up to 6,000 operations. - Page 44 Note: if the Feeding Balancing Function is enabled, the scale checks that a Clean-Up not weighing "0" or an Ingredient is programmed in the first position of the Recipe, otherwise disabling the Function. Note: if the Reload Function is enabled, the scale checks that first the Ingredients/Clean-Ups and then the Groups are ...
-
Page 45: Load And Unload
Load and unload 1. The display shows in sequence: the Recipe Name, the Total Weight of the Recipe and, if programmed, the Operator Name and Customer Name. If the Recipe is for Animals, the total number of Animals is also displayed. Lastly the display shows the Name of the element to be weighed and the ... -
Page 46: Prealarm Threshold
• Mixing Timer When the scale executes a Mixing Timer, the display shows the icon and the countdown of the programmed time. At the end of the countdown, the display shows the message “Countdown completed.”... -
Page 47: Stability Check
Stability check 1. If the Motion Function is enabled (see "Motion" Weighing Preference), you only pass to the next element if the displayed weight is stable when the Queue Time is up. To pass to the next element, when the weight is not stable, press OK. -
Page 48: Weight Hold Function
Weight Hold Function 1. If you must move the mixing wagon during execution, press to activate the Weight Hold Function. The display PAUSE shows “HOLD” and the message “LOCKED WEIGHT”. After having moved the mixing wagon, press once again to ... -
Page 49: How To Interrupt Execution
How to interrupt execution 1. Press ESC if you want to interrupt execution. The display shows the message “Do you want to interrupt the execution? Press OK to confirm or ESC to cancel.”. If you press OK the display shows the message “The execution has been ... -
Page 50: Manual Weighing
Manual Weighing 7 Use Manual Weighing to execute loads or unloads without programming any value. The possibility of viewing the Net Weight or the Total Weight allows you to weigh an unlimited number of Ingredients or to execute an unlimited number of unloads. -
Page 51: Load And Unload
Load and unload 1. Start of weighing operations. The display shows the Net Weight or Total Weight depending on the view chosen. 2. Press NET/TOTAL to change the type of view. 3. Interrupt weighing operations when the displayed weight reaches the desired value. -
Page 52: Target Weighing
Target Weighing 8 Use Target Weighing to weigh a single Ingredient or to unload a Group. By programming one value at a time, you can execute a Recipe composed of an unlimited number of Ingredients/Groups. 1. -
Page 53: Load And Unload
Load and unload 1. Start of weighing operations. The display shows the weight decrease, indicating the weight still left to weigh to reach the programmed value. 2. If during weighing operations you want to view the Total Weight, press NET/TOTAL. -
Page 54: Maximum Load Check
Maximum Load check 1. If the "Maximum Load" Weighing Preference is programmed, during weighing the scale checks that the programmed value is not exceeded, otherwise the display shows “ERR 21”. For further information, see “Annex C – Error Codes”. ... -
Page 55: Zero Scale
Zero Scale 9 Use the Zero Scale if the Total Weight is not ''0'' with the mixing wagon skip empty. It is recommended to execute the Zero Scale with the mixing wagon empty before starting the weighing operations. 1. -
Page 56: Applications
Applications 10 Use Applications to select the applications of the scale. 1. To access the Applications in Manual Weighing, press MENU. The display shows “APP”. Note: to access the Applications in Recipe Programming, press MENU, select the item “APPLICATIONS”, then ... -
Page 57: Export Daily Records File With T-Data Giga
Export Daily Records File with T-DATA Giga This is to transfer the Daily Records File using the T-DATA Giga. Once the file has been copied, it can be imported in the FarmManager NETWORK software. Only after importing the file it is possible to open/edit it with a commercial program like ... -
Page 58: Export Recipes With T-Data Giga
Export Recipes with T-DATA Giga This is used to export Recipes onto another scale using the T-DATA Giga. 1. To execute the procedure, select the item “EXPORT RECIPES T-DATA”, then press u. The display shows the message “Insert the T-DATA Giga. -
Page 59: Importing In Farmmanager Network The Daily Records Archive In Wireless Mode
Importing in FarmManager NETWORK the Daily Records Archive in wireless mode To import in FarmManager NETWORK (Business or Professional Edition) the Daily Records Archive in wireless mode it is necessary to connect a modem to i•FeedGood L (see “COM A Port”, “Modem Type for Data Transfer”... -
Page 60: Usage Files
Usage Files Use Usage Files to control the amount of material loaded, unloaded or recovered and to check the time spent by Operators to execute the weighing operations. 1. To execute the application, select the item “USAGE FILES”, and then press u. -
Page 61: Loads Check
Loads Check Use Loads Check to view the total amount of each Ingredient loaded. 1. To execute the procedure, select the item “LOADS”, then press u. The display shows the cancellation date and the first Ingredient stored with the relative total. -
Page 62: Report
Report Use Report to print 9 different Reports, useful to manage and control progress of the livestock. For further information, see the printing examples in Annex A. Note: the data can be filtered by the number of days you want to obtain the Report. -
Page 63: Recipes Executed By Group
Recipes Executed by Group This is used to print the list of Recipes executed, gathered by Group. Total Usages This is used to print the data relative to the total usages of each Ingredient. -
Page 64: Mixing Timer
Mixing Timer Use Mixing Timer to program and execute a timer which you can use to control the mixing time of the Ingredients/Clean-Ups loaded in the mixer wagon. The display indicates that the timer is activated by switching on the icon . 1. -
Page 65: Power Supply Voltage
Power Supply Voltage Use Power Supply Voltage to view the voltage with which the scale is powered. • If the value is correct, the display shows the icon in steady mode. • If the value drops below 10Vdc, the icon ... -
Page 66: Settings
Settings 11 Use Settings to select the Preferences, Calibrations, Utilities and Statistics. Note: if the "Scale Protect" System Preference is set at "Settings and Data" or at "Operator Management", when you try to modify a Preference or to execute a procedure, you can be asked to enter ... -
Page 67: Weighing Preferences
Weighing Preferences Use Weighing Preferences to customise the weighing operation. Note: the default value of the Preference is highlighted in “bold”. Note: default Administrator Password is “035”. 1. To access the Weighing Preferences, select the item “WEIGHING PREFERENCES”, then press u. -
Page 68: Weight Display
Weight Display This is for choosing how you want to show the weight in Recipes Execution and in Target Weighing. • If you set "Down", the weight displayed starts from the programmed value and the value decreases as you weigh. •... -
Page 69: Queue Time
Queue Time This is to enable and program the time the scale requires in Weighing to pass to the next element. Note: the Alarm Output remains active for the whole duration of the Queue Time. Note: to disable the Preference, set the value "0". -
Page 70: Motion
Motion This is to enable the Motion Function which requires the weight to be stable before passing to the next element or finishing execution in Weighing. Note: the display shows the message "MOTION ACTIVE" during the entire duration of the Motion. -
Page 71: System Preferences
System Preferences Use System Preferences to customise the scale operation. Note: the default value of the Preference is highlighted in “bold”. Note: the items can vary depending on the options installed. Note: default Administrator Password is “035”. 1. -
Page 72: Decimal Separator Format
Decimal Separator Format This is for choosing the format you want to use to display and print the decimal separator. Display: DECIMAL SEP. Options: Comma, Full stop. Power On Method This is for choosing the method you want to use to switch the ... -
Page 73: Power Saving
Power Saving This is to shut down the scale automatically if no key has been touched within the programmed time interval. When the programmed time has elapsed, the display shows the message “Automatic shutdown in progress. Wait... Press ESC to cancel.”. If you do not press ESC, the scale will shut down automatically ... -
Page 74: Functions Default
Functions Default This is to program the default values of the Jump, Unloads Adjustment, Feeding Balancing, Reload and Daily Functions when you create a new Ingredient/Group or a new Recipe. Note: the numbers displayed in the Daily field indicate the number of Meals of the Recipe. -
Page 75: Administrator Password
If the Preference is set at "Operator Management" and at least one Operator is stored in the Operators File with the programmed Password, at Power On the scale asks to enter a Password to continue. During operation the current Operator can be changed by pressing ID. -
Page 76: Data Password
Data Password This is to program the Data Password which allows you to modify Archives and Recipes when the "Scale Protect" System Preference is set at "Settings and Data". Note: if you have forgotten the Password, enter the "Administrator"... -
Page 77: Csv File Separator
CSV File Separator This is for choosing the type of separator you want to use in the CSV file of the Daily Records. Display: CSV SEPARATOR Options: Semicolon, Comma. W-Link ID This is to set the ID of the Private Radio Networks (PRN) to ... -
Page 78: L-Link Port
Note: contact Customer Service to know the parameter to be set. Display: CAN Options: No, Label 1, Label 2, Label 3, Label 4, Label 5, Label 6. 76 | i•FeedGood L • Technical Guide ... -
Page 79: 4-20Ma Analogue Output
The message must have a maximum of 2 rows with 20 alphanumerical characters each. Display: WELCOME MESS. Default: LABEL ADVANCED SOLUTIONS Buzzer This is to enable operation of the buzzer when you press a key or ... -
Page 80: Print Header
Print Header This is to enable and program the header you want to print on the receipts. The text consists of a maximum of 4 rows with 20 alphanumerical characters each. Note: empty rows are not printed. Note: the prints automatically centre the text on the receipt. -
Page 81: Inputs Setting
Inputs Setting This is to program operation of the Remote Control and External Keyboard accessories, associating operation of the keyboard or scale functions to the 4 keys of the accessories. Note: the Preference is only displayed if the scale is supplied with the Remote Control accessory or with the "4-Opto-Isolated Inputs"... -
Page 82: Self Parameters Setting
SELF Parameters Setting This is for setting the operating parameters of the SELF option. Note: for more information refer to the documentation attached to the “7-Power Outputs” option or contact the Customer Service. Display: SELF PARAMETER Options: ... -
Page 83: Relay Outputs Setting
“3-Relay Outputs”, “4-Relay Outputs” and “7-Power Outputs” options or contact the Customer Service. Note: the “COB-ID#1” item only appears if “L-Link Port” or “CAN-Bus Port” System Preferences have the “Label 5 or label 6” option set. ... -
Page 84: Auger Pulses/Turn Setting
Auger Pulses/Turn Setting This is to program the number of pulses detected by the Speed Sensor Proximity accessory (SSP) at each turn of the auger, necessary to calculate the Total Number of Auger Turns displayed in the Statistics. Note: the Preference is only displayed if the scale is supplied with ... -
Page 85: Calibrations
Calibrations 12 The scale is sold with "standard" Calibration. For its correct operation, it must be Calibrated upon installation to adapt the scale to the connected load cells. Use Calibrations to choose the Calibration you want to execute. -
Page 86: Calibration By Actual Weight
Calibration by Actual Weight This is to calibrate the scale when the mixing wagon is full and you cannot unload it. 1. To execute the Calibration, select the item “CAL. by ACTUAL WEIGHT”, then press u. The display shows the message “Do you want to execute the ... -
Page 87: Calibration By Load Cells Parameters
Calibration by Load Cells Parameters This is to calibrate the scale when it is connected to the load cells not listed in Table 1. 1. To execute the Calibration, select the item “CAL. by PARAMETERS”, then press u. The display shows the message “Do you want to execute the ... -
Page 88: Calibration By Sample Weight
Calibration by Sample Weight This is to calibrate the scale with the maximum precision. This Calibration can be executed in two ways: • With a Sample Weight. This is the method which achieves the maximum precision. Calibration will be ideal by using a Sample Weight at least ... - Page 89 Table 1 Load Calibration Value Sens. Model mV/V kg lbs kg lbs 16820008 4.100 9.039 0,960 1.068 2.354 16820009 6.100 13.448 0,940 ...
- Page 90 Load Calibration Value Sens. Model mV/V kg lbs kg lbs WB54005 5.700 12.556 0,480 2.969 6.545 WB54009 4.100 9.039 0,960 1.068 ...
-
Page 91: Calibration Of Speed Sensor Proximity
Calibration of Speed Sensor Proximity This is to calibrate the Speed Sensor Proximity accessory (SSP). Note: Calibration is only displayed if the scale is supplied with the "4-Opto-Isolated Inputs" option. 1. To execute the Calibration, select the item “SPEED SENSOR CAL.”, then press u. -
Page 92: Utility
Utility 13 Use Utility to execute safety and data restore procedures, diagnostic procedures and to update the scale software. Note: do not shut down the scale during execution of the Utilities to avoid irreparable damage. Note: default Administrator Password is “035”. -
Page 93: Setup Code
Setup Code This is to automatically set the main parameters of the scale depending on make and model of the mixing wagon. Note: contact Customer Service to know the Code to be entered. 1. To execute the procedure, select the item “SETUP CODE”, then press u. -
Page 94: Archives Restore
Archives Restore This is to replace the Archives with a saved copy by using the "General Backup" Utility. 1. To execute the procedure, select the item “ARCHIVES RESTORE”, then press u. The display shows the message “Insert the T-DATA Giga. -
Page 95: Archives Deletion
Archives Deletion This is to cancel all the data stored in the Archives, in the Recipes and in the Daily Records File. 1. To execute the procedure, select the item “ARCHIVES DELETION”, then press u. The display shows the message “The Archives data will be deleted. -
Page 96: Software Update
Software Update This is to update the software of the scale. Before executing the procedure, connect the T-DATA Giga to a Computer and copy the folder “iFGL_Update” containing the files “ER_ROM1” and “FLASHIN.BIN” in the main directory of the T-DATA Giga necessary to execute the update. -
Page 97: Diagnostics
Diagnostics This is to check correct operation of the internal and external parts of the scale through 7 different tests. Note: contact Customer Service in case of errors or malfunctioning. Note: the tests can vary depending on the options installed in the scale. -
Page 98: Memories
Memories The Test verifies operation of the memories of the scale and of the T-DATA Giga device. 1. To conduct the Test of all the memories, select the item “ALL”;; to conduct the Test of a single memory select the type of memory you want to check, then press u. -
Page 99: Formatting The T-Data Giga
Formatting the T-DATA Giga To format the T-DATA Giga, connect it to the Computer using the T-DATA Giga Reader and execute the same procedure used to format a USB flash drive. Note: eject the T-DATA Giga from the Computer using the Safely Remove procedure. -
Page 100: Statistics
Statistics 14 Use Statistics to display and reset data regarding use of the scale and of the mixing wagon which the scale stores automatically during operation. The Statistics are exported together with the Daily Records File so that they can easily be consulted on a ... -
Page 101: Reset Date
Reset Date This is to display the reset date and to reset stored data. Note: to reset stored data, select the item “DATE RESET”, then press u . The display shows the message “Do you want to delete the stored data? Press OK to confirm or ESC to cancel.”. -
Page 102: Overload Number
Overload Number This is to display the number of times the Maximum Load was exceeded in Weighing. Display: OVERLOAD NR. Zero Scale Date This is to display the date of the last Zero Scale executed. ... -
Page 103: Customisation
Customisation 15 i•FeedGood L is enriched by a large catalogue of accessories and options allowing you to customise operation at will and to make your daily work even simpler and more organised. Remote Terminals i•FeedGood ... -
Page 104: 868Mhz Rf Modem
868MHz RF Modem i•FeedGood L can be supplied with two RF modems, one to be connected to the scale and the other to the Computer, to implement a Private Radio Network (PRN) at 868MHz with which to transfer data in wireless mode from Computer with ... -
Page 105: Remote Control
Remote Control i•FeedGood L can be controlled at a distance with a 4-key Remote Control which replicates the i•FeedGood L keyboard or functions. i•FeedGood L and the Remote Control can reach a maximum distance of 100m. The maximum distance which can be reached is affected by different environmental conditions, such as how ... -
Page 106: Rs485 Port
RS485 Port i•FeedGood L can be supplied with an optional board making a RS485 Port available. CAN-Bus Port i•FeedGood L can be supplied with an optional board making a CAN-Bus Port available. ... -
Page 107: 4-Relay Outputs
4-Relay Outputs i•FeedGood L can have an option which provides four normally open relay contacts (NO) for driving inductive load (max. 5A). 4-Opto-Isolated Inputs i•FeedGood L can be supplied with an optional board making 4 NPN Opto-Isolated Inputs available. -
Page 108: Annex A
Annex A 16 Printing Examples The following pages illustrate printing examples of Archives, Reports and Weighing. Key Indicates the Type of element (I = Ingredient, M = Ingredient with programmed Manual Adding parameter). ... -
Page 109: Ingredients File
Ingredients File ---------------------------------------- Date: 30/01/2014 12:00 Scale: NEW SCALE ---------------------------------------- INGREDIENTS FILE ---------------------------------------- Code Type Jump Q.Wt. ---------------------------------------- ALFALFA HAY 91,0 CORN SILAGE 34,0 320 100,0 MINERAL 92,0 MOLASS 77,9 PREMIX 21,0 ---------------------------------------- Groups File ... -
Page 110: Operators File
Operators File ---------------------------------------- Date: 30/01/2014 12:00 Scale: NEW SCALE ---------------------------------------- OPERATORS FILE ---------------------------------------- Code Privilege Password ---------------------------------------- DAVID ADMIN JHON P.USER MARK NOBODY THOMAS USER ---------------------------------------- Customers File ---------------------------------------- Date: 30/01/2014 12:00 Scale: NEW SCALE ---------------------------------------- CUSTOMERS FILE... -
Page 111: Recipe By Animals
Recipe by Animals ---------------------------------------- Date: 30/01/2014 12:00 Scale: NEW SCALE ---------------------------------------- RECIPES FILE ---------------------------------------- Recipe: REC 2 HI COW Operator: DAVID Customer: EDWARD JONES Feeding Factor(%): Function: Meal 1(%): Meal 2(%): Animals Number: Average Wt. per Animal(kg): 27,67 Total Weight(kg): 4.980 Avg.Dry Wt. -
Page 112: Recipe By Totals
Recipe by Totals ---------------------------------------- Date: 30/01/2014 12:00 Scale: NEW SCALE ---------------------------------------- RECIPES FILE ---------------------------------------- Recipe: REC 2H Operator: JHON Customer: TWIN FARM Feeding Factor(%): Function: Total Weight(kg): 3.848 Total Weight Groups(kg): 3.848 ---------------------------------------- Code T/Jump Val. TOT.Wt ---------------------------------------- CORN SILAGE 3.060 2.754... -
Page 113: Feeding - Recipe By Animals
Feeding - Recipe by Animals ---------------------------------------- Date: 30/01/2014 12:00 Scale: NEW SCALE ---------------------------------------- FEEDING ---------------------------------------- Date: 29/01/2014 | 29/01/2014 ---------------------------------------- Recipe: REC HI COW Date: 29/01/2014 08:44 Operator: DAVID Customer: EDWARD JONES Feeding Factor(%): Function: Meal: 1-2/60 Animals Number: Avg.Wt. -
Page 114: Feeding - Recipe By Totals
Feeding - Recipe by Totals ---------------------------------------- Date: 30/01/2014 12:00 Scale: NEW SCALE ---------------------------------------- FEEDING ---------------------------------------- Date: 29/01/2014 | 29/01/2014 ---------------------------------------- Recipe: REC 2H Date: 29/01/2014 10:16 Operator: JHON Customer: TWIN FARM Feeding Factor(%): Function: Total Weight Loaded(kg): 3.889 Total Weight Unloaded(kg): 3.861 Tot. -
Page 115: Feeding Summary
Feeding Summary ---------------------------------------- Date: 30/01/2014 12:00 Scale: NEW SCALE ---------------------------------------- FEEDING SUMMARY ---------------------------------------- Date: 28/01/2014 | 29/01/2014 ---------------------------------------- Date Recipe Weight(kg) ---------------------------------------- 28/01/2014 08:30 REC HI COW 3.097 28/01/2014 10:03 REC 2H 3.876 28/01/2014 15:35 REC HI 3.154 28/01/2014 17:05 REC 2C 3.916... -
Page 116: Recipes Executed By Group
Recipes Executed by Group ---------------------------------------- Date: 30/01/2014 12:00 Scale: NEW SCALE ---------------------------------------- RECIPES EXECUTED by GROUP ---------------------------------------- Date: 28/01/2014 | 29/01/2014 ---------------------------------------- PEN1 ---------------------------------------- Date Recipe Weight(kg) ---------------------------------------- 28/01/2014 08:30 REC HI COW 3.001 28/01/2014 15:35 REC HI 3.102 29/01/2014 08:44 REC HI COW... -
Page 117: Total Usages
Total Usages ---------------------------------------- Date: 30/01/2014 12:00 Scale: NEW SCALE ---------------------------------------- TOTAL USAGES ---------------------------------------- Date: 19/01/2014 | 29/01/2014 ---------------------------------------- Total Used(kg): 69.659 Total Deviation(kg): 1.318 ---------------------------------------- Code Weight(kg) Deviation ---------------------------------------- ALFALFA HAY 8.858 CORN SILAGE 20.276 MINERAL 3.051 MOLASS 2.597 PREMIX 34.877... -
Page 118: Unloads Summary
Unloads Summary ---------------------------------------- Date: 30/01/2014 12:00 Scale: NEW SCALE ---------------------------------------- UNLOADS SUMMARY ---------------------------------------- Date: 28/01/2014 | 29/01/2014 ---------------------------------------- Date Group Weight(kg) ---------------------------------------- 28/01/2014 09:17 PEN1 3.001 28/01/2014 10:59 WILLER 3.824 28/01/2014 16:45 PEN1 3.102 28/01/2014 18:09 WILLER 3.876 29/01/2014 09:35 PEN1 3.025... -
Page 119: Activity By Operators
Activity by Operators ---------------------------------------- Date: 30/01/2014 12:00 Scale: NEW SCALE ---------------------------------------- ACTIVITY by OPERATORS ---------------------------------------- Date: 28/01/2014 | 29/01/2014 ---------------------------------------- DAVID ---------------------------------------- Date Recipe Time ---------------------------------------- 28/01/2014 08:30 REC HI COW 0:59 28/01/2014 15:35 REC HI 1:15 29/01/2014 08:44 REC HI COW 1:12 29/01/2014 15:37... -
Page 120: Recipes Execution By Animals
Recipes Execution by Animals ---------------------------------------- Date: 30/01/2014 12:00 Scale: NEW SCALE ---------------------------------------- RECIPES EXECUTION ---------------------------------------- Recipe: REC HI COW Date: 29/01/2014 08:44 Operator: DAVID Customer: EDWARD JONES Feeding Factor(%): Function: Meal: 1-2/60 Animals Number: ---------------------------------------- 08:47 PREMIX 1.321 (21,0) 08:58 PEN1 (28/01/2014) -
Page 121: Recipes Execution By Totals
Recipes Execution by Totals ---------------------------------------- Date: 30/01/2014 12:00 Scale: NEW SCALE ---------------------------------------- RECIPES EXECUTION ---------------------------------------- Recipe: REC 2H Date: 29/01/2014 10:16 Operator: JHON Customer: TWIN FARM Feeding Factor(%): Function: ---------------------------------------- 10:17 CORN SILAGE 2.769 10:34 ALFALFA HAY 10:41 MINERAL 10:49 MOLASS 10:56 TIMER 10:00... -
Page 122: Manual Weighing - Net Weight
Manual Weighing - Net Weight ---------------------------------------- Date: 30/01/2014 12:00 Scale: NEW SCALE ---------------------------------------- MANUAL WEIGHING ---------------------------------------- Net Weight(kg): 1.470 ---------------------------------------- Manual Weighing - Total Weight ---------------------------------------- Date: 30/01/2014 12:00 Scale: NEW SCALE ---------------------------------------- MANUAL WEIGHING ---------------------------------------- Total Weight(kg):... -
Page 123: Annex B
Annex B 17 Technical Specifications CPU .................. 32-Bit ARM SDRAM .................... 8MB NANDFlash .................. 128MB NORFlash ... -
Page 124: Annex C
Annex C 18 Error Codes ERR 1 Overrange Error The error indicates that the A/D converter is beyond the Full-Scale. For further information, consult the "Troubleshooting Guide" provided in the CD attached to the scale or contact Customer Service. -
Page 125: Err 18 File System Damaged
ERR 18 File System damaged The error indicates that, following a problem with the File System of NANDFlash, the scale automatically formatted NANDFlash. Press OK to continue. All the stored data were deleted, the Preferences and Calibrations were restored with default values. Set the Preferences and execute a Calibration. -
Page 126: Err 26 Meal Percentage Incorrect
ERR 26 Meal Percentage incorrect The error indicates that the sum of the percentages programmed in Meals is higher than 100%. For further information, see "Recipe Programming - How to modify the Name and Parameters of the Recipe". -
Page 127: Err 50 Wrong Scale
ERR 50 Wrong Scale ID The error indicates that in the Recipes which you are importing from the FarmManager NETWORK a Scale ID is stored different than that set in the scale. If the scale and/or Recipes have not programmed the Scale ID, the control is not executed. - Page 128 ...
- Page 129 ...
- Page 130 ...
- Page 131 Label will not be held liable for any printing errors. Label will not be held liable for direct or indirect damage to persons, animals or property resulting from misuse or improper use of its products and for damage resulting from failure to ...
- Page 132 Label S.r.l. Via Don Mazzucotelli, 6/A 24020 Gorle (BG) ITALY Phone +39 035 30.28.12 Fax +39 035 30.28.15 support@labelgroup.com www.labelgroup.com ...
Need help?
Do you have a question about the I Feed Good L and is the answer not in the manual?
Questions and answers