Advertisement
Table of Contents
- 1 Table of Contents
- 2 Important Notes and Precautions for Use
- 3 Description of the Appliance
- 4 Description of the Appliance
- 5 Instructions for the User
- 6 Troubleshooting
- 7 Technical Features
- 8 Instructions for the Installer
- 9 Instructions for the Installer
- 10 Assistance and Spare Part
- Download this manual
Advertisement
Table of Contents

Summary of Contents for General Gas CR6060
- Page 1 INSTRUCTIONS AND ADVICE FOR INSTALLING, USING AND SERVICING OF COOKERS...
-
Page 2: Table Of Contents
The appliance was designed and made in accordance with the European standards listed below: => EN 30-1-1, EN 30-2-1 and EN 437 plus subsequent amendments (gas) => EN 60 335-1 and EN 60 335-2-6 (electrical) plus relative amendments The appliance complies with the prescriptions of the European Directives as below: =>... -
Page 3: Important Notes And Precautions For Use
1. IMPORTANT NOTES AND PRECAUTIONS FOR USE You have purchased one of our products for which we The manufacturer disclaims all responsibility if these instructions are not followed. Should you have any thank you. We are confi dent that this new appliance, modern, functional and practical, made with top quality doubts, seek the assistance of a qualifi... -
Page 4: Description Of The Appliance
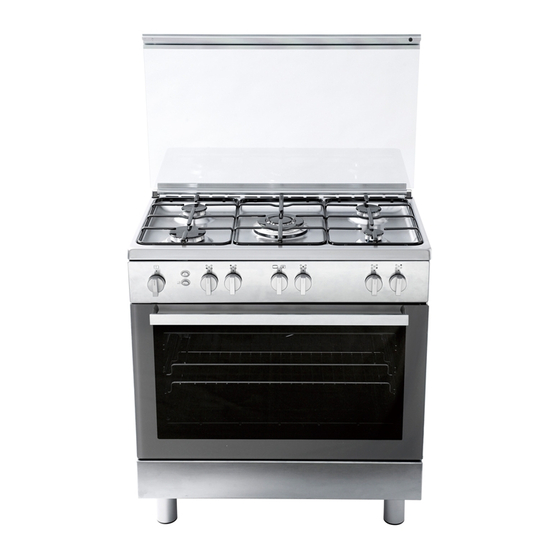
2. DESCRIPTION OF THE APPLIANCE PRESENTATION Our cookers are fi tted with a fully hob. The burners can be equipped with safety thermocouples (Tc) (see fi g. 10). Each knob on the front panel has a diagram printed above it showing to which burner or hotplate it refers. The combination of the different sized burners offers the possibility of various types of cooking. - Page 5 2. DESCRIPTION OF THE APPLIANCE CONTROL PANELS A. Gas burner knob B. Gas oven/grill thermostat knob C. Oven light switch D. Spit roast switch E. Timer knob MODEL: CR6060.. MODEL: CR8050..
-
Page 6: Description Of The Appliance
2. DESCRIPTION OF THE APPLIANCE DESCRIPTION OF THE CONTROLS HOB GAS BURNER KNOB (ref. A) By rotating the knob in an anticlockwise direction, the following symbols appear: = Closed position = “Full on” position = “Reduced rate” position GAS OVEN/GRILL THERMOSTAT KNOB (ref. B) By rotating the knob in an anticlockwise direction, the following functions appear: = Closed position... - Page 7 3. INSTRUCTIONS FOR THE USER HOB: GENERAL NOTES ON SAFETY LIGHTING THE BURNERS • When using the burners, do not leave the appliance unsupervised. Ensure that children do not play with a) Manual ignition the appliance. In particular, make sure that pan Press turn counterclockwise...
- Page 8 3. INSTRUCTIONS FOR THE USER d) Optimum use of the burners OVEN: GENERAL SAFETY INSTRUCTIONS In order to achieve maximum effi ciency with minimum • Do not leave the oven unsupervised during use. gas consumption it is useful to remember: Ensure that children do not play with the appliance.
- Page 9 3. INSTRUCTIONS FOR THE USER WHAT TO DO THE FIRST TIME YOU USE THE OVEN Before cooking for the fi rst time, ensure the oven is empty and its door closed, heat the oven at maximum tem- perature for 2 hours. This will allow the protective coating on the interior of the oven to be burnt off and dissipate the associated smells.
- Page 10 Add more water during grilling to compensate for evaporation. HOW TO USE THE SPIT Mod. CR6060.. (fi g. 8a) • Place the chicken or piece of meat to roast fi rmly between the two forks on the spit and make sure it is evenly balanced to prevent straining the motor.
- Page 11 3. INSTRUCTIONS FOR THE USER USEFUL COOKING TIPS Meat: • If, when cooking meat, the time needed is more than 40 minutes, turn the oven off 10 minutes Cakes and bread: before the end of cooking time to exploit the •...
- Page 12 3. INSTRUCTIONS FOR THE USER COOKING/BAKING TABLE Position of the oven Weight Temperatures Cooking time in shelf from the bottom FOODS NOTES in °C minutes 4 runners 6 runners MEAT 1 or 2 2 or 3 200-225 100-120 Roast veal 1 or 2 2 or 3 200-225...
- Page 13 3. INSTRUCTIONS FOR THE USER CLEANING AND MAINTENANCE STRUCTURE All the cooker parts (in enamelled or painted metal, • Prior to any maintenance work or cleaning, steel, or glass) should be cleaned frequently with disconnect the appliance from the electricity warm soapy water and then rinsed and dried with a mains.
-
Page 14: Instructions For The User
INSTRUCTIONS FOR THE USER OVEN DOOR REMOVAL The oven door can be removed to give easier access to the oven when cleaning. To remove, proceed as follows: • Open the oven door and move the release U-shape element (fi g. A) forwards until it is over the tooth in the upper sector of the hinge (fi... - Page 15 INSTRUCTIONS FOR THE USER OVEN SIDEWALL GRIDS (fi g. 11) To allow for a better cleaning of the side grids, you can extract them this way: • Side grids type 1 (fi g. 11a): Push with a finger on the last of the slots to release the grid from its hold.
-
Page 16: Troubleshooting
In case the appliance fails to operate correctly, contact our Service Centre. Warning: Servicing should be carried out only by authorised personnel. 5. TECHNICAL FEATURES OUTSIDE COOKER DIMENSIONS height H height h width L depth P MODEL 1442 CR6060.. 1342 CR8050.. - Page 17 1000 4 Auxiliary LPG - Propane 1000 150-1 1300 Town H.K. LPG - Butane 28-30 3250 LPG - Propane 6 Wok CR6060.. 3250 290-6 3250 Town H.K. LPG - Butane 28-30 3800 6 Wok CR8050.. LPG - Propane 3800 LPG - Butane...
-
Page 18: Instructions For The Installer
6. INSTRUCTIONS FOR THE INSTALLER TECHNICAL INFORMATION INSTALLATION • The installation, adjustments, conversions and maintenance operations listed in this part must UNPACKING YOUR COOKER only be carried out by qualifi ed personnel. The • Once the wrapping has been removed from the outer manufacturer cannot be held responsible for any surfaces and the various inner parts, thoroughly damage to persons or property resulting from an... - Page 19 6. INSTRUCTIONS FOR THE INSTALLER VENTILATION The appliance should not be installed in a room of volume less than 20 m³. The quantity of air necessary is that required for a regular combustion of the gas and for the ventilation of the room.
- Page 20 GAS CONNECTION ATTENTION: • If the appliance is going to be recessed (class 2 Before connecting the appliance check that the data subclass 1), connect it to the gas supply source on the rating plate affi xed to the cooker, correspond using only fl...
- Page 21 6. INSTRUCTIONS FOR THE INSTALLER ELECTRICAL CONNECTION The electrical connection must be carried out in accordance with the current standards and laws in force. Before connecting check that: • the system and electrical sockets amperage is adequate for the appliance maximum power (see data label affi...
- Page 22 6. INSTRUCTIONS FOR THE INSTALLER ADJUSTMENTS • Always disconnect the appliance from the electricity supply before making any adjustment. • All seal must be replaced by the technician following any adjustment or regulation. • The adjustment of the reduce rate (simmer) must be undertaken only with burners functioning on Town gas while in the case of burners functioning on L.P.G, the screw must be locked down fully (in clockwise direction).
- Page 23 6. INSTRUCTIONS FOR THE INSTALLER OVEN BURNER (fi g. 23) The burner is installed on the oven base and is covered by the bottom plate which must always remain in that position during oven operation, To adjust the primary air, light the burner and, watching the fl...
- Page 24 6. INSTRUCTIONS FOR THE INSTALLER MAINTENANCE Prior to any maintenance work or changing parts, disconnect the appliance from the gas and electricity power sources. Servicing must only be carried out by authorised personnel. REPLACING THE TAPS AND THERMOSTAT (mod. CR8050..)) Proceed in the following way when replacing a tap: •...
-
Page 25: Instructions For The Installer
REPLACING THE TAPS AND THERMOSTAT REPLACING THE ELECTRICAL COMPONENTS • The rear protection will have to be removed in order (mod. CR6060..) (fi g. 29) TProceed in the following way when replacing a tap or to change the electrical heating elements, spit the thermostat: motor, terminal board and power cable. -
Page 26: Assistance And Spare Part
7. ASSISTANCE AND SPARE PARTS Before this appliance left the factory it was tested and fi ne-tuned by specialised expert personnel in order to guarantee its best functioning results. Any subsequent repairs or adjustments that may be necessary must be done with the maximum of care and attention by qualifi...
Need help?
Do you have a question about the CR6060 and is the answer not in the manual?
Questions and answers