Table of Contents
Advertisement
Advertisement
Table of Contents

Related Manuals for Gonotec OSMOMAT 3000


Summary of Contents for Gonotec OSMOMAT 3000
- Page 1 User Guide OSMOMAT 3000basic OSMOMAT 3000 Version 1.22 1/6/2016...
- Page 2 Gonotec GmbH GSG-Hof Reuchlinstr. 10-11 10553 Berlin Germany Original Device Documentation Phone: (030) 7809 588-0 Fax: (030) 7809 588-88 E-mail: contact@gonotec.com Web: http://www.gonotec.com WEEE reg. no.: DE65424410 © 2014-2016 Version 1.22 1/6/2016...
- Page 3 This manual allows for the safe and efficient operation of the OSMOMAT 3000 (hereafter "device"). This manual is part of the device and must be stored in the immediate vicinity of the device and be easily accessible to personnel at any time.
- Page 4 Version 1.22 1/6/2016...
-
Page 5: Table Of Contents
OSMOMAT 3000basic // OSMOMAT 3000 Table of Contents Table of Contents Table of Contents ................5 Overview ................. 9 Safety ..................13 Explanation of symbols ............13 Intended use ..............15 Additional hazards ............15 2.3.1 Hazards due to electrical current ......15 2.3.2 Risk of infection ..........16... - Page 6 OSMOMAT 3000basic // OSMOMAT 3000 Table of Contents Setup ..................48 Check printer (Option D) (does not apply to OSMOMAT 3000basic) ............48 Check free movement of steel needle ......48 Set calibration defaults ............ 49 Date Time ................ 51 Measurement series name ..........
- Page 7 OSMOMAT 3000basic // OSMOMAT 3000 Table of Contents 11.5 Options ...............107 11.6 Nameplate ..............108 12 Index ..................109 Appendix ..................111 Returning the device ..............111 Limited Warranty ...............113 OSMOMAT 3000 Intend Use ............114 Classification of the IVD ............114 ® EC Compliance Statement—OSMOMAT 3000 .......115...
-
Page 8: Osmomat 3000Basic // Osmomat
OSMOMAT 3000basic // OSMOMAT 3000 Table of Contents Version 1.22 1/6/2016... -
Page 9: Overview
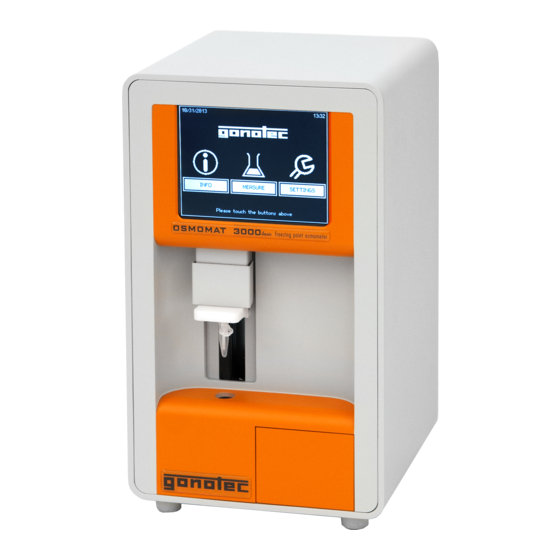
OSMOMAT 3000basic // OSMOMAT 3000 Overview Overview Fig. 1: Device overview—front Touchscreen, page 30 Upper cooling system (behind movable elevator cover), page 29 Temperature sensor with measurement vessel, page 29 Lower cooling system, page 29 Elevator ... - Page 10 OSMOMAT 3000basic // OSMOMAT 3000 Overview Device, rear Fig. 2: Device overview—rear Interfaces, page 33 (does not apply to OSMOMAT 3000basic) Microfuses On/Off switch Power cable connection Fan outlet Version 1.22 1/6/2016...
- Page 11 Always use the accessories and consumables supplied by Gonotec GmbH. Re-order consumables, in particular measurement vessels, from Gonotec GmbH (see page 3 for contact information). Measurement vessels, 100 pc. Calibration standard, 10 pc., 1ml each, concentration 300 mOsmol/kg Printer paper, 1 roll (Option D only) Fig.
- Page 12 OSMOMAT 3000basic // OSMOMAT 3000 Overview Accessories Fig. 4: Overview of accessories Power cable 2 microfuses, slow-blow 1.6A (HBC 1500A) RS-232 cable Ampoule opener (does not apply to OSMOMAT 3000basic) Blow-out device for removing condensate USB cable for connection to PC (slave)
-
Page 13: Safety
OSMOMAT 3000basic // OSMOMAT 3000 Safety Safety 2.1 Explanation of symbols The safety notices in this manual are identified by symbols. The safety Safety notices notices are preceded by signal words indicating the degree of hazard. DANGER! This combination of symbol and signal word indicates an immediate dangerous situation that will result in death or serious injury if not avoided. - Page 14 OSMOMAT 3000basic // OSMOMAT 3000 Safety Safety notices use the following symbols to indicate special hazards: Special safety notices WARNING! This combination of symbol and signal word indicates a potentially dangerous situation that may result in contamination with biohazardous materials.
-
Page 15: Intended Use
OSMOMAT 3000basic // OSMOMAT 3000 Safety 2.2 Intended use Intended use The OSMOMAT 3000 device is a non-invasive in-vitro diagnostic product used to determine the osmolality of aqueous solutions. Only use the device to measure aqueous solutions. Never measure organic, saturated, or highly viscous solutions. -
Page 16: Risk Of Infection
OSMOMAT 3000basic // OSMOMAT 3000 Safety 2.3.2 Risk of infection Risk of infection WARNING! Risk of infection due to sample residue and in case of inadequate hygiene, disinfection, and sterilization procedures! Exposure to sample residue in non-cleaned, non- sterilized, or non-disinfected components results in an elevated risk of infection. -
Page 17: Risks Of Device Damage
OSMOMAT 3000basic // OSMOMAT 3000 Safety 2.3.4 Risks of device damage Exposure to liquids and moisture NOTE! Device damage due to exposure to liquids and moisture! Exposure to liquids and moisture can cause damage to the electrical components of the device, e.g. due to a short. -
Page 18: Reproducibility Of The Measurement
OSMOMAT 3000basic // OSMOMAT 3000 Safety 2.3.5 Reproducibility of the measurement Incorrect measurement vessels NOTE! Impaired reproducibility of measurement due to incorrect measurement vessels! Repeated use of the measurement vessels and use of incorrect consumables cannot guarantee reproducible measurement results. -
Page 19: Operator Responsibilities
OSMOMAT 3000basic // OSMOMAT 3000 Safety 2.4 Operator responsibilities The operator of the device must fulfill the responsibilities according to Germany’s Medical Devices Operator Ordinance listed in this manual. In addition, the operator is responsible for learning about and complying with all local laws and associated standards and guidelines applicable at the time the device is used. - Page 20 OSMOMAT 3000basic // OSMOMAT 3000 Safety The operator has to maintain an inventory according to Germany’s Inventory Medical Devices Operator Ordinance: The following information has to be maintained in the inventory: name, product type, serial number, and year the device was purchased, ...
-
Page 21: Personnel Requirements
OSMOMAT 3000basic // OSMOMAT 3000 Safety 2.5 Personnel requirements WARNING! Risk of injury due to inadequately qualified personnel! Work performed on the device by unqualified personnel or the presence of unqualified personnel in the hazard zone of the device creates risks that can result in serious injury and substantial property damage. -
Page 22: Personal Safety Gear
OSMOMAT 3000basic // OSMOMAT 3000 Safety 2.6 Personal safety gear While performing the different tasks on and with the device, personnel must wear the personal safety gear referenced explicitly in the various sections of this manual. Description of personal safety gear The personal safety gear is explained below:... -
Page 23: Design And Function
OSMOMAT 3000basic // OSMOMAT 3000 Design and function Design and function 3.1 Device overview Fig. 5: Device overview—front Touchscreen, page 30 Upper cooling system (behind movable elevator cover), page 29 Temperature sensor with measurement vessel, page 29 ... - Page 24 OSMOMAT 3000basic // OSMOMAT 3000 Design and function Device, rear Fig. 6: Device overview—rear Interfaces, page 33. (does not apply to OSMOMAT 3000basic) Microfuses On/Off switch Power cable connection Fan outlet Version 1.22 1/6/2016...
- Page 25 Always use the accessories and consumables supplied by Gonotec GmbH. Re-order consumables, in particular measurement vessels, from Gonotec GmbH (see page 3 for contact information). Measurement vessels, 100 pc. Calibration standard, 10 pc., 1ml each, concentration 300 mOsmol/kg Printer paper, 1 roll (Option D only) Fig.
- Page 26 OSMOMAT 3000basic // OSMOMAT 3000 Design and function Accessories Fig. 8: Overview of accessories Power cable 2 microfuses, slow-blow 1.6A (HBC 1500A) RS-232 cable Ampoule opener (does not apply to OSMOMAT 3000basic) Blow-out device for removing condensate USB cable for connection to PC (slave)
-
Page 27: Measuring Method Basics
OSMOMAT 3000basic // OSMOMAT 3000 Design and function 3.2 Measuring method basics The device measures the total osmolality of any aqueous solution. Osmolality The osmolality of a solution is defined as the number (or amount of substance) of the osmotically active particles (e.g. salt ions, sugar, urea, proteins) present per kilogram of solvent (water). -
Page 28: Measurement Equipment
OSMOMAT 3000basic // OSMOMAT 3000 Design and function 3.3 Measurement equipment Fig. 9: Overview of measurement equipment Elevator Lower cooling system Upper cooling system Cover (behind movable elevator cover) Measurement vessel Handle for lowering the temperature sensor Temperature sensor The sample is pipetted into the measurement vessel (Fig. 9/7). - Page 29 OSMOMAT 3000basic // OSMOMAT 3000 Design and function Upper cooling system Cryst-needle Cooling nipple The cryst-needle (Fig. 10/1) of the upper cooling system "inoculates" the sample with ice crystals ("crystallization"). This causes the sample to freeze and heat up to its freezing point.
-
Page 30: Touchscreen
OSMOMAT 3000basic // OSMOMAT 3000 Design and function 3.4 Touchscreen Fig. 12: Overview of touchscreen The device is controlled using the touchscreen (Fig. 12/1) NOTE! Property damage due to incorrect operation! The touchscreen can be damaged by sharp or hard objects or excessive pressure force. - Page 31 OSMOMAT 3000basic // OSMOMAT 3000 Design and function Enter values Some menus are password-protected. Access to these menus is limited to the lab supervisor or authorized service personnel/Gonotec. Fig. 13: Enter values To enter values, tap the corresponding entry field in the opened menu.
-
Page 32: Printer (Does Not Apply To Osmomat 3000Basic)
OSMOMAT 3000basic // OSMOMAT 3000 Design and function 3.5 Printer (does not apply to OSMOMAT 3000basic) With built-in printer only (Option D) Opening for printer paper Printer pull-out handle The printer is used to print the measurement results. Rolls of printer paper are included with the delivery. -
Page 33: Connections And Interfaces (Does Not Apply To Osmomat 3000Basic)
OSMOMAT 3000basic // OSMOMAT 3000 Design and function 3.6 Connections and interfaces (does not apply to OSMOMAT 3000basic) The following connections and interfaces are located at the rear of the device: Fig. 15: Connections and interfaces COM1 (only for connecting barcode reader) -
Page 34: Interface Configuration
The upper COM1 (RS232) serial data port is used to connect a barcode COM1 data port reader. The barcode reader is configured at the factory and can be (does not apply to purchased from Gonotec GmbH or your authorized distributor. OSMOMAT 3000basic) WARNING! Incompatible barcode reader! -
Page 35: Log Formats
OSMOMAT 3000basic // OSMOMAT 3000 Design and function 3.6.2 Log formats The log output for the Osmomat 3000 may optionally be in one of the following three formats: Format Description Advantages Disadvantages Line by line comma- Compact Not a genuine standard format... -
Page 36: Csv Format
Intro line When the Osmomat 3000 is started, the device sends a line with version information to prevent future compatibility problems. This line contains the short name of the device type followed by the version numbers of the mainboard and the components connected to it. -
Page 37: Xml Format
OSMOMAT 3000basic // OSMOMAT 3000 Design and function Result line After each measurement a result line is sent which contains the following semicolon-separated values in a fixed order: Column Description batch Batch identifier in quotation marks, entered by the user or a sequential number generated automatically. - Page 38 OSMOMAT 3000basic // OSMOMAT 3000 Design and function Ticket 3.6.6.1 A ticket consists of an XML tag which corresponds to one published ticket. If it relates to a single measurement, it contains an additional XML tag called Measurement, which contains the measurement and the associated metadata.
-
Page 39: Legacy Csv Format
</Ticket>⏎ 3.6.7 Legacy CSV format Format initially used by OSMOMAT 3000 for data transfer. Select only if required for compatibility with existing LIMS connections configured accordingly. Documentation in the obsolete CSV format can be requested separately. We strongly advise against continuing to use this format! -
Page 40: Error Messages
OSMOMAT 3000basic // OSMOMAT 3000 Design and function 3.6.8 Error messages The following error messages may be used to diagnose an operating error or device failure: Notification Meaning ABORT User cancels by pressing the EXIT key LIFT User cancels by lifting the sensor... -
Page 41: Delivery, Packaging, And Storage
Note the extent of damage on the transport documents or the delivery note of the carrier. Notify Gonotec GmbH and initiate a complaint. File a complaint about every defect as soon as it is detected. Claims for damages can only be filed within applicable complaint deadlines. -
Page 42: Packaging
OSMOMAT 3000basic // OSMOMAT 3000 Delivery, packaging, and storage 4.1 Packaging The package is packaged according to the expected transport About the packaging conditions. Only environmentally friendly materials were used for the packaging. The packaging is intended to protect the device from transport damage and other damage until the time of installation. - Page 43 OSMOMAT 3000basic // OSMOMAT 3000 Delivery, packaging, and storage No disposal via municipal waste Indicates that disposal of the device via municipal waste is prohibited. Disposal of the decommissioned device should be via electronics and metal recycling. In addition, decommissioned devices can be returned to the manufacturer for disposal.
-
Page 44: Device Storage
OSMOMAT 3000basic // OSMOMAT 3000 Delivery, packaging, and storage 4.2 Device storage Store the device under the following conditions: Do not store outside. Store under dry and dust-free conditions. Do not expose to aggressive media. Protect from sunlight. -
Page 45: Installation
OSMOMAT 3000basic // OSMOMAT 3000 Installation Installation 5.1 Transport device inside lab Personnel: User Safety gear: Disposable lab gloves Power down device using on/off switch on rear side and disconnect power plug. Position a measurement vessel (Fig. 19/1) on the temperature sensor. -
Page 46: Install Device
OSMOMAT 3000basic // OSMOMAT 3000 Installation 5.2 Install device Personnel: User Safety gear: Disposable lab gloves NOTE! Risk of property damage! Only install device indoors. Install device at installation site. NOTE! Risk of incorrect measurements Select site based on the following criteria: free of vibrations no direct heat exposure (sun, electric heater, etc.) -
Page 47: Connect Device
OSMOMAT 3000basic // OSMOMAT 3000 Installation Remove transport safety device (Fig. 24/1) from temperature sensor. Proceed as follows: Fig. 24: Transport safety device Carefully pull transport safety device down and pull forward to remove. Fig. 25: Remove transport safety device 5.3 Connect device... -
Page 48: Setup
OSMOMAT 3000basic // OSMOMAT 3000 Setup Setup Personnel: Lab supervisor Complete all activities for installation and connection of the device. Verify that the connections at the rear side of the device are secure. Check the elevator for ease of movement. -
Page 49: Set Calibration Defaults
OSMOMAT 3000basic // OSMOMAT 3000 Setup CAUTION! Risk of injury from cryst-needle! The tip of the cryst-needle is exposed. Movement of the cryst-needle can cause needle puncture injuries. Always keep your hands and fingers clear from the area underneath the cryst-needle. - Page 50 OSMOMAT 3000basic // OSMOMAT 3000 Setup Configure calibration interval 10. Select a calibration interval. When selecting Manual, the device does not prompt you for calibration (not recommended). OSMOMAT 3000basic: Selection not available Fig. 31: Configure calibration interval Select calibration standards 11.
-
Page 51: Date Time
OSMOMAT 3000basic // OSMOMAT 3000 Setup 6.4 Date Time Set date and time 14. Enter date and time as follows: – Day, two digits [01…31] – Month, two digits [01…12] YYYY – Year, four digits [2014] – Hour, two digits [00…23]... -
Page 52: Operation
OSMOMAT 3000basic // OSMOMAT 3000 Operation Operation Electrical current DANGER! Risk of death due to electrical current on device! Contact with energized parts of the device results in immediate risk of death due to electric shock. Damage to the insulation of individual components can cause risk of death. -
Page 53: Power Up Device
OSMOMAT 3000basic // OSMOMAT 3000 Operation 7.1 Power up device Personnel: User Safety gear: Disposable lab gloves Power up device on rear side using on/off switch (Fig. 38/1). Fig. 38: Power up device Version 1.22 1/6/2016... -
Page 54: Modify User Preferences
OSMOMAT 3000basic // OSMOMAT 3000 Operation 7.2 Modify user preferences Configure language Tap Language and select a language. Fig. 39: Select language Overview Tapping Settings on the Start menu opens the Settings menu. The Settings menu lets the user configure the following settings: ... - Page 55 OSMOMAT 3000basic // OSMOMAT 3000 Operation Configure screen saver Select the duration after which the system activates the screen saver. Tapping OFF will never activate the screen saver. Fig. 42: Configure screen saver Activate paper feed (does not apply to...
- Page 56 OSMOMAT 3000basic // OSMOMAT 3000 Operation Laboratory options Tapping Lab Options in the Settings menu opens the Lab Options menu. The Lab Options option is protected with the lab supervisor password. The Lab Options menu lets the user configure the following settings: ...
-
Page 57: Measure Individual Samples
OSMOMAT 3000basic // OSMOMAT 3000 Operation 7.3 Measure individual samples Personnel: User Safety gear: Disposable lab gloves Materials: Soft, lint-free paper tissue Pipette Measurement vessel Sample NOTE! Impaired reproducibility of measurement due to incorrect measurement vessels! - Page 58 OSMOMAT 3000basic // OSMOMAT 3000 Operation Wait until ice forms on the cryst-needle (Fig. 48). After successful ice formation, a calibration prompt (Fig. 49) or the Ready to Measure screen (Fig. 50) is displayed (depending on the configured calibration interval).
- Page 59 OSMOMAT 3000basic // OSMOMAT 3000 Operation Position measurement vessel on temperature sensor with cover facing front (Fig. 52/1). The measurement vessel is securely attached to the temperature sensor when it clicks into place. Fig. 52: Position measurement vessel Option D only: (does not apply to OSMOMAT 3000basic) Tap Use printer on the measurement menu (Fig.
- Page 60 OSMOMAT 3000basic // OSMOMAT 3000 Operation The measurement result displays on the touchscreen (Fig. 55/1) and, if applicable, prints (Fig. 55/2) (Option D). Reproducibility: ±2 digits in the measurement range [0..400] mOsmol/kg ±0.5% in the measurement range [400..1500] mOsmol/kg ±1.0% starting with 1500 mOsmol/kg Fig.
-
Page 61: Batch/Series Measurement (Does Not Apply To Osmomat 3000Basic)
OSMOMAT 3000basic // OSMOMAT 3000 Operation 7.4 Batch/series measurement (does not apply to OSMOMAT 3000basic) Personnel: User Safety gear: Disposable lab gloves Materials: Soft, lint-free paper tissue Pipette Measurement vessel Samples NOTE! Impaired reproducibility of measurement due to... - Page 62 OSMOMAT 3000basic // OSMOMAT 3000 Operation Wait until ice forms on the cryst-needle (Fig. 59). After successful ice formation, a calibration prompt (Fig. 60) or the Ready to Measure screen (Fig. 61) is displayed (depending on the configured calibration interval).
- Page 63 OSMOMAT 3000basic // OSMOMAT 3000 Operation Pipette a sample volume of 50µl (15µl for Option M) into an unused and clean measurement vessel (Fig. 63). NOTE! Risk of incorrect measurement resulting from the presence of air bubbles in the sample! ...
- Page 64 OSMOMAT 3000basic // OSMOMAT 3000 Operation 12. Move elevator up. Moving the elevator up during the measurement will abort the measurement. 13. Remove measurement vessel from temperature sensor. Dispose of measurement vessel and sample according to local regulations. 14. Clean temperature sensor (Fig. 66/1) using a soft, dry, lint-free Fig.
-
Page 65: Calibrate Device
OSMOMAT 3000basic // OSMOMAT 3000 Operation 7.5 Calibrate device Depending on the pre-defined calibration interval, opening the Calibration methods measurement menu will automatically show a calibration prompt (Fig. 49). Calibration can also be started manually (Fig. 50). The device is calibrated using one of the following calibration methods: ... - Page 66 OSMOMAT 3000basic // OSMOMAT 3000 Operation Clean temperature sensor (Fig. 67/1) using a soft, dry, lint-free paper towel. Fig. 67: Clean temperature sensor Follow the instructions on the touchscreen. Fig. 68: Perform zero point calibration Pipette a distilled water volume of 50µl (15µl for Option M) into an unused and clean measurement vessel (Fig.
- Page 67 OSMOMAT 3000basic // OSMOMAT 3000 Operation Perform zero point calibration Move elevator (Fig. 71/1) down. Zero point calibration starts automatically. Zero point calibration is performed automatically. Pay attention to the displays on the touchscreen. Fig. 71: Move elevator down Move elevator up.
- Page 68 OSMOMAT 3000basic // OSMOMAT 3000 Operation Calibrate device using calibration NOTE! standard Impaired reproducibility of measurement due to improper handling of calibration standards! Improper handling and storage of the calibration standards included with the delivery negatively affects the measurement accuracy of the device.
- Page 69 OSMOMAT 3000basic // OSMOMAT 3000 Operation 13. Pipette a calibration standard volume of 50µl (15µl for Option M) into a clean and unused measurement vessel (Fig. 75). NOTE! Risk of incorrect measurement resulting from the presence of air bubbles in the sample! ...
- Page 70 OSMOMAT 3000basic // OSMOMAT 3000 Operation Calibration can be completed after performing the number of runs specified in the calibration defaults for the very last calibration point (Fig. 78). The system now shows the calibration results (Fig. 79). The resulting osmolalities are calculated as the mean across the individual measurements.
-
Page 71: Power Down Device
OSMOMAT 3000basic // OSMOMAT 3000 Operation 7.6 Power down device Personnel: User Safety gear: Disposable lab gloves Fig. 81: Power down device Power down device using on/off switch on rear side (Fig. 81/1) and disconnect power plug. Position a measurement vessel (Fig. 82/1) on the temperature sensor. -
Page 72: Troubleshooting
OSMOMAT 3000basic // OSMOMAT 3000 Troubleshooting Troubleshooting 8.1 Safety notices Electrical current DANGER! Risk of death due to electrical current on device! Contact with energized parts of the device results in immediate risk of death due to electric shock. Damage to the insulation of individual components can cause risk of death. -
Page 73: Notes Regarding Errors
OSMOMAT 3000basic // OSMOMAT 3000 Troubleshooting 8.2 Notes regarding errors In case of errors that cannot be resolved using the error table on page 74, contact the manufacturer. Please be prepared when contacting the manufacturer as follows: Use a telephone located close to the device. -
Page 74: Error Table
OSMOMAT 3000basic // OSMOMAT 3000 Troubleshooting 8.3 Error table Errors marked * are shown as an error message on the touchscreen. Error description Possible Cause Remedy Personnel Elevator gets stuck or Mechanical wear Lubricate the elevator guide using User ... - Page 75 OSMOMAT 3000basic // OSMOMAT 3000 Troubleshooting Error description Possible Cause Remedy Personnel No crystallization * Peltier element Replace upper cooling system Service defective service manual) technician Poor ice crystal Cable connection formation in upper between cooling system cooling system...
- Page 76 OSMOMAT 3000basic // OSMOMAT 3000 Troubleshooting Error description Possible Cause Remedy Personnel Incorrect Lower cooling system Align lower cooling system Service measurement results not aligned correctly service manual) technician Incorrect measurement Only use measurement vessels User vessel used of the correct type supplied by...
- Page 77 OSMOMAT 3000basic // OSMOMAT 3000 Troubleshooting Error description Possible Cause Remedy Personnel Error message: Needle bar disengaged Verify free movement of cryst-needle Service from motor or stuck page 81) technician Needle stuck* Motor slider misaligned see also: Motor of cryst-needle turns without stopping or does not turn one full revolution.
-
Page 78: Resolve Errors
OSMOMAT 3000basic // OSMOMAT 3000 Troubleshooting 8.4 Resolve errors 8.4.1 Replace cryst-needle Personnel: Service technician Safety gear: Disposable lab gloves Materials: Allen key SW 2.5 Precision key file Wire cutter WARNING! Risk of infection from sample residue! The cryst-needle is immersed into the sample during measurements. - Page 79 OSMOMAT 3000basic // OSMOMAT 3000 Troubleshooting Loose washer between cryst-needle and motor disk! Remove cryst-needle from motor disk. Hold washer (Fig. 87/1) of mounting screw in place. Fig. 87: Remove cryst-needle Fig. 88: Cryst-needle components Remove guide tube (Fig. 88/1) and fasteners (Fig. 88/3) of cryst-needle (Fig.
- Page 80 OSMOMAT 3000basic // OSMOMAT 3000 Troubleshooting Align motor swipe vertically with upper dead center (Fig. 90/1). The set screw of the motor swipe points down. Move cryst-needle through guide tube in upper cooling system (Fig. 90/2) onto cooling nipple (Fig. 90/3).
- Page 81 OSMOMAT 3000basic // OSMOMAT 3000 Troubleshooting 14. Fit cryst-needle to motor disk. Assemble fasteners as follows: 1 - Push washer (Fig. 91/2) and fastening tube (Fig. 91/3) onto mounting screw (Fig. 91/1). 2 - Push mounting screw with washer and fastening screw through head of cryst-needle (Fig.
-
Page 82: Replace The Temperature Sensor
OSMOMAT 3000basic // OSMOMAT 3000 Troubleshooting 8.4.2 Replace the temperature sensor Personnel: Service technician Safety gear: Disposable lab gloves Materials: Allen key SW 2 Adjustment tool Tweezers WARNING! Risk of injury in case of inadequate hygiene,... - Page 83 OSMOMAT 3000basic // OSMOMAT 3000 Troubleshooting Move elevator cover (Fig. 96/1) up. Fig. 96: Move elevator cover up Remove the 2 mounting screws (Fig. 97/1) using Allen key (SW 2). Fig. 97: Remove mounting screws Remove the complete elevator cover (Fig. 98/1).
- Page 84 OSMOMAT 3000basic // OSMOMAT 3000 Troubleshooting Move elevator up and remove the 2 mounting screws (Fig. 100/1) using Allen key (SW 2). Fig. 100: Remove mounting screws Remove temperature sensor with mounting plate toward the front (Fig. 101) while holding guide tube of cryst-needle (Fig. 101/1) in place.
- Page 85 OSMOMAT 3000basic // OSMOMAT 3000 Troubleshooting 12. Fit new temperature sensor to mounting plate (Fig. 102). Keep the data sheet affixed to the temperature sensor (Fig. 103/2) in the vicinity of the device. To protect thermistor, cover temperature sensor with a measurement vessel (Fig.
- Page 86 OSMOMAT 3000basic // OSMOMAT 3000 Troubleshooting 14. Tighten the 2 mounting screws only lightly. Align the temperature sensor The temperature sensor must be aligned using the adjustment tool. 15. Install adjustment tool (Fig. 104/1) in opening of lower cooling system using tweezers.
- Page 87 OSMOMAT 3000basic // OSMOMAT 3000 Troubleshooting Install elevator cover Fig. 108: Elevator cover with correct cable routing Cable Correct cable routing Cable guide on temperature sensor Incorrect cable routing NOTE! Risk of cable break! Place cable (Fig. 108/1) on temperature sensor in cable guide (Fig.
- Page 88 OSMOMAT 3000basic // OSMOMAT 3000 Troubleshooting Clean cooling nipple 22. Clean cooling nipple (Fig. 110/1) using a fiberglass pin. For this purpose, move elevator cover up. 23. Power up device on rear side using on/off switch. 24. Calibrate the new temperature sensor.
-
Page 89: Replace Microfuses
OSMOMAT 3000basic // OSMOMAT 3000 Troubleshooting 8.4.3 Replace microfuses Safety gear: Disposable lab gloves Materials: Flat blade screwdriver Microfuses (slow-blow 1.6A) DANGER! Risk of death due to electrical current! Power down device using on/off switch on rear side and disconnect power plug. -
Page 90: Clean Cooling Clamp
OSMOMAT 3000basic // OSMOMAT 3000 Troubleshooting 8.4.4 Clean cooling clamp Personnel: Service technician Safety gear: Disposable lab gloves Materials: Fine sandpaper Power down device on rear side using on/off switch. Remove device front panel ( on page 95). - Page 91 OSMOMAT 3000basic // OSMOMAT 3000 Troubleshooting Pull out printer (Fig. 117/1). Fig. 117: Pull out printer Turn knurled screw (Fig. 118/1) counter-clockwise. Remove empty paper roll from holder and dispose. Fig. 118: Turn knurled screw Cut off beginning of new paper roll (Fig. 119/1) and push onto holder.
-
Page 92: Replace Printer Ribbon (Option D Only) (Does Not Apply To Osmomat 3000Basic)
OSMOMAT 3000basic // OSMOMAT 3000 Troubleshooting On the Start menu, select Settings Printer. Tap Paper Feed. Fig. 120: Activate paper feed The paper feed of the printer is activated briefly. (Fig. 121). Tap Back to exit the menu. Replace printer cover and push printer into casing. - Page 93 OSMOMAT 3000basic // OSMOMAT 3000 Troubleshooting Pull out printer (Fig. 123/1). Fig. 123: Pull out printer Remove printer cover (Fig. 124/1). Fig. 124: Remove printer cover Push on Push marking on front side of ribbon (Fig. 125). The ribbon is released.
-
Page 94: Reset Device To Default Settings
OSMOMAT 3000basic // OSMOMAT 3000 Troubleshooting 8.4.7 Reset device to default settings If the device no longer functions properly due to incorrect settings, you can undo all the modified user settings and reset device to the default settings. To do this, proceed as follows: From the Start menu, select Settings ... -
Page 95: Servicing
OSMOMAT 3000basic // OSMOMAT 3000 Servicing Servicing 9.1 Safety notices Electrical current DANGER! Risk of death due to electrical current on device! Contact with energized parts of the device results in immediate risk of death due to electric shock. Damage to the insulation of individual components can cause risk of death. -
Page 96: Service Table
OSMOMAT 3000basic // OSMOMAT 3000 Servicing Service table The following sections describe the service activities required to ensure device operation under optimum, error-free conditions. If regular checks show excess wear, shorten the required service intervals based on actual signs of wear. If you have questions regarding service activities and intervals, contact the manufacturer (for contact information, see page 2). - Page 97 OSMOMAT 3000basic // OSMOMAT 3000 Servicing Move elevator (Fig. 129/1) down. Fig. 129: Move elevator down Move elevator cover (Fig. 130/1) up. Fig. 130: Move elevator cover up Remove the 2 mounting screws (Fig. 131/1) using Allen key (SW 2).
- Page 98 OSMOMAT 3000basic // OSMOMAT 3000 Servicing Pull out printer (Fig. 133/1) from device. (does not apply to OSMOMAT 3000basic) Fig. 133: Pull out printer Remove printer cover (Fig. 134/1) by pulling up. (does not apply to OSMOMAT 3000basic) Push printer back into device.
- Page 99 OSMOMAT 3000basic // OSMOMAT 3000 Servicing Personnel: Service technician Install device front panel Safety gear: Disposable lab gloves Materials: Allen key SW 2 Install device front panel on device and push into place (Fig. 137). Pull out printer from device using handle.
-
Page 100: Lubricate Elevator
OSMOMAT 3000basic // OSMOMAT 3000 Servicing Bolt elevator cover to elevator using the 2 mounting screws (Fig. 139/1). The device front panel is now installed. Fig. 139: Tighten mounting screws 9.4 Lubricate elevator Personnel: User Safety gear: Disposable lab gloves ... - Page 101 OSMOMAT 3000basic // OSMOMAT 3000 Servicing Fig. 141: Lubricate elevator guide Lubricate elevator guide on left (Fig. 141/A) and right side (Fig. 141/B) of ball bearing using silicone spray. The left ball bearing of the elevator guide is not easily accessible.
-
Page 102: Perform Visual Inspection Of Device
OSMOMAT 3000basic // OSMOMAT 3000 Servicing 9.5 Perform visual inspection of device Personnel: User Safety gear: Disposable lab gloves Materials: Fiberglass pin Soft cloth Tweezers Verify that the cables at the rear side of the device are secure and none of them are broken. -
Page 103: Check Reproducibility Of Measurements
OSMOMAT 3000basic // OSMOMAT 3000 Servicing 9.6 Check reproducibility of measurements The purpose of the measurement check is to verify the specified performance limits of the device. 9.6.1 Sample test protocol measurement check Mechanical check: Calibration/verification ZERO CAL1 CAL2 REF1... -
Page 104: Disposal
OSMOMAT 3000basic // OSMOMAT 3000 Disposal 10 Disposal After its useful life, the device must be disposed of under environmentally conscious considerations. Separation of consumables WARNING! Risk of death due to exposure to biohazards! Improper disposal causes a risk of exposure to biohazards. - Page 105 Restriction of Hazardous Substances in Electrical and Electronic Equipment (short RoHS, Restriction of Hazardous Substances). Gonotec manufactures b2b devices. The devices are classified as medical devices (WEEE category 8) and monitoring and control instruments (WEEE category 9) and registered with the ear foundation (Waste Electrical Equipment Register) accordingly under WEEE reg.
-
Page 106: Specifications
OSMOMAT 3000basic // OSMOMAT 3000 Specifications 11 Specifications 11.1 Dimensions Specification Value Unit Weight Width Depth Height 11.2 Performance parameters Analytic sensitivity and specificity Specification Value Unit Measuring range [0..3000] mOsmol/kg Resolution (across entire mOsmol/kg measuring range) Reproducibility Specification Value Unit Reproducibility (50µl) -
Page 107: Connection Ratings
OSMOMAT 3000basic // OSMOMAT 3000 Specifications 11.4 Connection ratings Electrical Specification Value Unit Power cable Detachable power supply cable Power connection 100-240 Frequency 50-60 Power consumption, max. Fuse (HBC 1500A) T 1.6 10 years System clock battery useful life Type: CR2032... -
Page 108: Nameplate
OSMOMAT 3000basic // OSMOMAT 3000 Specifications Smaller sample amount (M) Specification Value (does not apply to Sample volume 15 µl OSMOMAT 3000basic) Reproducibility ±6 digits [0..300] mOsmol/kg ±2.0% [300..3000] mOsmol/kg 11.6 Nameplate The nameplate is located at the rear of the device. -
Page 109: Index
OSMOMAT 3000basic // OSMOMAT 3000 Index 12 Index Unpack ............... 44 Visual inspection..........102 2-point calibration ..........65 Dimensions ............106 Disposal .............. 104 3-point calibration ..........65 Electrical current ........15, 52, 72, 95 Elevator ..............23 Accessories ............26 Lubricate ............ - Page 110 OSMOMAT 3000basic // OSMOMAT 3000 Index Insufficient air circulation ........17 Nameplate ............108 Needle puncture injury ........16 Needle puncture injury ........... 16 Shock ............17, 18 On/Off switch ..........10, 24, 33 Safety gear ............22 Operating conditions ......... 106 Sample Operator ..............
-
Page 111: Appendix
OSMOMAT 3000basic // OSMOMAT 3000 Appendix Appendix Returning the device When returning the device for repairs or a refund, please note the following. Personnel: User Safety gear: Disposable lab gloves 1. Power down device using on/off switch on rear side and disconnect power plug. - Page 112 OSMOMAT 3000basic // OSMOMAT 3000 Appendix 6. Tap Park Needle. Tap Back to exit the menu. WARNING! Risk of infection from sample residue! The cryst-needle is immersed into the sample during measurements. Contact with the cryst-needle increases the risk of infection.
-
Page 113: Limited Warranty
In some states of the US, in If Gonotec is notified within the warranty period of a defect some Canadian provinces and in some countries outside in a software product, in media or in a temperature sensor... -
Page 114: Osmomat 3000 Intend Use
Osmolality is an important measure of concentration for diluted solutions, such as all bodily fluids. The OSMOMAT 3000 Standard as well as the basic model need a sample volume of 50 µl, while the M option requires only 15 µl, making it suitable for measuring even minute samples. -
Page 115: Ec Compliance Statement-Osmomat ® 3000
Any departure from the specifications or independent modifications of the unit without the express consent of Gonotec GmbH may result in a violation of CE requirements. Such actions invalidate the compliance statement and transfer responsibility to the originator of said actions. -
Page 116: Consumables
Continuous loop ribbon cartridge for OSMOMAT 3000-D Accessories and Replacement Parts Item no. Item Pc. / VE 32.3.0010 Temperature sensor for OSMOMAT 3000 (50µl sample volume) 32.3.2010 Temperature sensor for OSMOMAT 3000-M (15µl sample volume) 30.9.0030 Blow-out device 30.6.0020 Cryst-needle 30.9.1050... -
Page 117: Before Calling Gonotec
OSMOMAT 3000basic // OSMOMAT 3000 Appendix Before Calling Gonotec Use a telephone located close to the device. Power up device. NOTE! Danger in case of continuous acoustic alarm! In case of continuous acoustic alarm, the electronics components of the device can be damaged.
Need help?
Do you have a question about the OSMOMAT 3000 and is the answer not in the manual?
Questions and answers
Good morning, Lab is 24h service, we cannot batch Osmolality samples, All levels of controls are run early morning, Osmometer switched OFF thereafter. Is lab required to run controls every time the Osmometer is switched ON for patient sample processing. Please advise. How stable is the Osmometer for quality results.? what is the correct procedure for quality patient results analyses on the Gonotec Osmomat3000 ? Kindly advise. Thank you in advance. Regards, S.Kolia- QA Autolab Lancet Labs - Johannesburg -South Africa
For quality patient results analysis on the Gonotec Osmomat 3000:
1. Always use clean, unused measurement vessels supplied by Gonotec GmbH.
2. Do not reuse vessels or use incorrect consumables like centrifuge tubes or reaction vessels, as these affect measurement reproducibility.
3. Follow proper user safety protocols, including wearing disposable lab gloves.
4. Use a pipette to transfer the sample into the measurement vessel.
5. Perform individual measurements as directed in the operation procedure.
Stability and quality:
The Osmomat 3000 is described as very stable and reliable, providing consistent results even after long periods of non-use. It is sensitive and maintains high accuracy, with measurement imprecision under 1% even for highly concentrated solutions.
This answer is automatically generated
What is width and diameter of Osmomat 3000D paper roll