Table of Contents
Advertisement
Advertisement
Table of Contents

Subscribe to Our Youtube Channel
Related Manuals for Greenbroz 215


Summary of Contents for Greenbroz 215
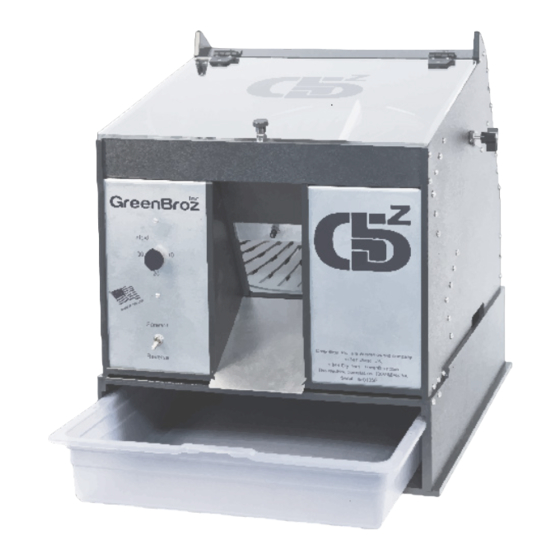
- Page 1 DRY TRIMMER USER MANUAL 215 & 420 MODELS...
- Page 2 Operation of the Cleaning the machine prior to processing trimming machine P.13 P.14 P.16 Warranty Registration Limited Warranty Additional Resources icon means a video tutorial of the section can be found at www.greenbroz.com/videos GREENBROZ INC. DRY TRIMMER USER MANUAL 2016...
- Page 3 Ensure the machine is unplugged prior to any disassembly. Do not operate the machine with the lid open. Failure to comply with the above may result in serious injury. GREENBROZ INC. DRY TRIMMER USER MANUAL 2016...
- Page 4 7. Sweeper Bar: Gently moves material in the trim chamber. 8. Blade Tension Screw: Holds the sweeper bar and hub in place. 9. Table Top Tray (Dry Trimmer 215 Model Only): Catches trim. 10. Timer: Automatic shutoff timer will stop the motor when the time is up.
- Page 5 (fig. 1.A) Remove any additional packing material from the machine Set your machine on its stand. If you have not purchased the GreenBroz 215 Dry Trimmer stand, then place it on a sturdy tabletop or counter. (fig. 1.B) Loosen the Blade Tension Adjustment Screw and set next to the machine.
- Page 6 It should not be tight, rather it should turn very easily. (fig 1.I) Your machine is now prepped and ready to use! fig. 1.b fig. 1.c fig. 1.a fig. 1.d fig. 1.e fig. 1.f fig. 1.h fig. 1.i fig. 1.g GREENBROZ INC. DRY TRIMMER USER MANUAL 2016...
- Page 7 PREPARATION OF MATERIAL PRIOR TO PROCESSING The Greenbroz Dry Trimmers are intended for trimming of DRY material. Using wet material will cause excessive residue on the blades and cutting chamber, and will provide less than optimal results Use these simple tests to evaluate your product prior to processing: All stems should snap when bent.
- Page 8 We recommend reviewing all of the disclosures on page 3 and following all of the instructions to ensure safety and optimal processing. The trimmer is designed to sit on top of the GreenBroz Inc. Dry Trimmer stand. Prior to use, ensure that the machine placement is sound to prevent the machine from falling during operation.
- Page 9 Trimmed material will fall out of the machine and into your container. (fig. 3.D) Repeat until your harvest is complete. fig. 3.b fig. 3.c fig. 3.a fig. 3.d GREENBROZ INC. DRY TRIMMER USER MANUAL 2016...
- Page 10 (fig. 4.F) Use your metal wire brush to remove any tiny debris that might remain deep in the grooves. GREENBROZ INC. DRY TRIMMER USER MANUAL 2016...
- Page 11 Lastly, remove the tray from under the machine. Spray with isopropyl alcohol and wipe down. You can also spray and wipe the bottom compartment of the machine if you like. (fig. 4.Q) Congratulations! Your machine is now clean and ready for another run! GREENBROZ INC. DRY TRIMMER USER MANUAL 2016...
- Page 12 4.c fig. 4.a fig. 4.e fig. 4.f fig. 4.d fig. 4.h fig. 4.i fig. 4.g fig. 4.j fig. 4.k fig. 4.l fig. 4.m fig. 4.n fig. 4.o fig. 4.p fig. 4.q fig. 4.r GREENBROZ INC. DRY TRIMMER USER MANUAL 2016...
- Page 13 30 days from purchase date to activate your warranty. ALL INFORMATION OBTAINED BY GREENBROZ INC. WILL BE KEPT PRIVATE AND SECURE. GREENBROZ INC. WILL NOT SHARE OR DISTRIBUTE YOUR INFORMATION WITHOUT CONSENT. GREENBROZ INC. DRY TRIMMER USER MANUAL 2016...
- Page 14 Length of Warranty: The length of this warranty shall be 12 months from the date of original retail purchase of the product. To Qualify for this Warranty: The product must be purchased from GreenBroz, Inc. or a dealer authorized by GreenBroz, Inc. to sell the products. This warranty only applies to the first retail purchaser and is not transferable to subsequent owners.
- Page 15 FITNESS FOR A PARTICULAR PURPOSE OR USE and any implied warranty of MERCHANTABILITY otherwise applicable to this product. GreenBroz, Inc. disclaims any responsibility for loss of time or use of the product, transportation, commercial loss, or any other incidental or consequential damage, including lost profits.
- Page 16 ADDITIONAL RESOURCES Download the e-version of this user manual and view all video tutorials at: WWW.GREENBROZ.COM 844-DRY-TRIM INFO@GREENBROZ.COM GREENBROZ INC. DRY TRIMMER USER MANUAL 2016...
- Page 17 THANK YOU.
Need help?
Do you have a question about the 215 and is the answer not in the manual?
Questions and answers