Table of Contents
Advertisement
Quick Links
Download this manual
See also:
Operating Manual
Advertisement
Table of Contents

Subscribe to Our Youtube Channel
Related Manuals for E.F. Johnson 5100 SERIES

Summary of Contents for E.F. Johnson 5100 SERIES
- Page 1 PRELIMINARY Service Manual 5100 SERIES PORTABLE DIGITAL/ANALOG VHF/UHF/800 MHz 7.2 VDC 5 & 1 W (VHF), 4 & 1 W (UHF), 3 W (800 MHz) Part No. 242-51xx-xxx First Printing September 2001...
- Page 2 The company designs, manufactures, and markets conventional and trunked radio systems, mobile and portable subscriber radios, repeaters, and Project 25 digital radio products. E.F. Johnson is a wholly owned subsidiary of Transcrypt International, Inc.
-
Page 3: Table Of Contents
TABLE OF CONTENTS TABLE OF CONTENTS GENERAL INFORMATION Radio Wide Scanning ..... 2-8 Scan Resume Delay ..... . 2-9 Standard Mode Scan List . - Page 4 TABLE OF CONTENTS TABLE OF CONTENTS (CONT’D) TRANSCEIVER PROGRAMMING SMARTNET/SmartZone System Other ID’s Screen ......3-20 SMARTNET/SmartZone System Phone GENERAL .
- Page 5 TABLE OF CONTENTS TABLE OF CONTENTS (CONT’D) TRANSMIT FREQUENCY LIST OF FIGURES DETERMINATION ....4-13 HARMONIC FILTER ....4-13 Front Panel Controls .
-
Page 6: General Information
C4FM modulation according to the Project 25 stan- This service manual contains alignment and dard. This mode uses a channel spacing of 12.5 kHz. service information for the E.F. Johnson 5100-Series portable digital transceivers. 1.2.3 OPERATING PROTOCOLS 1.2 TRANSCEIVER DESCRIPTION The 5100-series transceivers can be programmed for all the following operating protocols. -
Page 7: Secure Communication
4 SMARTNET channels. Zones are similar to Warranty Department by phone as described in banks used in other E.F. Johnson transceivers. One use Section 1.7. The Warranty Department may also be of zones may be to program the channels used for contacted for Warranty Service Reports, claim forms, operation in a specific geographical area. -
Page 8: Part Number Breakdown
GENERAL INFORMATION 1.4 PART NUMBER BREAKDOWN E (Encryption and Security Software) A - No encryption The following is a breakdown of the part number B - SC20-460 used to identify this transceiver. Some combinations C - SC20-DES/460 are not available. 1.5 TRANSCEIVER IDENTIFICATION 242-51FT-SEC-OADE The transceiver identification number is printed... -
Page 9: Factory Customer Service
Table 1-1. When your call is answered at E.F. Johnson, you will hear a brief message informing you of numbers Encryption Options - Transcrypt 460 scrambling is that can be entered to reach various departments. -
Page 10: Factory Returns
E.F. Johnson has a site on the World Wide Web that can be accessed for information on the company When returning equipment for repair, it is also a and such things as products, systems, and regulations. - Page 11 GENERAL INFORMATION 5100 SERIES PORTABLE SPECIFICATIONS The following are general specifications intended for use in testing and servicing this transceiver. For current advertised specifications, refer to the specification sheet available from your sales representative. Values are typical and are subject to change without notice.
-
Page 12: Operation
OPERATION SECTION 2 OPERATION • 2.1 FEATURES Emergency alarms to alert dispatcher of emergency conditions • 2.1.1 GENERAL FEATU RES Emergency calls for high priority system access • Failsoft operation on a predefined conventional • Programmable for the following modes of channel if trunked system fails •... -
Page 13: Controls And Display
OPERATION Table 2-1: Programmable Option Switch Functions CONVENTIONAL MODE SMARTNET/SmartZone Mode Function See Section: Function See Section: Backlight 2.4.4 Backlight 2.4.4 Clear/Secure 2.4.13 Call Alert 2.7.7 Displayed Information 2.6.2 Call Response 2.7.4, 2.7.5 High/Low Power 2.6.10 Clear/Secure 2.4.13 Home Zone 2.4.9 Home Zone 2.4.9... -
Page 14: Top Panel Controls
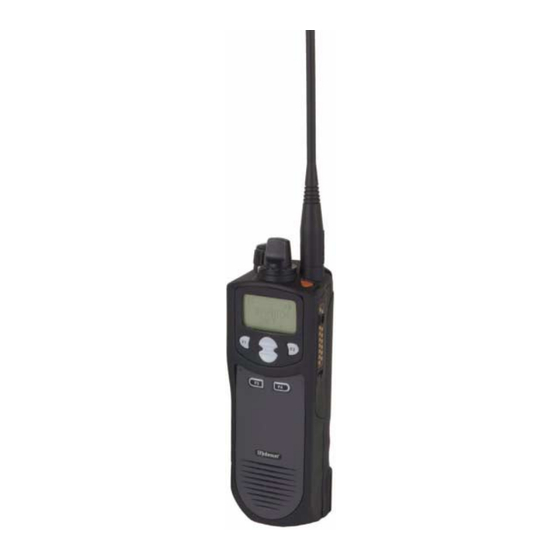
OPERATION Display Up/Down Sw Option Keys Microphone Option Keys DTMF Keypad Speaker Full Keypad Model Limited Keypad Model Figure 2-1 Front Panel Controls 2.3.2 TOP PANEL CONTROLS Antenna On-Off Connector Volume Two-Color Indicator - Indicates the following conditions: Steady Red - Transmitter keyed, normal power. Flashing Red - Transmitter keyed, low battery (the low power mode is automatically selected). -
Page 15: Side Controls
OPERATION Channel Switch - This 16-position switch allows up 2.3.4 DISPLAY to 16 channels to be selected. This switch operates in conjunction with up to 16 programmable zones to allow up to 256 channels to be selected. SL Pri Call ID Scan Antenna Connector - Connection point for the antenna. -
Page 16: General Operation
OPERATION Call ID - Indicates that the display is showing the ID 2.4.3 POWER-UP PASSWORD of the calling party (see Section 2.7.4). General Scan - Indicates that system scan is activated (see Section 2.5). The power-up password feature prevents unau- thorized use of the transceiver. -
Page 17: Option Switches
OPERATION • when any key is pressed. It then automatically turns The indicator on the top panel flashes red in the off after a programmed delay so that battery drain is transmit mode and green in the receive mode. • minimized. -
Page 18: Home Zone
OPERATION 2.4.9 HOME ZONE 2.4.12 TRANSCEIVER OPERATING MODES The radio can be programmed with a home zone. Introduction Then when power is turned on, the radio can be programmed so that either the home or last selected Each selectable channel can be programmed for zone is automatically selected. -
Page 19: Secure Communication
OPERATION The control channel transmits and receives disabled and vice versa. More information on these system information to and from all radios registered on modes follows. the system. Therefore, once a control channel is found, it is continuously monitored for incoming call infor- 2.5.2 STANDARD SCANNING mation and is used to make call requests. -
Page 20: Scan Resume Delay
OPERATION • If the zone or channel is changed while radio wide 2.5.8 NUISANCE CHANNEL DELETE scanning, scanning continues normally. With standard scanning, channels can be tempo- 2.5.4 SCAN RESUME DELAY rarily deleted from the scan list, for example, if messages on a channel become annoying. -
Page 21: Conventional Features
OPERATION the selected channel is fixed and cannot be changed. modes, and to Section 2.7 for information on features Scanning may also be disabled on some channels. unique to the SMARTNET/SmartZone mode. 2. If scanning is enabled, turn it off by pressing the 2.6.2 DISPLAY MODE SELECTION Scan option switch. -
Page 22: Monitor Mode
OPERATION transmitter even if the channel is not in use. In this Off - Busy channel lockout is disabled and the trans- case, the channel must be monitored manually as mitter keys even if the channel is busy. follows: Noise - The transmitter is disabled if a carrier is Rx Indicator - With scanning disabled, note if the indi- detected on the channel. -
Page 23: Penalty Timer
OPERATION Tone Call Guard Squelch 1. Using the number keys, enter the number of the channel that is programmed with the code you want Tone-type Call Guard squelch utilizes subaudible to reassign to all channels (only channels 1-9 can be CTCSS tones from 67-254.1 Hz. -
Page 24: Power Output Select
OPERATION you are out of range of the repeater, you cannot talk to If a Project 25 (digital) channel is selected, anyone else on that channel even though the mobile pressing this switch selects the emergency mode and if you are calling may be only a short distance away. To the PTT switch is pressed, an emergency status is sent. -
Page 25: Priority Channel Sampling
OPERATION No Priority - No priority channel sampling occurs 0.25-4.00 seconds in 0.25-second steps can be when the list is selected. The radio transmits on the programmed. selected channel. Lookback Time B - This time determines how often Priority/Tx Priority - Priority sampling occurs and the priority channel is checked once an incorrect Call the priority channel is the one programmed in the Guard (CTCSS/DCS) or NAC code is detected. -
Page 26: Dtmf/Ani Signaling
OPERATION 2. Monitor the channel automatically or manually as 2.6.16 PROJECT 25 MODE FEATURES described in Section 2.6.3. Individual, Group, and NAC Codes 3. Press the PTT switch and the call proceeds as follows: Individual ID - Each transceiver that operates on Project 25 (digital) channels is programmed with •... -
Page 27: Conventional Secure Communication
OPERATION (cycling power does not reselect the old talk group). analog channels: SecureNet™ and 460 scrambling. Proceed as follows: More information on these protocols follows. 1. Select the channel to be changed and then press the SecureNet Talk Group Select option switch. SecureNet is a proprietary Motorola protocol that 2. -
Page 28: Smartnet/Smartzone Features
OPERATION with the 460 Scrambler, a Clear/Secure option switch With the SecureNet protocol, the following may be programmed. Pressing this switch changes the receive options can be programmed: transmission mode for the selected channel and momentarily displays either “CLEAR” or “SECURE”. No Autodetect - Only signals coded like the transmit signals are received. -
Page 29: Enhanced Private Conversation Calls
OPERATION at a fixed location). Most calls you make will probably Receiving a Standard Call be this type. When a SMARTNET/SmartZone group call is Placing a Standard Group Call received, the transceiver can be programmed to display the Individual ID of the calling mobile and/or 1. - Page 30 OPERATION • 3. Press the PTT switch to initiate the call. The display If the called party answers but the radio system is then indicates the alias of the destination radio. If busy, four low tones sound and “BUSY” is the entered digits do not correspond to a valid list displayed.
-
Page 31: Private Conversation Ii Calls
OPERATION 2.7.5 PRIVATE CONVERSATION II CALLS 2. Using the 0-9 keys, enter the ID (all six digits) of the mobile unit you are calling. To erase the last digit, General press the key, and to cancel the call, press the CLR key. -
Page 32: Telephone Calls
OPERATION • To end the call when the conversation is complete Direct Entry Method (Full Keypad Models Only) or at any other time, press the CLR key. If the call is not answered within 20 seconds, it is automati- 1. With a SMARTNET/SmartZone channel selected, cally terminated. -
Page 33: Call Alert
OPERATION • If you are not authorized to make telephone calls, List Entry Method “REJECT” is displayed and a continuous tone sounds. End the call by pressing the CLR key. 1. With a SMARTNET/SmartZone channel selected, momentarily press the Call Alert option switch. The •... -
Page 34: Messaging
OPERATION Answering a Page 2. To change the displayed status, enter the index of the desired status if you know it or scroll through the list 1. When a page is received, the display indicates using the keys until you find the desired “PAGE”... -
Page 35: Failsoft Operation
OPERATION with a standard call. All calls that follow are then When responding to messages in the scan mode, emergency calls and they occur on the emergency programming determines if the response always talk group. occurs on the talk group of the call or the selected talk group (if they are different). -
Page 36: Smartnet/Smartzone Secure Communication
OPERATION • value of the current site as “RSSI x” and then returns The time-out timer is about to expire or the penalty to displaying the channel alias. timer has expired (Sections 2.4.10 and 2.6.7). • The conversation timer is about to expire (Section Searching For a New Site 2.6.8). -
Page 37: Keypad Programming
OPERATION Zone No. ZONE x CLR key PARM CHAN xx Wide/Nar Band Clone? Rx Freq Tx Freq Tx Timer Rx CG/NAC Tx CG/NAC Penalty Timer Tx Power Conver. Timer TOT On-Off Figure 2-3 Keypad Programming Flowchart Six Beeps 2.9 KEYPAD PROGRAMMING •... -
Page 38: Cloning
OPERATION shows the keypad programming mode menu structure 2.9.5 CHANNEL PROGRAMMING for this radio. Zone Selection The information which follows describes how the various parameters are programmed. When program- The zone containing the channel to be ming is complete, exit the keypad programming mode programmed must be selected if applicable. - Page 39 OPERATION Receive Frequency - When the Rx icon is indicated Transmit NAC - When “NAC xxx” is displayed with to the left of Pgm and a frequency or eight zeros is the Tx icon indicated to the left of Pgm , the receive displayed, the receive channel frequency can be NAC can be programmed the same as the Receive programmed.
-
Page 40: Transceiver Programming
TRANSCEIVER PROGRAMMING SECTION 3 TRANSCEIVER PROGRAMMING Programming Cable Part No. 023-5000-011 Figure 3-1 Programming Setup ® • 3.1 GENERAL Intel 486 processor or equivalent • At least 4 MB of RAM • 3.1.1 PROGRAMMING SETUP A hard disk drive with at least 5 MB of free space •... -
Page 41: Connecting Computer To Transceiver
TRANSCEIVER PROGRAMMING 3. Windows 3.1 - In the Program Manager, double 3.3.1). The two types that are stored for each program- click the SETUP.EXE file on the CD-ROM or click ming session have the same name but different exten- this file name and select File > Run. sions as follows: Windows 95/98/NT/2000 - Select Start >... -
Page 42: File Size Indicator
TRANSCEIVER PROGRAMMING Data File Name Radio Wide Screens System Screens Conv System SMARTNET System Channel Screen Figure 3-2 Main Screen (Later PCTrunk Versions) Revised PC Trunk (Version 5.10.0 or Later) 3.1.10 FILE SIZE INDICATOR Revised versions of PCTrunk use a pane on the The maximum number of channels that can be left side of the screen (see Figure 3-2) to display the programmed may be limited by the available memory... -
Page 43: Programming Procedure
TRANSCEIVER PROGRAMMING 3.2 PROGRAMMING PROCEDURE 3.2.3 PROGRAMMING CONVENTIONAL SYSTEMS The following is a general procedure you can use to program a transceiver. NOTE: If no conventional channels are to be programmed, skip this section. 3.2.1 PRELIMINARY 1. Make sure the conventional system is displayed by 1. -
Page 44: Menu Commands
TRANSCEIVER PROGRAMMING 1. Select Download from the menu bar and then the Save - Saves the current file to disk using the current file type to be transferred (programming or file name. scrambling). Save As - Same as “Save” except you are prompted to •... -
Page 45: Upload Menu
TRANSCEIVER PROGRAMMING DSP Code to 50xx Series Portable - Used along with 3.3.7 WINDOW MENU the proper data file to update the radio operating software. 3.3.4 UPLOAD MENU Later Versions Early Versions The Upload Menu is displayed only in the opening screen before a programming file is created. -
Page 46: Radio-Wide General Screen
TRANSCEIVER PROGRAMMING This parameter is displayed in the status bar with later seconds that the backlight stays on after it is enabled PCTrunk versions (see Figure 3-2). by pressing a key (see following) or by the Backlight option switch. Options Backlight Keypress - If checked, the backlight turns on for the Backlight On Time whenever a key is pressed. - Page 47 TRANSCEIVER PROGRAMMING NOTE: With PCTrunk, Version 5.10.0 or later, the message is no longer being received. Times of 0 - 7.5 seconds can be programmed (see Section 2.5.4). following screens are selected by clicking their name in the left pane, not by clicking the button in the General screen.
- Page 48 TRANSCEIVER PROGRAMMING Acknowledgment Delay - Delay time from 50-1550 ms before the scrambler responds to information received from a controller. System Delay - Delay time from 50-1550 ms between when the PTT switch is pressed and the scrambler transmits data over the air. Emergency Delay - The amount of time the scram- bler waits to send the emergency signal after the emergency switch is pressed.
-
Page 49: Radio-Wide Conventional Screen
TRANSCEIVER PROGRAMMING Silent Signaling - If selected, causes the scrambler to send a tone ahead of data packets that forces the receiving unit to mute its audio before the data burst is heard. Quiet Delay - If selected, adds an extra 100 ms lead- in delay at the beginning of the silent signaling tone (if enabled). -
Page 50: Radio-Wide Smartnet/Smartzone Screen
TRANSCEIVER PROGRAMMING Talk Group on Rx - The alias of the talk group on Hot DTMF which the call is being received is displayed. Enable/Disable - When enabled, allows the user to PTT ID - The ID of the mobile placing the call is send DTMF tones while transmitting. -
Page 51: Radio-Wide Portable Options Screen
TRANSCEIVER PROGRAMMING 3.5 PROGRAMMING CONVENTIONAL Adjustable Parameters SYSTEMS AND CHANNELS Busy Override Delay - With SmartZone operation, this is the amount of time a user must press the PTT 3.5.1 INTRODUCTION switch to override a SmartZone busy that occurs because some member of the talk group is present at The following information describes how to a site where there are no traffic channels available. - Page 52 TRANSCEIVER PROGRAMMING To modify a list, click and the Timers screen which follows is displayed. Select the desired Tx Time-Out Timer - This timer limits the length of scan list in the box on the top and then select the zone transmissions (Section 2.4.10).
- Page 53 TRANSCEIVER PROGRAMMING No Priority - Priority sampling does not occur (all If the “Priority/Tx Priority” or “Priority/Tx channels are scanned in sequence). The radio trans- Selected” mode is programmed, fixed priority mits on the selected channel. sampling is selected. The priority channel must then be chosen for the scan list.
-
Page 54: Conventional System Talk Group Screen
TRANSCEIVER PROGRAMMING Call Encryption PID - Indicates which DES-OFB encryption key should be used for secure private calls. Call Timer - Sets the maximum time that the radio remains in the individual call mode after an individ- ual call is received. A response must be made before - Deletes the selected talk group. -
Page 55: Conventional Analog Channel Screen Parameters
TRANSCEIVER PROGRAMMING Figure 3-3 Conventional Analog Channel Screen 3.5.6 CONVENTIONAL ANALOG CHANNEL Receive - Programs the receive frequency of the SCREEN PARAMETERS channel. Enable This Channel - The box must be checked for The following parameters are programmed in the the channel to be selectable. - Page 56 TRANSCEIVER PROGRAMMING Transmit Power Channel Modulation This fixes the transmit power on the channel for This selects if the channel modulation is wide- the high or low level or allows it to be switch select- band (5 kHz), narrowband (2.5 kHz), or NPSPAC (4 able (the Hi/Lo Power option switch is then required).
-
Page 57: Screen Parameters
TRANSCEIVER PROGRAMMING Figure 3-4 Conventional Project 25 Digital Channel Screen 3.5.7 CONVENTIONAL PROJECT 25 (DIGITAL) Busy Channel Lockout CHANNEL SCREEN PARAMETERS Off = disabled, Noise = transmit disallowed if The following parameters are programmed in the carrier is detected, NAC = transmit allowed only if conventional Project 25 digital channel screen shown correct NAC is detected (Section 2.6.5).
Need help?
Do you have a question about the 5100 SERIES and is the answer not in the manual?
Questions and answers