
Subscribe to Our Youtube Channel
Summary of Contents for DF RobotShop ROVER
- Page 1 ROVER USER GUIDE Rev 2.4 This guide is only available in English Ce manuel est seulement disponible uniquement en Anglais...
-
Page 2: Table Of Contents
The DFRobotShop Rover is intended to be a “learning platform” which provides users with the hardware to get started in programming mobile robots using Arduino. The sample code available here can be used as reference to help you test the various platforms, but users are expected to learn how to use the Arduino software. - Page 3 Sketch #2: Basic Rover – W/A/S/D Keyboard Control.................27 Sketch #3: V2.0 Mecanum – Basic Directions....................28 Sketch #4: Omni Wheel Rover – Basic Directions..................30 Sketch #5: Basic Rover V1.0 and V1.5 - Analog Sensors................32 Sketch #6: Encoders - Counting.........................32 Hyperterminal configuration........................33 Troubleshooting V2............................35...
- Page 4 Useful Links..............................53 Products..............................53 Software..............................53 Support...............................53...
-
Page 5: Arduino
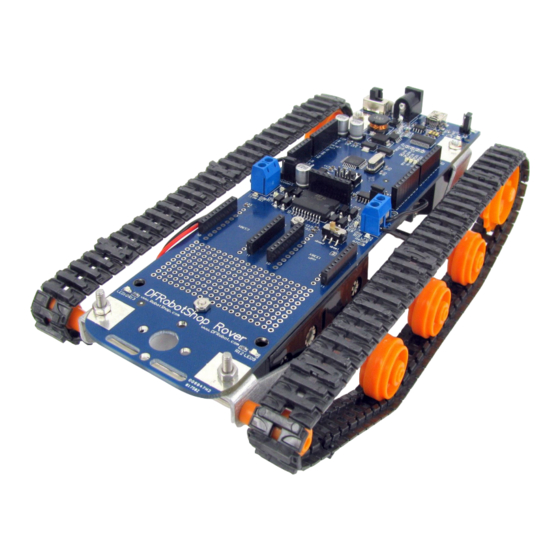
The DFRobotShop Rover is a versatile mobile robot tank based on the popular Arduino microcontroller. The basic Rover uses the Tamiya twin motor gearbox but can also be purchased in a variety of kits and configurations. The DFRobotShop Rover PCB incorporates a standard Arduino (surface mount ATMega328), dual motor driver (connected to digital pins 5 to 8), onboard voltage regulator and prototyping area. -
Page 6: Pcb V1.0
PCB V1.5 Figure 1: DFRobotShop Rover V1.5 Features (1) 3.7V LiPo battery charging jumper. Important note: jumper should only be in place when using a LiPo battery connected to (38), otherwise remove. Do NOT use jumper if you are using the 4xAA pack. - Page 7 Voltage: 3.5V (min) to 9V (max) via Vin pin, PWRin (3.5mm jack) or white connector. The Tamiya motors run at 3 to 4.5V nominal. 6V+ will work but reduce the motor’s life 6V motors are available separately should you want to make your rover faster.
-
Page 8: Pcb V2.0
PCB V2.0 Figure 2: DFRobotShop Rover V2 Features (1) Cool blue LED (2) 3.7V LiPo battery charging circuit. Important note: jumper should only be in place when using a LiPo battery connected to (38), otherwise remove. Do NOT use jumper if you are using the 4xAA pack. - Page 9 Xbee Headers The two XBee slots can be used with both series 1 and series 2 XBee modules. Note that the basic rover does NOT include the headers which can be purchased separately (they would need to be soldered to the board).
-
Page 10: Basic Kit (V1.0, V1.5, V2.0 )
EITHER the mini JST connector OR the barrel connector – NOT BOTH. a. 4x AA Battery Pack : The DFRobotShop Rover includes a 4xAA battery pack which can be connected directly to the white power input at the back of the board. Both alkaline (1.5V) and rechargeable (1.2) batteries can be used, and the batteries power both the board and the... -
Page 11: Motion
Rover. Motion The DFRobotShop Rover Basic Kit uses two tank tracks, each connected to their own DC gear motor. Rotating the tracks at the same time in the same direction produces forward motion. Rotating the tracks at the same time in the opposite direction causes the robot to move in reverse. Varying the speed of one of the tracks will cause the robot to move in a circle. -
Page 12: Bluetooth / Xbee Kits (V1.0, V1.5)
USB port of the shield. Motion The DFRobotShop Rover Basic Kit uses two tank tracks, each connected to their own DC gear motor. Rotating the tracks at the same time in the same direction produces forward motion. Rotating the tracks at the same time in the opposite direction causes the robot to move in reverse. -
Page 13: Specifications (Basic Kit)
Specifications (Basic Kit) Maximum speed (using 4x AA NiMH batteries and motor config. 'C'): 12.5cm/sec (no load) • PCB Dimensions: 57mm x 195mm (200mm for V2.0) • Overall dimensions: 200mm long x 108mm wide x 58mm high • Weight (assembled kit not including batteries): 250g... -
Page 14: Bluetooth / Xbee Kits (V2.0)
Use EITHER the mini JST connector OR the barrel connector – NOT BOTH. The DFRobotShop Rover Bluetooth and Xbee kits still include a 4xAA battery pack which can be connected directly to the white power input at the back of the board instead of the LiPo . Both alkaline (1.5V) and rechargeable (1.2) batteries can be used, and the batteries power both the board and the motors. -
Page 15: Motion
Motion The DFRobotShop Rover Basic Kit uses two tank tracks, each connected to their own DC gear motor. Rotating the tracks at the same time in the same direction produces forward motion. Rotating the tracks at the same time in the opposite direction causes the robot to move in reverse. Varying the speed of one of the tracks will cause the robot to move in a circle. -
Page 16: V2.0 Mecanum Kit
V2.0 Mecanum Kit Assembly Guide The assembly video guide for the DFRobotShop Rover 2.0 Mecanum Kit can be found on RobotShop’s Youtube page (RobotShopTV) at: http://www.youtube.com/watch?v=UEIFHebyM5s Important Notes Unlike the basic kit, you can assemble the Tamiya Gearbox in ANY of the three configurations. -
Page 17: Motion
Motion The image below gives you an idea of the range of motion possible when using Mecanum wheels. Note that some directions are slower than others because of the forces involved. To facilitate zero radius turning (two images at bottom right below), consider mounting the Tamiya Gear Motors in the opposite configuration (with DC motor facing outward). -
Page 18: V2.0 Omniwheel Kits
The brackets can be mounted with the motors above or below the PCB. Assembly Guide The assembly video guide for the DFRobotShop Rover 2.0 Omniwheel Kit can be found on RobotShop’s Youtube page (RobotShopTV) at: http://www.youtube.com/watch?v=5dP-0V6_ayY Important Notes There must be sufficient space between the bracket and the PCB –... -
Page 19: Power
7.4V. The higher the voltage, the faster the motor will turn. We suggest using the 7.4V, 2200mAh LiPo battery, though it’s important to note that the DFRobotShop Rover’s onboard LiPo charger can only charge 3.7V LiPo batteries. Alternatively, you can use the 4xAA battery pack with 4x reachargeable or 4x Alkaline batteries. The 3.7V LiPo works, but the robot is quite slow. -
Page 20: Motion
Motion The image below gives you a sense of the motions possible when using omni directional wheels. Note that some directions will be slower than others because of the forces involved. -
Page 21: Specifications (Basic Kit)
The Autonomous kit includes a rechargeable 3.7V 1000mAh LiPo battery. To charge the battery, ensure the Li_Sel jumper located in position 2 on the DFRobotShop Rover PCB is in place, and connect a USB cable from your computer to the board. Alternatively, you can use the included 4xAA battery pack, though the jumper needs to be removed. -
Page 22: Important Notes
2. Digital pins 5 to 8 are permanently connected to the onboard motor controller on all versions of the rover. You can use these pins normally only if no motors are connected to the screw terminals. Note that the motor controller will still be receiving signals. -
Page 23: Basic Kit (V2.0)
2. Ensure you know which COM port is associated with the USB Bluetooth dongle on your computer. 3. For Windows users, open Hyperterminal and follow “Hyperterminal Configuration” in this guide. 4. In the hyperterinal serial window, you can type W, A, S, D (and any other key to stop) to move the rover. Autonomous Kit (V2.0) The DFRobotShop Rover Autonomous Kit includes a variety of sensors intended to allow users to experiment with autonomous control with feedback from the environment. -
Page 24: Bluetooth Kit (V2.0)
9. For Windows users, open Hyperterminal and follow “Hyperterminal Configuration” in this guide. 10. In the serial window, you can type W, A, S, D (and any other key to stop) to move the rover. 11. If the rover is turned off or loses power, you may need to upload the code once again. -
Page 25: Xbee Kit (V2.0)
9. For Windows users, open Hyperterminal and follow “Hyperterminal Configuration” in this guide. 10. In the serial window, you can type W, A, S, D (and any other key to stop) to move the rover. 11. If the rover is turned off or loses power, you may need to upload the code once again. -
Page 26: Sample Code
Sample Code The DFRobotShop Rover is not intended to be a “complete product” which explains all the steps needed to achieve a specific objective. Instead, the Rover is a platform which provides you with the basic hardware and basic software to get started in programming mobile robots and Arduino. The code below is not “optimized”... -
Page 27: Sketch #2: Basic Rover - W/A/S/D Keyboard Control
Sketch #2: Basic Rover – W/A/S/D Keyboard Control /*To control the rover, Copy and paste the code below into the Arduino software*/ int E1 = 6; //M1 Speed Control int E2 = 5; //M2 Speed Control int M1 = 8; //M1 Direction Control int M2 = 7;... -
Page 28: Sketch #3: V2.0 Mecanum - Basic Directions
Sketch #3: V2.0 Mecanum – Basic Directions /* To control the Rover, copy and paste the code below into the Arduino software. Ensure the motors are connected to the correct pins. The code does not factor in encoders at this time*/ //Front motors int E1 = 3;... - Page 29 analogWrite (E1,a); digitalWrite(M1,LOW); analogWrite (E2,b); digitalWrite(M2,HIGH); analogWrite (E3,a); digitalWrite(M3,HIGH); analogWrite (E4,b); digitalWrite(M4,HIGH); void ccw (char a,char b) analogWrite (E1,a); digitalWrite(M1,HIGH); analogWrite (E2,b); digitalWrite(M2,HIGH); analogWrite (E3,a); digitalWrite(M3,HIGH); analogWrite (E4,b); digitalWrite(M4,LOW); void cw (char a,char b) analogWrite (E1,a); digitalWrite(M1,LOW); analogWrite (E2,b); digitalWrite(M2,LOW); analogWrite (E3,a);...
-
Page 30: Sketch #4: Omni Wheel Rover - Basic Directions
Sketch #4: Omni Wheel Rover – Basic Directions /* To control the Rover, copy and paste the code below into the Arduino software. Ensure the motors are connected to the correct pins. The code does not factor in encoders at this time*/ //Front motors int E1 = 10 ;... - Page 31 digitalWrite(M2,HIGH); analogWrite (E3,a); digitalWrite(M3,LOW); analogWrite (E4,b); digitalWrite(M4,HIGH); void reverse (char a,char b) analogWrite (E1,a); digitalWrite(M1,HIGH); analogWrite (E2,b); digitalWrite(M2,LOW); analogWrite (E3,a); digitalWrite(M3,HIGH); analogWrite (E4,b); digitalWrite(M4,LOW); void ccw (char a,char b) analogWrite (E1,a); digitalWrite(M1,HIGH); analogWrite (E2,b); digitalWrite(M2,HIGH); analogWrite (E3,a); digitalWrite(M3,HIGH); analogWrite (E4,b); digitalWrite(M4,LOW);...
-
Page 32: Sketch #5: Basic Rover V1.0 And V1.5 - Analog Sensors
Sketch #5: Basic Rover V1.0 and V1.5 - Analog Sensors /* To read the onboard light and temperature sensors, run the code below, then open the serial window at 9600 baud. Ensure the two jumpers are in place*/ int LightValue = 0;... -
Page 33: Hyperterminal Configuration
Hyperterminal configuration To access Hyperterminal in Windows XP / 2000: Start > All Programs > Accessories > Communications > HyperTerminal Windows 7 does not come with Hyperterminal as a standard feature, so you must find an alternative. Note that hypertrm.exe is available online and emulates Hyperterminal. Hyperterminal screen in Windows... - Page 34 The name “DFRobotShop Rover” is not necessary; you can name it whatever you want. Specify the COM port (USB) that is connected to the DFRobotShop Rover. If you are using XBee, Bluetooth or RF, select the COM port connected to the Bluetooth dongle / XBee breakout / RF Transmitter (USB).
-
Page 35: Troubleshooting V2
Depending on the module, the bluetooth module may be set to 9600 or 115200 baud, 8 bits. If the default is 115200, the baud rate in the code uploaded to the DFRobotShop Rover must be changed from 9600 to 115200 and correspondingly when using hyperterminal, the baud rate must also be set to 115200. -
Page 43: Faq
17 “Request RMA”. Please contact us via the RobotShop Support Center and indicate: Subject: DFRobotShop Rover Troubleshooting V2, Step 17 If you can provide any additional information about what happened or any steps you took which were not outlined in the guide, please include them. -
Page 44: Programming
Encoder modules will soon be available for the rover which allow you to count how many steps each motor has rotated. Knowing how each step translates to linear displacement, you can ensure the robot moves in straight lines and the movements are repeatable. - Page 45 There is sample code for the Adventure Robot, but it needs to be modified slightly since the DFRobotShop Rover uses DC gear motors rather than servo motors for propulstion, and an ultrasonic sensor rather than IR sensors for obstacle avoidance.
-
Page 46: Versions & Kits
Versions & Kits Several versions of the DFRobotShop Rover have been released: V1.0 Board (discontinued) Arduino Duemilanove Design w/FTDI USB to Serial LEDs connected to pin 13, Tx, Rx and PWR Temperature and Light sensors connected to A0 and A1 (via jumpers) - Page 47 V1.5 Board (discontinued) V1.0 board with following modifications: Onboard LiPo battery charger RoHS compliance V1.5 Basic Kit (discontinued) Tamiya Twin Motor Gearbox Tamiya Tank Track Kit 2x Metal Brackets V1.0 Hardware Bag 4xAA battery holder V1.5 Bluetooth Kit (discontinued) V1.5 Basic Kit DFRobot Bluetooth Module USB Bluetooth Module 3.7V, 1000mAH LiPo battery...
- Page 48 1x DFRobotShop Rover Motor Controller Shield 4x Encoders for Tamiya Twin Motor Gearbox 1x 4xAA battery holder V2.0 Omniwheel Kit (40mm) V2.0 DFRobotShop Rover PCB + 2x Hardware bags 2x Rover frame (left and right) 2x Omniwheel Brackets 4x 40mm Omniwheels...
- Page 49 2x Encoder pairs for DC gear motors 1x 4xAA battery holder V2.0 Omniwheel Kit (60mm) V2.0 DFRobotShop Rover PCB + 2x Hardware bags 2x Rover frame (left and right) 2x Omniwheel Brackets 4x 60mm Omniwheels 1z DFRobotShop Rover Motor Controller Shield...
-
Page 50: Upgrades And Optional Parts
LiPo Battery A Lipo Battery is included with all but the Basic version of the DFRobotShop Rover, eliminating the need for the 4xAA battery pack. LiPo batteries are very lightweight and provide respectable capacity. http://www.robotshop.com/lithium-polymer-battery-packs-1.html... -
Page 51: Compatibility
The universal connection point incorporates the standard servo horn hole pattern used on Lynxmotion servo erector set brackets. These brackets are ideal for mounting a pan / tilt system to the rover (or a pan and tilt or just a tilt) or for mounting your own custom hardware. We suggest using micro sized servo brackets to reduce weight, though standard sized servo brackets can also be used. -
Page 52: Shield Compatibility
Shield Compatibility The configuration of the DFRobotShop Rover is the same as the Arduino Duemilanove except for the fact that pins 5, 6, 7 and 8 are used to control the motor driver. If you are not using the motor driver, all shields should be compatible with the rover. - Page 53 Useful Links Products Manufacturer Websites: www.robotshop.com, www.dfrobot.com Software Arduino Software: http://arduino.cc/en/Main/Software Support DFRobotShop Rover on RobotShop Forum: http://www.robotshop.com/forum/forumdisplay.php?46-DFRobotShop-Rover DFRobotShop Rover Category: http://www.robotshop.com/ca/dfrobotshop-rover-arduino-robot-construction-kits.html Order specific support, RMAs etc: http://robotshop.helpserve.com/index.php?_m=tickets&_a=submit...
- Page 54 V0.8 16/04/2010 V 1.4 14/12/2010 V 1.7 06/05/2011 V1.8 02/09/2011 V2.0 29/11/2011 V2.1 16/01/2012 V2.2 10/02/2012 V2.3 20/04/2012 V2.4 13/02/2013 We are grateful to Arduino for making their platform and software open source. Should you find any erroneous information in the guide, please contact RobotShop via the Support Center.
Need help?
Do you have a question about the ROVER and is the answer not in the manual?
Questions and answers