Table of Contents
Advertisement
Advertisement
Table of Contents

Summary of Contents for COSMOGAS CR04
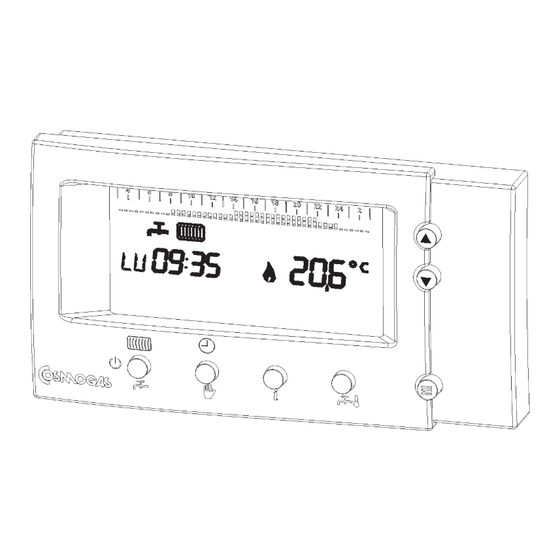
- Page 1 REMOTE TIME CONTROL “CR04”...
-
Page 2: Table Of Contents
Table of contents 1 - Main features ......................3 2 - Operating features ....................3 2.1 - LCD Display ..........................3 2.2 - Keys and associated functions ....................3 3 - Initial start-up ......................4 4 - Introduction ......................4 5 - Users’... -
Page 3: Safety Instructions
The CR04 series remote control acts as a time-programmable thermostat, a thermoregulator and a remote control. It can be used as an initial installation device or as an optional extra, connecting it to COSMOGAS boilers appropriately set up for such installation. -
Page 4: Initial Start-Up
3 - Initial start-up On initial start-up or in any event each time the power supply fails for more than 5 hours, it is necessary to set the time and day of the week. This is done as follows: - switch on the power supply to the boiler, the display will come on with the date field flashing; use the K+ and K- keys to set the correct day of the week;... -
Page 5: Selecting The Operating Modes
5.1 - Selecting the operating modes Using key K1, with the remote control positioned in any operating mode, it is possible to select, by rotation, the possible operating modes of the boiler, such as: · OFF · domestic hot water and heating ·... -
Page 6: Adjusting The Domestic Hot Water Temperature
5.3 - Adjusting the domestic hot water temperature Using key K4, with the remote control positioned in any operating mode (excluding OFF mode), it is possible to select the menu for setting the domestic hot water temperature. The display shows the wording REG SAN and the domestic hot water temperature value; using keys K+ o K- it is possible to change these values between 40 and 65 °C. -
Page 7: System Parameters' Consultation
- follow the setting of the timing programme of the heating service The activation of the AUTO domestic hot water mode is indicated on the display when the clock symbol lights up. It is possible to interrupt the function in question at any given moment, re-setting the continual function (always ON) of the domestic hot water mode. -
Page 8: Programming The Heating Times
5.8 - Programming the heating times Using key KM and subsequently key K4 (>>), page 2 of the menus is accessed. Using key K1 (PROG), the programming menu is selected. Having selected this menu, it is possible to make one of the following choices: ·... - Page 9 By means of the procedure for programming the timebands, as per the previous section, it is possible to customize the pre-set programme loaded in the memory. Having loaded and possibly customized the pre-set programme, just press key KM to save it and return to the main page.
-
Page 10: Programming Of Domestic Hot Water Timing
5.8.2 - Programming of domestic hot water timing Using key KM and subsequently key K4 (>>), access is gained to page 2 of the menus. Using key K1 (PROG), the programming menu is selected. Once this menu has been selected, it is possible to make one of the following choices: ·... -
Page 11: Adjusting The System Operating Parameters
- press keys K+ o K- to select the pre-set programme nearest to one’s requirements; - press key K1 (OK) in order to load the programme in the memory or press key K2 (ANNULLA) to return to the previous menu without loading any pre-set programme. Once the programme has been loaded, the display returns to show the menu of the domestic hot water programming mode. -
Page 12: Date, Hour And Minute Setting
5.10 - Date, hour and minute setting It is possible to adjust or set the date, hour and minutes of the remote control at any given time. Proceed as follows: Using key KM and then key K4 (>>), access is gained to page 2 of the menus. Using key K3 (OROL), the programming menu is selected. -
Page 13: Installers' Menu
6 - Installers’ menu Pressing down key KM for around 10 seconds it is possible to access the menus intended for the installer. Page 1 makes it possible to make one of the following choices: · INFO display the system parameters ·... -
Page 14: Displaying And Changing The System Parameters
6.2 - Displaying and changing the system parameters Pressing down key KM for 10 second and then key K2 (IMP), the menu which permits the display, and possible change, of the operating parameters of the remote time control, which can be accessed by the installer, is selected. Using keys K1 (<<) and K4 (>>), it is possible to display the information listed below: ·... -
Page 15: Thermoregulation - Setting The Gradient
6.2.1 - Thermoregulation - Setting the gradient Pressing key KM down for 10 seconds and then key K2 (IMP), the CURVA EST parameter is immediately displayed. Using the keys K+ o K- , it is possible to change the setting. The graph in figure 4, shows the ratio between the external temperature and the supply temperature calculated in relation to the value assigned to the CURVA EST parameter. -
Page 16: Thermoregulation - Correction With Room Temperature
EAST CURVE set at 2.0 External temperature (TMP ESTERN) °C Figure 5 - Parallel adjustment of the line as per figure 4. 6.2.2 - Thermoregulation - Correction with room temperature Pressing key KM down for 10 seconds, then key K2 (IMP) and finally key K4 (>>) the COMPENS AMB parameter is displayed immediately. - Page 17 COMPENS AMB = 15 COMPENS AMB = 8 COMPENS AMB = 4 COMPENS AMB = 0 Delta calculated by the compensation of the room temperature CURVA EST without influence of room compensation (COMPENS AMB = 0) Reference conditions: - CURVA EST 2.0 - Room temperature required 20°C - Room temperature read 18°C External temperature (TMP ESTERN) °C...
-
Page 18: Thermoregulation - Choosing The Operating Modes
6.2.3 - Thermoregulation - Choosing the operating modes The MODO FUNZ parameter is one of the most important to be adjusted. On the basis of the setting of this parameter, the type of thermoregulation to be used in the system is chosen. Therefore, it is indispensable to choose the type of thermoregulation carefully, in relation to the type of system owned, in order to achieve the best degree of comfort envisaged. -
Page 19: Hour Type Displayed
adjustment (MODO FUNZ = 4) The room temperature and the external temperature do not interact on the operating mode of the thermoregulation in question. The adjustment of the supply temperature to the radiators is carried out at two temperature levels, set respectively at TMP MIN RIS (minimum supply temperature, see section 6.2.7) and REG RISCALD (maximum supply temperature, see section 6.2.8). -
Page 20: Minimum Supply Temperature
this way, when the time programming is carried out it will be sufficient to introduce the switching on and switching off of the heating in correspondence with the time period of effective need; the remote time control will automatically take steps to bring forward the ignitions so as to obtain the desired room temperature, in the time period set. 6.2.7 - Minimum supply temperature Pressing the KM key down for more than 10 seconds and then key K2 (IMP) followed by key K4 (>>) until TMP MIN RIS is displayed, it is possible to select, using keys K+ e K-, the minimum supply temperature for the heating. -
Page 21: Factory Settings
6.2.13 - Factory settings Pressing the KM key down for more than 10 seconds and then key K2 (IMP) followed by key K4 (>>) until IMP FABBRIC is displayed, it is possible to select, using keys K+ e K-, whether to re-set the initial factoring settings. If during the programming of the remote time control, programmings or adjustments are carried out so that the system no longer correctly functions, it is possible to reset the initial factory settings, so as to re-start from a known programming basis. -
Page 22: Models Axia-H, Ecoplus, Ecobi, Inkas, Novadens, Inkadens And Cielodens
6.3.2 - models AXIA-H, ECOPLUS, ECOBI, INKAS, NOVADENS, INKADENS and CIELODENS ERRORS DISPLAYED BY CR04 ERRORS DISPLAYED BY BOILER ERROR 01 ERROR 04 ERROR 06 ERROR 07 ERROR 11 ERROR 15 ERROR 17 ERROR 18 ERROR 18 ERROR 20 ERROR 23... -
Page 23: Installation
6.7 - Installation The remote control is connected to the boiler by means of the connection of two unpolarized wires which must run in ducts other than those containing the 230 Vac power lines. The remote control is equipped with a specific screw terminal for this connection. In order to gain access to the terminal board, remove the front part of the remote control using a screwdriver as lever at the point indicated (see figure 8): Figure 8 - Removal of front part... - Page 24 COSMOGAS s.r.l. Via L. da Vinci 16 - 47014 MELDOLA (FC) ITALY info@cosmogas.com www.cosmogas.com...
Need help?
Do you have a question about the CR04 and is the answer not in the manual?
Questions and answers