
Related Manuals for Nonin 3150


Summary of Contents for Nonin 3150
- Page 1 Operator’s Manual Model 3150 ™ WristOx Pulse Oximeter Wrist-Worn Pulse Oximeter ® with Bluetooth Wireless Technology 0123 English...
- Page 2 , PureLight, and nVISION are registered trademarks or trademarks of Nonin Medical, Inc. The Bluetooth word mark and logo are owned by the Bluetooth SIG, Inc. and any use of such marks by Nonin Medical, Inc. is under license. Other trademarks and trade names are those of their respective owners.
-
Page 3: Table Of Contents
Federal Communications Commission (FCC) Notice..........3 Guide to Symbols...................... 4 Displays, Controls, and Indicators ................5 Introduction ....................... 8 Unpacking the WristOx , Model 3150 ..............8 Standard Kit ....................... 8 Starter Kit ......................8 Batteries ........................ 9 Bluetooth Technology.................... 9 Operation Modes ..................... - Page 4 Contents (Continued) Memory and Data .....................29 nVISION Software ....................30 nVISION Settings ....................30 Accessing nVISION Settings ................30 Cable Connection....................31 USB Driver Installation (XP) ................32 USB Driver Installation (Vista) ................32 USB Driver Installation (Windows 7)..............33 Bluetooth Connection................... 33 Parts and Accessories ...................
- Page 5 Figures Figure 1. Front Display (Startup Screen).............. 5 Figure 2. Comparison of Full and Partial Display ..........11 Figure 3. Remove Battery Door................12 Figure 4. Insert Batteries ..................12 Figure 5. Ring Strap ................... 13 Figure 6. Thread Ring Strap................14 Figure 7.
-
Page 6: Indications For Use
EMC information specified in this manual. Only use Nonin-branded sensors with a length of 1 meter or less. Accuracy may degrade if sensor cable is over 1 meter in length. Using the sensor cable adapter does not affect accuracy. -
Page 7: Cautions
Do not place liquids on top of this device. Do not place the WristOx , Model 3150, in liquid or clean it with agents containing ammonium chloride or isopropyl alcohol. Refer to the “Care and Maintenance” section of this operator’s manual. -
Page 8: Declaration Of Conformity With Fcc And Canadian Ministry Of Health Rules For Electromagnetic Compatibility
ANSI/IEEE Std. C95.1-2005. • The FCC requires the user to be notified that any changes or modifications to this device that are not expressly approved by Nonin Medical, Inc. may void the user’s authority to operate the device. -
Page 9: Guide To Symbols
Guide to Symbols Guide to Symbols This chapter describes the symbols that are found in this manual and on the WristOx Model 3150. Detailed information about display symbols can be found in “Displays, Controls, and Indicators.” Table 1: Labeling Symbols... -
Page 10: Displays, Controls, And Indicators
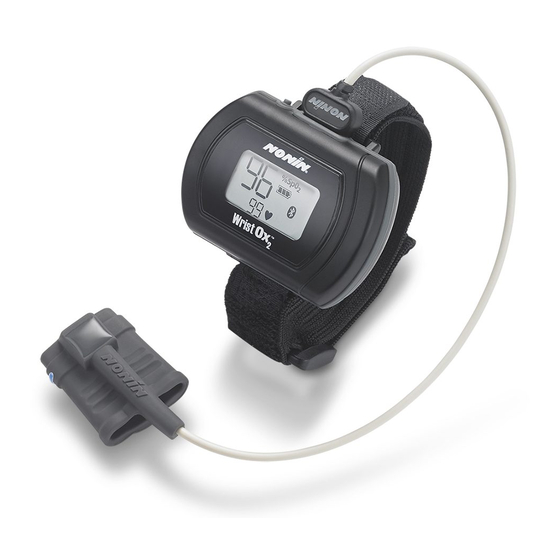
Displays, Controls, and Indicators Displays, Controls, and Indicators Sensor Port Activation Switch Figure 1: Front Display (Startup Screen) %SpO Display This 3-digit display, located in the upper left corner of the LCD, ). The range is shows percent blood oxygen saturation (%SpO from 0 to 100 %. - Page 11 Displays, Controls, and Indicators Activation Switch This switch is located next to the sensor port. Pressing this switch activates the Bluetooth radio for 3 minutes. It can also be used to turn the device on when it is in Standby mode. See “Activation Switch”...
- Page 12 Displays, Controls, and Indicators Bluetooth Indicator This indicator displays when the Bluetooth radio is on. It appears as either the Bluetooth logo or the Bluetooth logo with animated bars. This indicator displays for the first 2 minutes the device is on. If a Bluetooth indicator master device does not connect to the device in those 2 minutes, the...
-
Page 13: Introduction
Unpacking the WristOx , Model 3150 The WristOx , Model 3150, standard or starter kit includes the items listed below. Once the shipping carton is unpacked, verify these items were received. Contact the carrier immediately if the shipping carton is damaged. -
Page 14: Batteries
Nonin’s use of Bluetooth wireless technology allows SpO and pulse rate data to be transmitted through a Bluetooth radio to a compatible Bluetooth-enabled device. Nonin’s wireless system removes the cable connection from the device, giving patients increased ability to move freely. -
Page 15: Operation Modes
Operation Modes Operation Modes The WristOx , Model 3150, has three states: Cable, Standby, and On. Cable The device is in Cable mode when it is connected to a PC using the USB interface cable. While in Cable mode, the device does not collect or save data and the Bluetooth radio is off. -
Page 16: Sensor Activation Mode
Operation Modes Sensor Activation Mode Sensor Activation mode may be selected through nVISION software. In this mode, the device turns on when the activation switch is pressed or when the sensor is disconnected and reconnected. This mode is useful when using a sensor that is not easily removed from the sensor site (e.g., disposable or wrap sensor). -
Page 17: Using The Wristox , Model 3150
Using the WristOx2, Model 3150 Using the WristOx , Model 3150 WARNING: Do not use the device when alarms are required. WARNING: The USB cable must be unplugged from the device before replacing batteries. Installing Batteries 1. Open the battery compartment by sliding the battery door off the back of the ... -
Page 18: Wrist Straps
Wrist Straps The WristOx , Model 3150, is designed to be applied to the patient’s wrist using a two- piece wrist band. The two-piece wrist band consists of a ring strap and an adjustable strap. For pediatrics and petite adults, the device may be applied using a single adjustable strap. -
Page 19: Attach Ring Strap To Device
Using the WristOx2, Model 3150 Attach Ring Strap to Device 1. Place device face down. 2. Locate strap bar at top of device (by sensor port). 3. Position ring strap so hook and loop side of strap faces up. 4. Thread square end fastener through the strap bar by the sensor port. Start from... -
Page 20: Adjustable Strap Description
Using the WristOx2, Model 3150 Adjustable Strap Description This strap is part of the two-piece wrist band and may also be used to apply the device using a single strap. The adjustable strap is available in various lengths (see “Parts and Accessories”). It has hook and loop fasteners at both ends (figure 8). -
Page 21: Figure 9. Thread Adjustable Wrist Strap
Using the WristOx2, Model 3150 4. Thread square end fastener through the strap bar by the battery door. Start from the back of the device and thread it towards the front of the device (figure 9). Strap bar by... -
Page 22: Figure 11. Device With Wrist Straps Attached (Front And Back Views)
Using the WristOx2, Model 3150 6. Verify straps are attached properly (figure 11). The smooth, woven side of the strap should contact the patient. Front View Back View Figure 11: Device with Wrist Straps Attached (Front and Back Views) -
Page 23: Attaching The Sensor
1. Insert the sensor connector into the sensor port at the top of the device (figure 12). The Nonin logo on the sensor connector should face the front of the device. 2. Push the connector until it clicks into place. -
Page 24: Patient Application
Using the WristOx2, Model 3150 Patient Application The WristOx , Model 3150, is usually worn on the back of a patient’s wrist. This section describes how to secure the device to a wrist using either the two-piece wrist band or a single strap. -
Page 25: Figure 14. Thread And Tighten Two-Piece Wrist Band
Using the WristOx2, Model 3150 2. Place the device on the back of the patient’s arm. 3. Thread the rounded end of the adjustable strap through the plastic ring on the ring strap. Pull the adjustable strap through the plastic ring until the device fits comfortably on the wrist (figure 14). -
Page 26: Single Strap Application
Using the WristOx2, Model 3150 Figure 16: Apply Sensor to Patient 7. When in Spot Check mode, inserting a finger in the sensor automatically turns the device on. When the finger is removed, the device enters Standby mode in approximately 10 seconds. -
Page 27: Figure 18. Thread Single Strap
Using the WristOx2, Model 3150 2. Place the device on the back of the patient’s arm and wrap the strap around the patient’s arm. 3. Thread the rounded end of the strap through the strap bar by the sensor port (figure 18). -
Page 28: Figure 20. Fasten Single Strap
6. Attach the sensor by inserting the sensor connector into the sensor port at the top of the device. The Nonin logo on the sensor connector should face the front of the device. (See “Attaching the Sensor” for more information.) 7. -
Page 29: Verifying Operation
(example shows 23 April 2010 at 5:57 p.m.): Year Month and Day Hour and Minutes (MM:DD) (YY) (HH:MM) If the time is not set, the device displays 01:01:10:00:00. If any indicator does not display, do not use the device. Contact Nonin Technical Service for assistance. -
Page 30: Activation Switch
The activation switch is located next to the sensor port at the top of the WristOx , Model 3150. It is primarily used to: • Activate the Bluetooth radio when the device is either on or in Standby. • Activate the device when it is in Sensor Activation mode so the user does not need to disconnect and reconnect the sensor. -
Page 31: Troubleshooting
Refer to sensor Instructions for Use pulse strength bar for proper sensor application. graph indicator. Device needs repair. Contact Nonin Technical Service. Possible interference from blood Reduce or eliminate restriction. flow restrictors (arterial catheters, blood pressure cuffs, infusion lines, etc.). - Page 32 [328 feet] spherical radius). Bluetooth radio has timed out. Press activation switch to turn on Bluetooth radio. If these solutions do not correct the problem, please contact Nonin Technical Service at (800) 356-8874 (USA and Canada) or + 1 (763) 553-9968.
-
Page 33: Care And Maintenance
Dry with a soft cloth, or allow to air dry. Clean once per week or more frequently if handled by multiple users. CAUTION: Do not place the WristOx , Model 3150, in liquid or clean it with agents containing ammonium chloride or isopropyl alcohol. Cleaning the Sensor Refer to the sensor Instructions for Use for cleaning information. -
Page 34: Memory And Data
Memory and Data Memory and Data , Model 3150 measures, collects, and stores up to 1,080 hours The WristOx and pulse rate data with a 4-second data collection rate. Data collected at a of SpO 1 or 2-second rate reduces memory capacity to 270 or 540 hours, respectively. -
Page 35: Nvision Software
Software nVISION Software ® Nonin’s nVISION software (version 6.3 or greater) works with Microsoft Windows 2000/ XP/Vista/7 operating systems. It allows users to transfer recorded patient data from the device to a PC and then analyze, report, and archive the data. The software is required to access the device’s additional modes of operation and advanced features. -
Page 36: Cable Connection
nVISION Software Figure 22: nVISION Settings Window Cable Connection To connect the device to a PC, use the PC USB interface cable found in the starter kit. Once connected to a PC, the device settings may be accessed and data can be downloaded using nVISION software. -
Page 37: Usb Driver Installation (Xp)
Select System. System Properties window opens. c. On the Hardware tab, select Device Manager. d. Expand Ports (COM & LPT). One port should say “Nonin Model 3150 (COM#).” Make a note of the COM#. It is needed to set up the device with nVISION. -
Page 38: Usb Driver Installation (Windows 7)
11. In the Device Manager window, look up the communications (comm or COM) port for the device. Expand Ports (COM & LPT). One port should say “Nonin Model 3150 (COM#).” Make a note of the COM#. It is needed to set up the device with nVISION. -
Page 39: Bluetooth Connection
, Model 3150, will automatically connect with the last paired master device when turned on or activated. 1. To connect the WristOx , Model 3150, to a PC or another device using Bluetooth, see Nonin’s online Bluetooth Connection Tutorial: http://www.nonin.com/training/products/3150/bluetooth_connection_tutorial/ 2. -
Page 40: Parts And Accessories
Parts and Accessories Parts and Accessories For more information about Nonin parts, accessories and sensors, contact your distributor, or contact Nonin at (800) 356-8874 (USA and Canada) or +1 (763) 553-9968. This information is also available on Nonin’s website: www.nonin.com. Model Number... -
Page 41: Service, Support, And Warranty
Pulse Oximeter for 3 years from the date of purchase. NONIN shall repair or replace any WristOx , Model 3150, found to be defective in accordance with this warranty, free of charge, for which NONIN has been notified by the purchaser by serial number that there is a defect, provided said notification occurs within the applicable warranty period. -
Page 42: Technical Information
Technical Information Technical Information Manufacturer’s Declaration Refer to the following table for specific information regarding this device’s compliance to IEC 60601-1-2. Table 3: Electromagnetic Emissions Emissions Test Compliance Electromagnetic Environment—Guidance This device is intended for use in the electromagnetic environment specified below. The customer and/or user of this device should ensure that it is used in such an environment. -
Page 43: Table 4. Electromagnetic Immunity
Technical Information Table 4: Electromagnetic Immunity Immunity IEC 60601 Compliance Electromagnetic Test Test Level Level Environment—Guidance This device is intended for use in the electromagnetic environment specified below. The customer and/or user of this device should ensure that it is used in such an environment. Electrostatic ±6 kV contact ±6 kV contact... -
Page 44: Table 5. Guidance And Manufacturer's Declaration
Technical Information Table 5: Guidance and Manufacturer’s Declaration— Electromagnetic Immunity Immunity Test IEC 60601 Test Compliance Electromagnetic Environment— Level Level Guidance This device is intended for use in the electromagnetic environment specified below. The customer and/or user of this device should ensure that it is used in such an environment. Portable and mobile RF communications equipment should be used no closer to any part of the device, including cables, than the recommended separation distance calculated from the equation applicable to the frequency of the transmitter. -
Page 45: Equipment Response Time
Technical Information Table 6: Recommended Separation Distances This table details the recommended separation distances between portable and mobile RF communications equipment and this device This device is intended for use in an electromagnetic environment in which radiated RF disturbances are controlled. Users of this device can help prevent electromagnetic interference by maintaining a minimum distance between portable and mobile RF communication equipment (transmitters) and the device as recommended below, according to maximum output power of the communications equipment. -
Page 46: Testing Summary
Specific to this example: • The response of the 4-beat average is 1.5 seconds. Testing Summary accuracy and low perfusion testing was conducted by Nonin Medical, Inc., as described below. Accuracy Testing accuracy testing is conducted during induced hypoxia studies on healthy, non- smoking, light- to dark-skinned subjects during motion and no-motion conditions in an independent research laboratory. -
Page 47: Specifications
Technical Information Specifications Oximeter Specifications Oxygen Saturation Display Range: 0 to 100 % SpO Pulse Rate Display Range: 18 to 321 beats per minute (BPM) Displays: Numeric: 3-digit LCD Pulse Strength: Pulse Strength Bar Graph 70 % to 100 % Saturation Accuracy A %SpO No Motion... -
Page 48: System Specifications
Technical Information System Specifications Temperature: Operating: -5 °C to 40 °C (23 °F to 104 °F) Storage/Transportation: -40 °C to 70 °C (-40 °F to 158 °F) Humidity: Operating: 10 % to 95 % noncondensing Storage/Transportation: 10 % to 95 % noncondensing Operating Altitude: Up to 12,192 meters (40,000 feet) Operating Hyperbaric Pressure:... -
Page 49: Transmitter
Technical Information Transmitter Bluetooth Compliance: Version 2.0 Operating Frequency: 2.4 to 2.4835 GHz Output Power: < 20 dBm Operating Range: 100-meter (328-foot) radius indoors Network Topology: Point-to-Point Operation: Slave Antenna Type: Internal Modulation Type: Frequency Shift Keying Frequency Hopping Spread Spectrum Band Width: 1 MHz...
Need help?
Do you have a question about the 3150 and is the answer not in the manual?
Questions and answers