Advertisement
Advertisement

Related Manuals for Lec R50263W


Summary of Contents for Lec R50263W
- Page 1 LEC R50263W User Manual...
- Page 2 LEC Customer Care Please keep this handbook in a safe place. Please fill in the model number and serial number in the spaces provided below as they will assist us should you need to call. 0844 815 3737 When you dial this number you will hear a recorded message and be given a number of options.
- Page 3 Specification of the appliance Voltage:220V-240V Frequency:50Hz Refrigerant:R600a Rated Current:0.6A Lamp Power: 10W Insulation Blowing Agent:Cyclopentane...
-
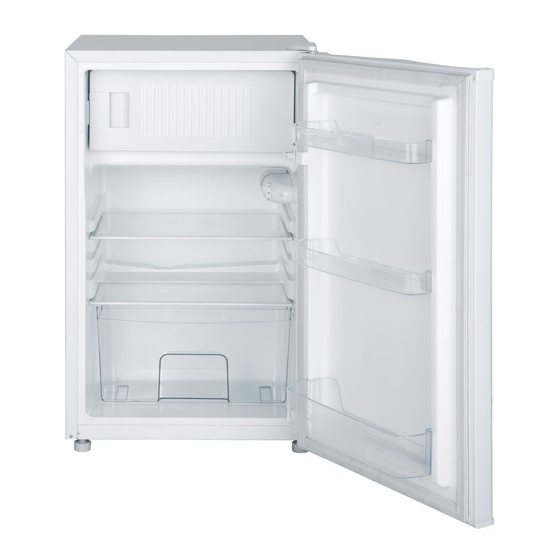
Page 4: Description Of The Appliance
Description of the Appliance 1. Freezer Box – 2 Star Rating 2. Thermostat Control, Interior Light 3. Interior Glass Shelf x 1 4. Salad Crisper Box with Glass Shelf 5. Door Storage – Specific Areas for Bottles & Dairy Products (Picture shown for indicative purposes only, model supplied may differ). -
Page 5: Table Of Contents
CONTENTS: Section 1. Installation Section 2. Safety Advice Section 3. Operating the Appliance Section 4. Maintenance Section 5. Warning... -
Page 6: Section 1. Installation
Section 1. Installation IMPORTANT! This appliance must be left to stand in an upright position for at least 4 hours before being switched on for the first time. Remove all packaging and securing tape from the appliance. Wash the interior of the appliance with luke warm water containing a small amount of bicarbonate soda (5ml to 0.5 litres of water). -
Page 7: Section 2. Safety Advice
Please ensure that there is a small ‘air-gap’ between the condenser on the rear of the appliance and the rear wall. Do not place or store heavy items on the top of this appliance. Ensure that the appliance is positioned on a firm flat floor. - Page 8 manufacturer accepts no responsibility for incorrect installation and usage. If this appliance is to replace an old refrigerator with a lock, as a safety measure break or remove the lock and/or door before disposal. Your old appliances contain insulation gases and refrigerant that must be disposed of correctly.
-
Page 9: Section 3. Operating The Appliance
ensure that the electrical circuit is not overloaded as this could cause overheating. Do not twist or bend the cables, and keep them away from hot surfaces. Do not plug ın or unplug this appliance with wet hands. Following installation make sure that the power cable is not trapped underneath the appliance. - Page 10 Place the appliance close to the wall with a distance not exceeding 75mm 3.2. Temperature Control The temperature selector knob is located on the right hand side of the inner cabinet (see Description of the Appliance on page 4). Please note that a larder fridge does not have an ice-box and will operate at a slightly higher temperature than a fridge with an ice-box.
- Page 11 This appliance has a two star freezer-box and is suitable for the long-term storage of frozen food items. It can also be used for freezing and storing fresh food items. You should always follow the storage guidelines printed on each food producers packaging, however the following information is provided as a general guide for the maximum storage life of frozen items: Fresh Meat and Poultry –...
- Page 12 Locate the appliance in a cool well-ventilated room and make sure that the air vents are clear. Try to avoid keeping the door open for a long time, warm air will enter the cabinet and may cause a build up of ice as well as affecting the energy consumption.
-
Page 13: Section 4. Maintenance
Section 4. Maintenance Before any maintenance or cleaning work is carried out, DISCONNECT the appliance from the ELECTRICITY supply. 4.1. Internal Cleaning Clean the interior and accessories with warm water and bicarbonate of soda (5ml to 0.5 litre of water). Rinse and dry thoroughly. - Page 14 but it may take some time to achieve the pre-set operating temperature. 4.4. When the appliance is not in use When the appliance is not in use for long periods, remove the contents, disconnect from the electricity supply and clean the appliance, leaving the door ajar until you wish to use the appliance again.
- Page 15 When reversing the door, the appliance must not be connected to the mains. Remove the plug from the mains beforehand.
- Page 16 Remove the plastic UppeCover (1) Top Hinge Cover 4. Lower Hinge Pin/Foot Top Hinge 5. Left Foot Left Hand Hinge Holes/Plastic Door Caps Remove the retaining screws and the Top Hinge (2) Remove the plastic Upper Hinge Cover (1) Lift the door off the Lower Hinge (4). Remove the retaining screws and the Lower Hinge (4) Remove the Hinge Pin and Foot from the Lower Hinge (4), turn the hinge over and refit the Hinge...
- Page 17 There is no power to the appliance: Check there is not a power cut Check there power electric socket/appliance Check the fuse in the plug (Must be 13 amp) The compressor runs continuously: Is the door closed correctly? Have large quantities of food recently been added to the appliance? –...
-
Page 18: Section 5. Warning
Important Note: This appliance is marked according to the European directive 2002/96/EC on Waste Electrical and Electronic Equipment (WEEE). By ensuring this product is disposed of correctly, you will help prevent potential negative consequences for the environment and human health, which could otherwise... - Page 19 1. If the power cable is damaged, it must be replaced by the manufacturer, its service agent or similarly qualified persons in order to avoid a hazard. 2. Children should be supervised to ensure that they do not play with the appliance. 3.
- Page 20 7. - WARNING: Keep ventilation openings, appliance enclosure or in the built-in structure, clear of obstruction. WARNING: Do not use mechanical devices or other means to accelerate the defrosting process, other than those recommended by the manufacturer. WARNING: Do not damage the refrigerant circuit. WARNING: Do not use electrical appliance inside the food storage compartments of the appliance, unless they are...
Need help?
Do you have a question about the R50263W and is the answer not in the manual?
Questions and answers