Table of Contents

Summary of Contents for Briel Computers Altair 8800 micro
- Page 1 Altair 8800 micro Setup and Users Manual Setup and Users Manual Setup and Users Manual Setup and Users Manual JULY 2010 PRELIMINARY MANUAL Briel Computers Briel Computers Briel Computers Briel Computers 5392 Cornell Blvd North Ridgeville, OH 44039...
- Page 2 North Ridgeville, OH 44039 Copyright 2010 Briel Computers; All rights reserved. Printed in the United States of America. Except as permitted under the Copyright Act of 1976, no part of this publication may be reproduced or distributed in any form or by any means, or stored in a database or retrieval system, without the prior written permission of the publisher, with the exception that the program listings may be entered, stored, and executed in a computer system, but they may not be reproduced for publication.
- Page 3 ALTAIR 8800 micro Users Manual Forward Forward Forward Forward Recreating a cult classic Anybody who has been even remotely involved in vintage computers knows of the Altair 8800. There have been many discussions on the first personal computer, the first home computer, but nobody can argue that the Altair set the industry in motion.
- Page 4 ALTAIR 8800 micro Users Manual In 1977, Ed Roberts moved back to rural Georgia after the sale of MITS to Pertec. Nearby Mercer University started a medical school in 1982 and Ed Roberts went on to be the first graduating class and get his medical degree in 1986.
- Page 5 ALTAIR 8800 micro Users Manual 2010 page 5 © Briel Computers...
- Page 6 ALTAIR 8800 micro Users Manual 2010 page 6 © Briel Computers...
- Page 7 ALTAIR 8800 micro Users Manual The second letter was sent out to all major computer publications after a very strong negative response from many in the field. In late 1975 Imsai released the 8080 as a direct competing clone of the Altair. Most feel that the Imsai was a better machine than the Altair and used the same bus expansion scheme.
- Page 8 ALTAIR 8800 micro Users Manual Setup and Users Manual Index Chapter 1: Introducing the Altair 8800 micro Chapter 2: Unpacking your system Chapter 3: Building your kit with step by step instructions Chapter 4: Powering up and testing your system...
-
Page 9: Chapter 1: Introducing The Altair 8800 Micro
Chapter 1: Introducing the Altair 8800 micro The Altair 8800 micro is the result of 5 years of concept ideas and many failures. While the project spent much time on the shelf, the desired result would keep this project alive. The micro is based on a simple early version Altair 8800 with memory and a serial card for I/O. - Page 10 With the core of the CPU and front panel emulation complete, the built on terminal section received its features. The terminal section is from the Briel Computers PockeTerm with a lot of changes. The addition of an SD card slot gives the ability to load and store programs and memory.
- Page 11 ALTAIR 8800 micro Users Manual Altair 8800 micro VGA port The VGA output port is part of the terminal system. Consider all of the I/O ports as part of the terminal system and you will better understand how everything is connected. The VGA port gives the user an 800X600 display of 80X40 characters with a single color choice that can be modified on the keyboard.
- Page 12 ALTAIR 8800 micro Users Manual PS/2 keyboard port The ps/2 keyboard port gives the user the ability to use a standard PC style keyboard to type data into the system. The ps/2 port is also connected to the terminal section and any data from it is treated the same as a standard terminal.
-
Page 13: Chapter 2: Unpacking Your System
Chapter 2: Unpacking Your System Ok, you’ve just received your Altair 8800 micro system, what do you do next? Well, if you purchased the kit, you will want to skip ahead to chapter 3 on building your kit. If you have the assembled system, we can guide you to getting it set up. - Page 14 WARNING: If you attempt to use an incorrect power supply, you could damage the Altair 8800 micro. Please feel free to ask if you are unsure about your power supply or have any problems. You are now ready to use your Altair 8800 micro and begin your new adventure in old school computing. 2010 page 14 ©...
-
Page 15: Chapter 3: Building Your Kit With Step By Step Instructions
Chapter 3: Building Your Kit with Step By Step Instructions If you purchased your Altair 8800 micro as a kit, you will need to assemble it before you can begin programming. In order to assemble your kit, you will be required to solder the components onto the 2 printed circuit boards and mount the boards and panels in the case. - Page 16 ALTAIR 8800 micro Users Manual Tools required for assembly: 1. Soldering iron or gun (25-35W preferred) 2. Solder (low temp solder works best) 3. Phillips screwdriver 4. Wire cutters 5. Old dry towel for cleaning iron Before you begin, make sure you have plenty of space to work with and have your components sorted into sections.
- Page 17 ALTAIR 8800 micro Users Manual Resistor color chart The first color on the left is Yellow which equals the value 4. The 2 color is Violet which equals 7. The 3 color is red. This is your multiplier. Red equals 2 so we add 2 zero’s to the end. So, the resistor value is 4-7-00 4700 or 4.7K.
- Page 18 ALTAIR 8800 micro Users Manual Step 4: Install the Diode. The diode is like the resistor in shape but it is polarized. You must install it so the white stripe on the diode matches the white stripe on the PCB. Bend the leads just like the resistors and push it flush onto the PCB.
- Page 19 ALTAIR 8800 micro Users Manual Step 9: Install the Composite Video Out connector. Make sure the yellow post portion is facing the edge of the board. Mount it flush and bend the leads to hold component in place. Flip the board over and solder down.
- Page 20 Find the chip labeled ATMEL ATMEGA8515. This is the main CPU chip of the Altair 8800 micro. One short edge will have a notch in it. Match the notch on the chip with the silkscreen or socket on the PCB and carefully install the chip. The machined sockets are going to give resistance to installing the chip so use caution not to bend the leads.
- Page 21 NOTE: The headers MUST be installed from the back side of the panel so they stick out the bottom (back) of the PCB. If they are installed incorrectly, your Altair 8800 micro will not function. Please notice picture below showing the headers mounted to the back side of the PCB.
- Page 22 The 2 large case screws can now be installed. This completes the assembly procedures for the Altair 8800 micro. Any trouble shooting of the hardware will need to be done with the case open.
-
Page 23: Chapter 4: Powering Up And Testing Your System
ALTAIR 8800 micro Users Manual Chapter 4: Powering up and testing Your System Before you power up your system, it is best if you prep a SD card to load BASIC from. Included on your CD is a copy of 8KBASIC. Make sure you have an SD card that is formatted in FAT or FAT32. Be sure to copy BASIC from the SD card over to the root directory of the SD card. - Page 24 ALTAIR 8800 micro Users Manual Right mouse button click on the drive that is your SD card and you will get a drop down (or up) menu of options. Move the mouse cursor over Format and left mouse select Format.
- Page 25 The file system is FAT32 because FAT has a 2GB limit. We are also choosing the smallest Allocation unit size of 32KB to help ensure the card is readable with the Altair 8800 micro system. You can also see that Quick Format is selected. This is ok as long as the card will do a Quick Format. If Quick Format fails, unselect this box and do a full format of the card.
- Page 26 Users Manual Once you copy BASIC onto your SD card, remove the card and place it in the Altair 8800 micro SD card slot. With the SD card ready, plug in your VGA or composite TV/monitor. I use a 19” LCD VGA monitor for the VGA output and a 7”...
-
Page 27: Chapter 5: Programming With The Front Panel
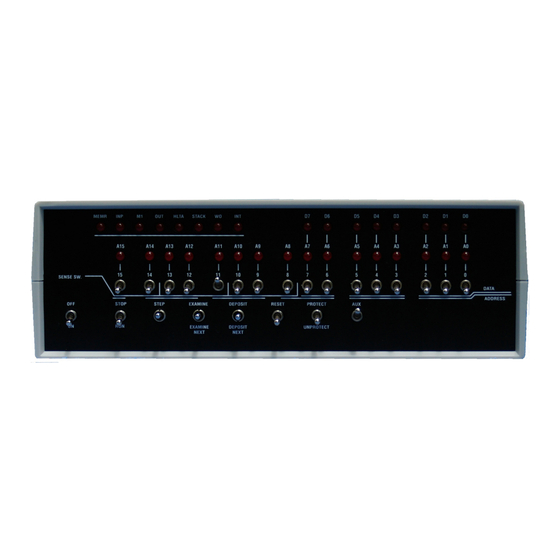
Chapter 5: Programming with the front panel The front panel on the Altair 8800 micro is very similar to the real Altair 8800. It has 16 data/address switches, 8 of which are called the “SENSE SWITCHES”. There are momentary switches to STEP, DEPOSIT and EXAMINE memory. - Page 28 ALTAIR 8800 micro Users Manual Ok, now you know how to store data in memory, but there is a slightly quicker way. What do you do when there are several bytes you need to program all in the same block of memory? DEPOSIT NEXT will deposit your data in the current memory location, the auto advance to the next memory location.
-
Page 29: Chapter 6: Loading Basic
Chapter 6: Loading BASIC The Altair 8800 micro has the ability to run 4K or 8K BASIC as of the writing of this manual. Other versions may work with time. To load BASIC, you must do this from a power up stage. The reason is because you must have the terminal section restart to be ready to send BASIC from the SD card. -
Page 30: Chapter 7: Saving Memory To An Sd Card
Chapter 7: Saving memory to an SD card Now that you have had the chance to use the Altair 8800 micro, you may need to save your work. The SD card slot is connected to the terminal section of the system and the data from the Altair needs to be transmitted from memory to the SD card. -
Page 31: Chapter 8: Loading A Text File Basic Program Listing
Chapter 8: Loading a text file BASIC program listing The Altair 8800 micro terminal section has the ability to dump text files into the system as if you were typing them in. This makes loading programs from a text file convenient and easy. Prepare your SD card with a text file of a BASIC program that you wanted entered into the system. -
Page 32: Chapter 9: On Screen Graphics And Color
TURNS ON/OFF BACKSPACE MODE* CTRL-F5 CHANGE CURSOR TYPE BLOCK, UNDERSCORE, BLINKING * Altair BASIC uses _ to simulate a backspace. The Altair 8800 micro terminal uses the backspace key to simulate this function. You can turn it on/off with CTRL-F4. 2010 page 32 ©... -
Page 33: Chapter 10: Special Front Panel Functions
Turn up AUX switch and make sure PROTECT is down. Now you can power on the Altair 8800 micro to begin the boot loading procedure. The boot loader will prompt you for a file name. You must enter a file name using standard 8.3 naming procedure. - Page 34 Users Manual Break-point stop mode: Use this feature to stop the Altair 8800 micro at the address that is on the front panel address switches when the CPU hits that address. Let’s say you want the CPU to stop when it hits address $2000. To get the CPU to stop at memory location $2000 you must set the front panel in break-point mode using the PROTECT switch and the 16 address switches.
-
Page 35: Chapter 11: Performing A Firmware Update
After a long 4 minutes, the EEPROM will be finished and you will get a message that the update is complete. However, you will not know if it worked correctly unless you turn off the Altair 8800 micro and turn it back on. -
Page 36: Appendix A: Troubleshooting
| Use a true PS/2 with no USB – PS/2 adapter If you are having a problem with your Altair 8800 micro and you have just built a kit, check the board, cables and connectors for any issues or missed soldering connections. Feel free to email me at vince@brielcomputers.com... -
Page 37: Appendix B: The Expansion Port
ALTAIR 8800 micro Users Manual Appendix B: The expansion port Signals Description Direction A0-A15 address bus signals Output D0-D7 Data bus signals Bidirectional Read or Write mode Output I/O or RAM mode (high=I/O) Output Address Latch Enable Output RAM chip select (low select) -
Page 38: Appendix C: Bill Of Materials
ALTAIR 8800 micro Users Manual Appendix C: Bill of materials DESCRIPTION ATMEL ATMEGA8515 AVR CPU 62256 SRAM CYPRESS 70NS 74HCT573 LATCHES PROPELLER CHIP EEPROM 5MHz CRYSTAL 20MHz CRYSTAL LM7805 VOLTAGE REGULATOR LM3940 VOLTAGE REGULATOR 40 PIN SOCKET 28 PIN SOCKET... -
Page 39: Appendix D: Vt100 Control Commands
ALTAIR 8800 micro Users Manual Appendix D: VT100 Control Commands Altair specific non standard commands: ESC[R to load program into AVR ESC[S to store memory into file ESC[nT change TV text color to value n 1-22 ESC[Z turn off TV cursor... - Page 40 ALTAIR 8800 micro Users Manual List of unsupported codes ESC[xxh All of the ESC[20h thru ESC[?9h commands ESC[xxl All of the ESC[20i thru ESC[?9i commands ESC= Alternate keypad mode ESC< Enter/Exit ANSI mode ESC> Exit Alternate keypad mode Esc5n Device status report...
-
Page 41: Warranty
Briel Computers, shall have resulted either directly or indirectly from accident, abuse, or misapplication of the product, shall be assumed by the customer, and the Briel Computers shall assume no liability as a consequence of such events under the terms of this warranty.
Need help?
Do you have a question about the Altair 8800 micro and is the answer not in the manual?
Questions and answers