Advertisement
Advertisement
Table of Contents

Summary of Contents for PiPO Midea Box X9
- Page 1 Midea BOX—X9 USER MANUAL...
- Page 2 WELCOME! hank you for purchasing this device。it brings you wonderful user experience.Before beginning,please refer to this user manual carefully. IncaseofanydoubtsregardingPIPOX9,you are welcomed to visit the PIPO Official Facebook website: www.facebook.com/pipo.cn, for raising your Questions and sharing your experience。Thank you! Product features:...
-
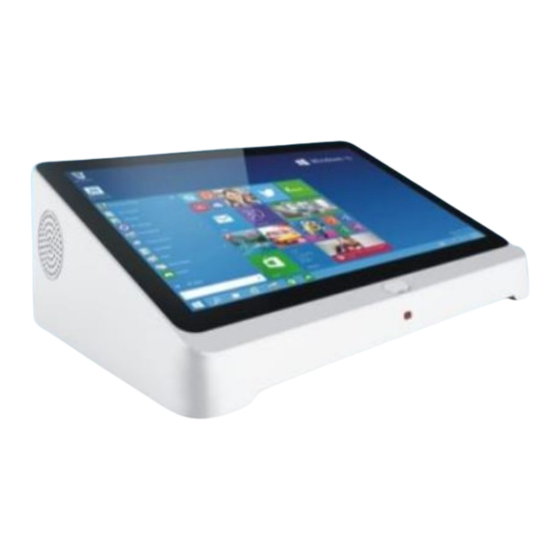
Page 3: Chapter One A Glance On X9
CHAPTER ONE A glance on X9 一、X9 Appearance... -
Page 4: Product Specifications
KEYS 1:Power Switch key, 2/6:USB port,for connecting peripherals 3:Earphone jack 4:Micro USB for connecting to PC,whenX9 is running Android OS 5:TF card slot:for TF card,maximumto64GB 7:HDMI port 8:LanRJ45forinternetcable 9:DC12Vpowersupplyjack 二、Product Specifications... - Page 5 Items Function description Processor Baytrail3736F,frequencyis1.83GHz,upto2.16 8.9”1920*1200 Storage 32GBOR64GB Windows10 home with Bing+ Android4.4 2.4GHz,WiFi signal; WiFi Connection HDMI*1 Micro USB for power supply and upgrading, ports And USB2.0 for peripherals; Mode switching、reset、upgrading key; Switchkey Bluetooth 三、X9 Accessories: Name quantity...
-
Page 6: Chapter Two Operations
Powercharger User manual CHAPTER TWO Operations 一、OS operation 1.Connect12V2.4AChargertotheX9DCjackforpowersupplying; 2.press power button for a few seconds to turn it on;... - Page 7 3.Select Android or Windows,press Android icon to got regular Android OS,and press Windows icon to got Windows system 4.OS Switch WhenyouareinWindowssystempresstheWintoAndIconforswitching Into Android...
- Page 10 When you are in Android system,slide the top right corner,and press The OS switch icon to set up into Windows...
- Page 11 5.HDMI output Go to“Device”-“project”,andconnectX9 to TV set(any display) Via HDMI cable...
- Page 12 5.1PCscreenonly ImagescouldbeshownonlyinTVBOXX9,HDMI output will be cutoff 5.2 Duplicate The HDMI output on the TV set maybe not by full screen,This is Because the X9LCD solution is1920*1200,so the HDMI output on the TVsetisalsoshownby1920*1200.
- Page 14 5.3 Extend When you setup Project mode into Extend,thentheX9 rotation may Be locked,you cannotrotatetheX9LCD.Press the desktop for a few seconds,go to the setting shows in below picture.”graphics options display” ”—“rotation”—“built-in “digital television”,to set up rotation here...
- Page 15 TheX9 LCD is the first screen,and the TV set display is the second screen, Move the mouse pointer out side of first screen,it will jump into second screenandifyoumovethemousepointeroutsideofscreenscreen,the Mouse pointer will jump into first screen.First screen and second screen Are separate displays,you can do different task on first screen and Second screen.For example watching video on second screen,and the the Same time Skype chat or what’s app chat with friends on the first screen.
- Page 18 5.4Secondscreenonly Inthismode,theimagescouldonlybeshownontheTVsetdisplay, AndtheX9LCDwillbelightoff.And the second screen image maybe Up side down.Then please rotate the X9,place the X9 to be landscape Mode or portrait mode,the second screen could be adjusted to normal displaying.
-
Page 19: Other Functions
二、Other functions Reset reset recover “setting”--”change setting”—“update and recovery” Systemupgradingandsoftwarefixing PleasedownloadtheWINPE-TOOLSandX9ImagesfromPIPOofficialwebsite: www.pipo.cn/en Service section Procedure: COPY The WINPE_TOOLS FILE TO The USB_STORAGE, PLACE THIS FILE TO THE ROOT(USB NTFS and FAT32, FORMAT TO be IT DEPENDS ON MAGES FOR EXAMPLE... - Page 20 " 2. C WIMPE_TOOLS. FOR EXAMPLE COPY THE OPY THE MAGES INTO MAGE OF " &" " INSTALL WINRE FOLDER INTO THE IMAGES FOLDER OF WINGE_TOOLS F INSTALL ENTER INTO SCRIPT CHANGE THE MAIN CMD INTO DELETE ANOTHER MAIN CMD OR RENAME IT AFTER ALL OF THE ABOVE STEPS START THE TABLETS WITH THE STORAGE INSERTED...
- Page 21 ECLARATION Poisonoussubstancesasshownbellow: Dangeroussubstance parts ( Cr6+ ) (PBB) (PBDE) (Pb) (Hg) (Cd) ○ ○ ○ Case × × ○ ○ × × × ○ ○ × ○ ○ Battery × ○ ○ ○ ○ ○ ○ ○ ○ ○ × ×...
-
Page 22: Fcc Statement
FCC STATEMENT 1. This device complies with Part 15 of the FCC Rules. Operation is subject to the following two conditions: (1)This device may not cause harmful interference,and (2)This device must accept any interferencereceived,including interference that may cause undesired operation. 2. -
Page 23: Industry Canada Notice
—Reorient or relocate the receiving antenna. —Increase the separation between the equipment and receiver. —Connect the equipment into an outlet on a circuit different from that to which the receiver is connected. —Consult the dealer or an experienced radio/ TV technician for help. FCC Radiation Exposure Statement: The device has been evaluated to meet general RF exposure requirement. - Page 24 Avis d’Industrie Canada Le présent appareil est conforme aux CNR d’Industrie Canada applicables aux appareils radio exempts de licence. L’exploitation est autorisée aux deux conditions suivantes : (1) l’appareil ne doit pas produire de brouillage, et (2) l’utilisateur de l’appareil doit accepter tout brouillage radioélectrique subi, même si le brouillage est susceptible d’en compromettre le fonctionnement.
Need help?
Do you have a question about the Midea Box X9 and is the answer not in the manual?
Questions and answers