Table of Contents
Advertisement
Available languages
Available languages
Quick Links
Advertisement
Chapters
Table of Contents

Subscribe to Our Youtube Channel
Related Manuals for Ferroli Rem W


Summary of Contents for Ferroli Rem W
-
Page 1: User Manual
Rem W Ventilconvettore a parete Fan coil for wall application °F COOL HEAT SLEEP SWING °C AUTO MON TUE WED THU FRI SAT HEATER 23 23 UNIT TIMER TIME PARAMETERS MODE FRESH SLEEP CANCEL MANUALE UTENTE USER MANUAL... - Page 2 FERROLI S.p.A Dear Customer, Thank you for having purchased a FERROLI Idustrial coolers. It is the result of many years experience, particular research and has been made with top quality materials and higlly advanced technologies. The CE mark guaranteed thats the appliances meets European Machine Directive requirements regarding safety. The qualitative level is kept under constant surveillance.
-
Page 3: Table Of Contents
SOMMARIO CARATTERISTICHE GENERALI . . . . . . . . . . . . . . . . . . . . . . . . . . . . . . . . . . . . . . . . . . . . . . . . . . . . . . . . . . .4 RICEVIMENTO. -
Page 4: Caratteristiche Generali
CARATTERISTICHE GENERALI RICEVIMENTO Al momento del ricevimento dell'unità è indispensabile controllare di aver ricevuto tutto il materiale indicato sul documento d'accompagnamento, ed inoltre che la stessa non abbia subito danni durante il trasporto. In caso affermativo, far costatare allo spedizioniere l'entità del danno subito, avvertendo nel frattempo il nostro ufficio gestione clienti. -
Page 5: Installazione Del Comando
INSTALLAZIONE DEL COMANDO DATI TECNICI UNITA’ Come prima cosa è necessario scegliere in quale punto installare il controllore remoto; in base alla dimensione ed alla lunghezza dei collegamenti, predisporre una canalina adeguatamente dimensionata per contenere i cavi di col- legamento oppure una apposita scatola di derivazione. Il disegno sotto indica le dimensioni del comando. Fig.1 Per il fissaggio del controllo remoto, rimuovere la parte frontale dello stesso, rimuovere con delicatezza la scheda elettronica al suo interno (fissata con viti al resto della struttura) e procedere al fissaggio del controllo tramite due viti,... -
Page 6: Messa In Funzione
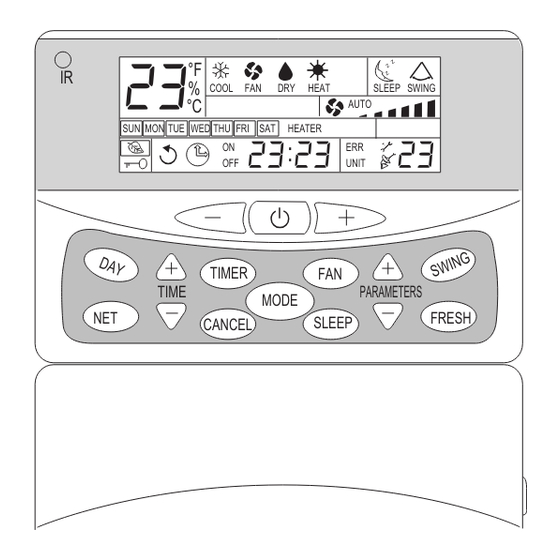
MESSA IN FUNZIONE TASTI FUNZIONI E DISPLAY Il comando (Fig. 1) è composto da una serie di tasti e da un display che visualizza tutte le funzioni attive ed i vari parametri necessari all’utente ed all’installatore per un corretto utilizzo dell’unità stessa. I tasti sono i seguenti: Fig.1 °F... -
Page 7: Indicatori Led Unita
MESSA IN FUNZIONE Fig.4 INDICATORI LED UNITA’ Di seguito viene descritto il significato dei LED situati nel pannello °F frontale dell’unità interna: 1 . INDICATORE POWER (verde) Si illumina di quando l’unità è alimentata. COOL HEAT 2 . INDICATORE PROTEZIONI ATTIVE (rosso) °F Si illumina quando sono attive alcune protezioni o allarmi. -
Page 8: Regolazione Della Temperatura
°F COOL HEAT SLEEP SWING °F MESSA IN FUNZIONE °C AUTO OOL FAN HEAT SLEEP SWING COOL HEAT SLEEP SWING °C AUTO AUTO MON TUE WED THU FRI SAT HEATER °F HU FRI SAT HEATER MON TUE WED THU FRI SAT HEATER 23 23 23 23... -
Page 9: Programmazione Del Timer
°C SUN MON TUE WED THU FRI SAT HEATER 23 23 MESSA IN FUNZIONE UNIT PROGRAMMAZIONE DEL TIMER °F Il tasto TIMER e CANCEL (Fig.6) consentono di impostare l’orario di Fig.6 SLEEP SWING COOL accensione, di spegnimento o di annullare ogni impostazione oraria. Per °C la programmazione procedere come segue. -
Page 10: Impostazione Singola
UNIT °F COOL HEAT SLEEP SWING MESSA IN FUNZIONE °C AUTO Fig. 1 MON TUE WED THU FRI SAT HEATER 23 23 °F IMPOSTAZIONE SINGOLA COOL HEAT SLEEP SWING UNIT Premere il tasto NET, il display visualizzerà quale unità è sotto controllo. °C AUTO PARAMETERS... -
Page 11: Programmazione Del Timer In Master-Slave
3 23 UNIT °F MESSA IN FUNZIONE COOL HEAT SLEEP SWING °C AUTO Fig. 1 MON TUE WED THU FRI SAT HEATER PROGRAMMAZIONE DEL TIMER IN MASTER-SLAVE 23 23 Qualora si volesse associare mediante un unico pannello di controllo diverse impostazione del TIMER alle diverse unità SLAVE facenti UNIT parte del gruppo si deve innanzi tutto selezionare quale unità... -
Page 12: Blocco Funzioni Tastiera
°C SUN MON TUE W MESSA IN FUNZIONE °F COOL FAN HEAT SLEEP SWING COOL HEAT SLEEP SWING Fig. 1 °C AUTO AUTO BLOCCO FUNZIONI TASTIERA THU FRI SAT HEATER MON TUE WED THU FRI SAT HEATER 23 23 23 23 E’... -
Page 13: Visualizzazione Errori Unita
MESSA IN FUNZIONE Codice Tipo di errore Note Azioni* Errore Errore sulla resistenza elettrica Allarme ( non previsto per queste unità) Errore sulla sonda batteria T2 Allarme ( non previsto per queste unità) Errore sulla sonda aria ambiente Allarme Chiamare l’assistenza tecnica Errore sulla sonda batteria T1 Allarme Chiamare l’assistenza tecnica... -
Page 14: Manutenzione
MANUTENZIONE PULIZIA FILTRI Fig. 1 Per un corretto funzionamento dell'apparecchio è necessario controllare e pulire periodicamente il filtro dell'aria. Per fare ciò procedere come indicato in seguito (Fig. 1): 1 . Staccare la spina dalla presa di corrente. 2 . Sollevare il pannello frontale. 3 . - Page 15 SUMMARY MAIN CHARACTERISTICS . . . . . . . . . . . . . . . . . . . . . . . . . . . . . . . . . . . . . . . . . . . . . . . . . . . . . . . . . . . . . . . .4 RECEIPT .
-
Page 16: Main Characteristics
MAIN CHARACTERISTICS RECEIPT On receiving the unit it is essential to check the presence of all the material indicated on the accompanying document, and also that it has not been damaged during transport . If so, immediately inform the forwarder regarding the damage, at the same time also notifying our Customer Care department . -
Page 17: Control Installation
CONTROL INSTALLATION UNIT TECHNICAL DATA First it is necessary to choose where to install the remote controller; according to the size and the length of the connections, arrange a raceway suitable for holding the connection cables or a special junction box. The figure below shows the dimensions of the control . -
Page 18: Startup
STARTUP FUNCTION BUTTONS AND DISPLAY The control (Fig . 1) has a number of buttons and a display that shows all the active functions and the various parameters necessary to the user and installer for correct use of the unit . The buttons are: Fig .1 °F... -
Page 19: Unit Led Indicators
STARTUP Fig .4 UNIT LED INDICATORS The meaning of LEDs in the front panel of the internal unit is °F described below: 1 . POWER INDICATOR (green) Lights up when the unit is powered . COOL HEAT 2 . PROTECTION DEVICES ACTIVE INDICATOR (red) °F Lights up when some protection devices or alarms are activated . -
Page 20: Temperature Adjustment
°F COOL HEAT SLEEP SWING °F STARTUP °C AUTO OOL FAN HEAT SLEEP SWING COOL HEAT SLEEP SWING °C AUTO AUTO MON TUE WED THU FRI SAT HEATER °F HU FRI SAT HEATER MON TUE WED THU FRI SAT HEATER 23 23 23 23 23 23... -
Page 21: Timer Programming
°C SUN MON TUE WED THU FRI SAT HEATER 23 23 STARTUP UNIT TIMER PROGRAMMING °F Use the CANCEL and TIMER button (Fig .6) to set the activation/ Fig .6 SLEEP SWING COOL deactivation time or cancel any time setting . For programming, proceed °C AUTO as follows . -
Page 22: Single Setting
UNIT °F COOL HEAT SLEEP SWING STARTUP °C AUTO Fig . 1 MON TUE WED THU FRI SAT HEATER 23 23 °F SINGLE SETTING COOL HEAT SLEEP SWING UNIT Press the NET button and the display will show which unit is under control . °C AUTO PARAMETERS... -
Page 23: Programming Timer In Master-Slave
3 23 UNIT °F STARTUP COOL HEAT SLEEP SWING °C AUTO Fig . 1 MON TUE WED THU FRI SAT HEATER PROGRAMMING TIMER IN MASTER-SLAVE 23 23 To associate different TIMER settings with the various SLAVE units in the group via a single control panel, first select which unit to set . UNIT Press the NET button and the display will show which unit is under PARAMETERS... -
Page 24: Keypad Functions Lock
°C SUN MON TUE W STARTUP °F COOL FAN HEAT SLEEP SWING COOL HEAT SLEEP SWING Fig . 1 °C AUTO AUTO KEYPAD FUNCTIONS LOCK THU FRI SAT HEATER MON TUE WED THU FRI SAT HEATER 23 23 23 23 The keypad functions can be locked by keeping the (+) and (-) buttons UNIT UNIT... -
Page 25: Unit Errors Display
STARTUP Error Error type Notes Actions* code Electrical resistance error Alarm (not provided for these units) Coil probe T2 error Alarm (not provided for these units) Ambient air probe error Alarm Call the After-Sales Service Coil probe T1 error Alarm Call the After-Sales Service Protection for exchanger If the alarm does not disappear... -
Page 26: Maintenance
MAINTENANCE FILTER CLEANING Fig . 1 For proper operation of the unit is necessary to periodically check and clean the air filter . To do this, proceed as follows (Fig . 1): 1 . Disconnect the plug from the power socket . 2 . - Page 28 Ferroli spa ¬ 37047 San Bonifacio (Verona) Italy ¬ Via Ritonda 78/A tel. +39.045.6139411 ¬ fax +39.045.6100933 ¬ www.ferroli.it...
Need help?
Do you have a question about the Rem W and is the answer not in the manual?
Questions and answers