Table of Contents

Summary of Contents for Dirty Hand Tools 106817
- Page 1 3” Chipper/Shredder MODEL # 106817 Operation Manual This safety alert symbol identifies important safety messages in this manual. Failure to follow this important safety information may result in serious injury or death. Part # 107162 Rev A...
- Page 2 For Service or Questions Call 1-877-487-8275 720-287-5182 www.dirtyhandtools.com Dirty Hand Tools® is a brand of 1100 W 120th Ave, Suite 600 Westminster, CO 80234 • 720-287-5182...
-
Page 3: Table Of Contents
Table of Contents Important Safety Information Intended Use ................4 Personal Protective Equipment ..........4 General Safety ................5 Safety Decals ................6 Assembly Instructions Attaching the Kick Stand ............7 Attaching the Wheels..............7 Attaching the Hopper Guard ............7 Attaching the Handle ..............8 Attaching the Debris Bag ............8 Chipper/shredder Overview ............9 Operating Precautions ..............10 Operation... -
Page 4: Important Safety Information
Important Safety Information WARNING WARNING: Read and thoroughly understand all instructions and safety information before assembling or operating this chipper/ shredder. Failure to do so may cause serious injury or death. Do not allow anyone to operate this chipper/shredder who has not read this manual. -
Page 5: General Safety
Important Safety Information General Safety Failure to follow warnings, cautions, assembly and operation instructions in the Operation Manual may result in serious injury or death. DANGER READ THE OPERATION MANUAL BEFORE USE SINGLE PERSON OPERATION ONLY! THIS UNIT MEETS OR EXCEEDS ANSI B71-6-2000 SAFETY STANDARDS •... -
Page 6: Safety Decals
Safety labels on the chipper/shredder are to remind you of important information while you are operating the unit. Make sure all safety warning decals are attached and in readable condition. Replace missing or defaced decals. Contact Dirty Hand Tools at 1-877-487-8275 for replacement decals. HANDS BELOW THIS... -
Page 7: Assembly Instructions Attaching The Kick Stand
Assembly HITCH 1. Deploy Stand (see Figure 1). 1. Set engine assembly on flat surface and swing the stand into position. 2. Insert the lock pins into the holes in the stand base to secure. DRAWBAR 3. Fully insert the drawbar in the receiver and insert the lock pin. 4. -
Page 8: Attaching The Handle
Assembly 4. Attach Hopper. HOPPER 1. Position hopper on shredder inlet flange (see Figure 4). 2. Attach with four M10 x 20 Bolts and M10 Nylock nuts. 5. Install Shredder Safety Guard 1. Position the shredder guard inside the hopper (see Figure 5). -
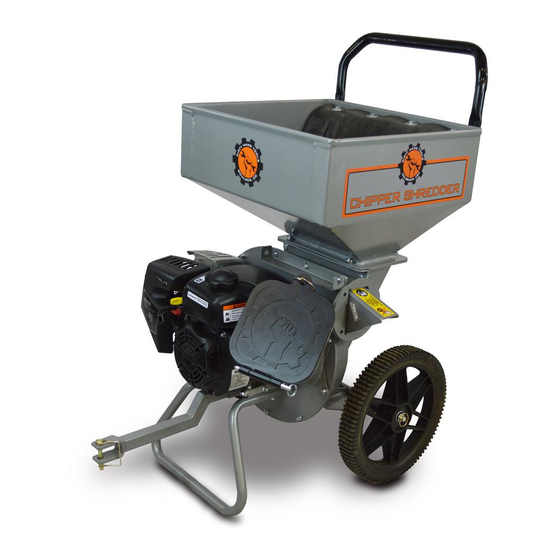
Page 9: Chipper/Shredder Overview
Chipper/Shredder Overview HANDLE SHREDDER GUARD HOPPER DEBRIS BRACKET MUFFLER FUEL FILL ENGINE DEFLECTOR CONTROL LEVER GAS LINE SHUT OFF RECOIL HANDLE TOW BAR (REVERSIBLE) CHIPPER INLET COVER HITCH... -
Page 10: Operating Precautions
Operating Precautions CAUTION READ, UNDERSTAND AND FOLLOW ALL OF THE PRECAUTIONS BELOW. Always perform the pre-start checklist before starting the engine. • Never operate the chipper/shredder without safety guards and covers in place. • Keep hands, feet, and clothing away from rotating parts. Keep clear of chipper/shredder tines at all times. -
Page 11: Operation
Operation CAUTION DO NOT ATTEMPT TO START ENGINE BEFORE ADDING OIL TO ENGINE The engine is shipped from the factory without oil. Use only the recommended weight of oil for a 4-cycle engine (See Engine Operation Manual). NOTE: Upon start-up and shut-down, you may hear the metal-to- metal sound of the triangular hammers and J-hammers positioning themselves on the rotor. -
Page 12: Preparation
Operation Preparation for Operation Fill Engine Crankcase with Oil 1. Add oil according to engine manual. Do not overfill. Use a clean, high quality detergent oil. Use no special additives with recommended oils. Do not mix oil with gasoline. Oil level must be full. Check the oil level by removing oil fill plug. -
Page 13: Startup
Operation Starting the Engine Turn fuel shut-off valve to ON position. CHOKE Cold Starts 1. Move the engine control lever to the left (choke) position (see STOP Figure 8). 2. Pull recoil handle out slowly one time and allow to return normally. -
Page 14: Operation Recommendations
Operation Chipping Recommendations • Prune branches down close to the main branch to make feeding them into the chipper inlet easier. • Large, hard, dried tree branches that resist chipping can be processed by rotating them as you alternately insert and retract them. •... -
Page 15: Maintenance
Maintenance WARNING BEFORE PERFORMING ANY MAINTENANCE PROCEDURE STOP THE ENGINE, WAIT FIVE (5) MINUTES TO ALLOW ALL PARTS TO COOL. Disconnect the spark plug wire, keeping it away from the spark plug. Regular maintenance is the way to ensure the best performance and long life of your machine. - Page 16 Maintenance WARNING BEFORE PERFORMING ANY MAINTENANCE STOP THE ENGINE & ALLOW ALL PARTS TO COOL. Disconnect the spark plug wire, keeping it away from the spark plug. Engine Maintenance Refer to the engine manual included with your equipment for information on engine maintenance. 1.
- Page 17 Maintenance Clean Debris from Engine & Chipper Check for dirt and debris before each use and every 100 hours. The engine requires air flow to cool itself and for combustion. Before each use, clean any debris from the unit especially from around the air shroud intake, air filter, and muffler.
-
Page 18: Shredding Hammer Rotation And Replacement
Maintenance Shredding Hammer Rotation and Replacement The cutting edges of the shredding hammers may eventually wear out requiring rotation of the hammer or replacement if all cutting edges have been dulled. Triangular hammers can be rotated twice after the first edge dulls, then flipped over once and rotated again for a total of 6 edges. -
Page 19: Chipping Knives Sharpening And Replacement
Split Lock Washers for each of the Chipper Blades. Reach Order replacement blade Part # 106844 through the Chipper Inlet Tube to remove the Chipper from Dirty Hand Tools. Blade. (See figure 12). Alternatively, the tube may be removed for easier access. -
Page 20: Chipper/Shredder Assembly
Chipper/Shredder Assembly... -
Page 21: Chipper/Shredder Assembly Parts List
Chipper/Shredder Assembly Parts List Item # Part # Description Qty. 101094 Trimmer Wheel Assembly 106558 Drawbar 106535 Axle Rod 102342 Lynch Pin, 3/16” x 1” 100181 Flat Washer, M12 100068 Hex Nut, Nylock, M10 x 1.5 102973 Hex Bolt, M10 x 1.5 x 20mm 106593 Bag Support Assembly 106761 Fabric Debris Collection Bag 102476 Lock Pin, Round, 5/16”... -
Page 22: Engine And Housing Assembly
Engine and Housing Assembly... -
Page 23: Engine And Housing Assembly Parts List
Engine and Housing Assembly Parts List Item # Part # Description Qty. 107140 Engine Kohler, RH265, 1” Shaft 106559 Engine Spacer 106906 Feed Tube Closure 106571 Flywheel Assembly 106518 Chipper Housing 106515 Shredder Interface 106514 Shredder Housing 106533 Axle Bracket 106556 Drawbar Bracket 106530 Bag Arm Bracket 106829 Spring Plunger Assembly... -
Page 24: Chipper Rotor Assembly
Chipper Rotor Assembly... -
Page 25: Chipper Rotor Assembly Parts List
Chipper Rotor Assembly Parts List Item # Part # Description Qty. 106566 Flywheel 106844 3.5” Chipper Blade 106570 Flail Spacer 106572 Flail Bushing 106569 J-Flail 106568 Trident Flail 100089 Lock Washer, M10 100127 Lock Washer, M8 100130 Flat Washer, M8 104986 Hex Bolt, M8 x 1.25 x 16mm 104365 Hex Bolt, M10 x 1.5 x 50mm... -
Page 26: Troubleshooting
Troubleshooting PROBLEM SOLUTION • Add gas to gas tank. Engine will not start • Connect spark plug wire to spark plug • Engine control lever must be at choke for a cold start Engine runs rough, floods during operation • Clean or replace air cleaner •... -
Page 27: Storage
Storage WARNING DO NOT STORE CHIPPER/SHREDDER IN UNVENTILATED AREA where fuel fumes may reach flame, sparks, pilot lights or other ignition source. Drain fuel outdoors away from any ignition sources. Use only approved fuel containers. Prepare for Storage Follow the steps below to prepare your chipper/shredder for storage. -
Page 28: Warranty & Specifications
220 Lbs. (99.8kg) Warranty 2 Year / 2 Year Limited Warranty *As rated by engine manufacturer For Service or Questions Dirty Hand Tools® is a brand of Call 1-877-487-8275 720-287-5182 1100 W 120th Ave., Suite 600 www.dirtyhandtools.com Westminster, CO 80234 • 720-287-5182...
Need help?
Do you have a question about the 106817 and is the answer not in the manual?
Questions and answers
I have a Dirty Hand Tool 3in chopper shredder with Kohler RH265 Series 6.5 hp 196cc motor. I cannot find a model number. I need a manual. I need to know spark plug gap I need to know staring procedure
The spark plug gap for the Dirty Hand Tools 3-inch chipper shredder with the Kohler RH265 6.5 HP, 196cc engine is 0.03 inches (0.76 mm). The starting system is manual recoil.
This answer is automatically generated