Table of Contents
Advertisement
Advertisement
Table of Contents

Summary of Contents for INVISIBLE FENCE CF3000
- Page 1 CF3000 Dealer Diagnostic Tool Instruction Manual www.invisiblefence.com...
-
Page 2: Table Of Contents
CF3000 Operating Instruction Table of Contents: ..……………………………………………………………………..……..3 About the CF3000 ……………..……………………………………………………..……..4 Important Precautions ……………………………………………………………………………..……..5 Components ………..…………………………………………………………..……..7 Charging the CF3000 ……..…………………………………………………………..……..8 Licensing the CF3000 …...………………………………………………………………..….13 Updating the Firmware ………..…………………………………………………………………..……17 Entering Users …………..…………………………………………………………..……19 Customer Sessions ……………………….…………………………………………19 Add a Customer ………………………………………………………....22 Open a Session …………………………………………………………………24... -
Page 3: About The Cf3000
CF3000 Operating Instruction CF3000 Dealer Diagnostic Tool: ® The CF3000 Dealer Diagnostic Tool provides a holistic approach to Invisible Fence Brand system diagnostics for everyone involved in the process, from service technicians to sales people. Factory level test functions combined with diagnostic tools and programming functions gives dealer personnel the confidence to undertake any service required. -
Page 4: Important Precautions
CF3000 Operating Instruction Important Precautions: To avoid damaging the CF3000 Dealer Diagnostic Tool, please observe the following precautions: Y Do not press on the LCD screen. Y Do not allow hard or sharp objects to rest on the LCD screen. -
Page 5: Components
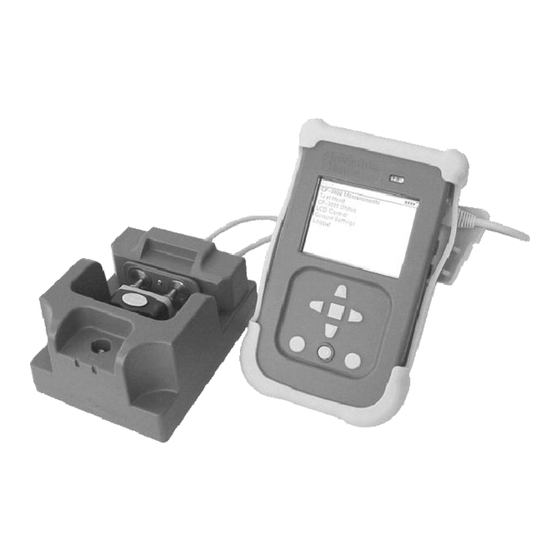
CF3000 Operating Instruction Components: Paperwork/Manual Holder Rugged Polyethylene Case Protective Skin CAT5 Cable SD Card Slot ® Power Cap Tester Mini-USB Collar Relief RJ45 Jack Loop Wire Plugs CF3000 Handheld Device Test-Head Test Hub www.invisiblefence.com... - Page 6 CF3000 Operating Instruction Components: LCD Screen RJ45 Jack & Loop Plugs Left Button Up Button Right Button Back Button SELECT Button Down Button Power Button Help Button www.invisiblefence.com...
-
Page 7: Charging The Cf3000
CF3000 Operating Instruction Charging the CF3000 handheld device: When you receive your new CF3000 Dealer Tool the battery pack will need charging. The battery pack will come disconnected from the dealer tool. 1. Remove the handheld device from the dealer tool case. -
Page 8: Licensing The Cf3000
Licensing the CF3000 handheld device: In order for a CF3000 to operate it must have a valid license in its system memory. A license is downloaded into the tool from an online website and is valid for a set number of days. It will be required to download a valid license for all new tools and as the license time period runs out. - Page 9 Copy and paste the link into your internet explore address bar. ® c. Enter through the Top Dog Tools on the Invisible Fence Brand Cube. 8. Select – Request a New 90-Day License. 9. Enter the serial number located on the back of the handheld device into the box and click the submit button.
- Page 10 CF3000 Operating Instruction 10. The CF3000 License validation page will display – Click the here hyperlink to download your license file. 11. The following message will display. 12. Select the Save button. 13. The “Save As” message will display. 14. Select the “Save in:” dropdown menu.
- Page 11 17. The Download Complete message will display. The Close button can be pressed to remove the Download complete pop up. 18. Licensing is complete. If a firmware update is required continue to step 8 of the Updating the Firmware of the CF3000 Handheld Device section of this instruction. www.invisiblefence.com...
- Page 12 CF3000 Operating Instruction 19. Power down and disconnect the CF3000 handheld device from the computer a. Press and hold the power button located on the face of the device until the unit beeps and displays ‘Shutting Down”. b. Unplug the USB cable from the handheld device and the computer and return to the dealer tool case.
-
Page 13: Updating The Firmware
Updating the Firmware of the CF3000 handheld device: From time to time it will be necessary to update the firmware of the CF3000 handheld device. Updates will be releases each time features and/or functions are added or modified. The updates ®... - Page 14 Copy and paste the link into your internet explore address bar. ® c. Enter through the Top Dog Tools on the Invisible Fence Brand Cube. 8. Select – Download New Firmware Updates. 9. Click the “Download a new firmware version” hyperlink.
- Page 15 CF3000 Operating Instruction 12. Select the “Save in:” dropdown menu. a. Double click on the CF3000 drive. Your computer may or may not show an icon or label the drive CF3000. The drive letter could also be any letter. 13. Double click on the firmware directory.
- Page 16 CF3000 Operating Instruction 16. Firmware update is complete. 17. Power down and disconnect the CF3000 handheld device from the computer 18. Press and hold the power button located on the face of the device until the unit beeps and displays ‘Shutting Down”.
-
Page 17: Entering Users
Entering Users into the CF3000 handheld device: To operate the CF3000, it will be required to enter a User name and a 4 to 8 digit pin number. The handheld device can be set up with a User name and pin for each person using the device or with one User name and pin for everyone to share. - Page 18 CF3000 Operating Instruction 5. Enter a user name by highlighting each letter and pressing SELECT. The user name can be up to 32 digits long and made up of upper case letters, lower case letters and numbers. a. When done highlight Enter and press SELECT.
-
Page 19: Customer Sessions
An open Customer Session is required to gain access to the Test Head functions. Add a Customer: 1. Power up the CF3000 handheld device and login. 2. From the Home screen, highlight Open Customer Session and press SELECT to display the Open Session screen. - Page 20 CF3000 Operating Instruction a. When done highlight Enter and press SELECT. 6. Enter the Customer’s name. a. The blank space after First Name: will be highlighted. Press SELECT. b. Enter the customer’s first name by highlighting each letter pressing SELECT. The Customer ID can be up to 20 digits long and made up of upper case letters and lower case letters.
- Page 21 CF3000 Operating Instruction c. Enter the 13 digit serial number. For older transmitters – Enter the serial number followed by asterisks to total 13 digits. d. Highlight Enter and press SELECT. At this point you can enter addition transmitters or press the BACK button to return to the Home screen.
-
Page 22: Open A Session
CF3000 Operating Instruction Open a Customer Session: (Gives access to Test Head functions) 1. Power up the CF3000 handheld device and login. 2. From the Home screen, highlight Open Customer Session and press SELECT to display the Open Session screen. - Page 23 CF3000 Operating Instruction b. Begin entering the customer’s ID. Customers will display with as few as one matching digit. c. Highlight the customer desired and press SELECT to open a Customer Session. 5. To Search by Customer Last Name. a. Highlight Search by Customer Last Name and press SELECT to display the Search by Name screen.
-
Page 24: Close A Session
CF3000 Operating Instruction c. Highlight the customer desired and press SELECT to open a Customer Session. Close a Customer Session: 1. From the Home screen, highlight Close Customer Session and press SELECT. www.invisiblefence.com... -
Page 25: Test-Head Functions
CF3000 Operating Instruction Test Head Functions: One of the functions of the CF3000 Dealer Tool is the ability to functionally test Computer ® Collar in the field. The CF3000 can test for power consumption, sensitivity of all three antenna circuits and correction output. The CF3000 Dealer Tool is also used to configure Computer ®... - Page 26 CF3000 Operating Instruction ® b. Place the Computer Collar and test hub into the test head. i. Pull back the correction post contact plate. ® ii. Align the Computer Collar with test hub in the test head. iii. Press down and back to lock the test hub into the test head.
- Page 27 4. Use the arrow keys to change settings 5. Highlight Next Page and press SELECT to move the next page. 6. When complete, highlight Save Changes and press SELECT. The CF3000 will load the ® changes into the Computer Collar 7.
-
Page 28: Computer Collar ® History
CF3000 Operating Instruction Viewing and Clearing the Computer Collar ® History: ® ® 1. Follow steps 1 & 2 under Configuring a Computer Collar to load a Computer Collar into the test head. 2. From the Test-Head screen highlight Show Receiver History to display the Receiver History screen. -
Page 29: Testing A Computer Collar
Follow steps 1 and 2 under Configuring a Computer Collar 2. From the Test-Head screen, highlight Test Receiver and press SELECT to display the Receiver Tests screen. The CF3000 will scan the area for magnetic noise that may affect the test results. -
Page 30: Correction
CF3000 Operating Instruction a. Highlight Test All and press SELECT to begin the test. b. The following screen will display each test with a PASS or FAIL result. c. Press the BACK button to return to the Receiver Tests screen. -
Page 31: Sensitivity
CF3000 Operating Instruction c. The handheld device will display the correction output, in millijoules (mJ), with a pass result if the output is within specifications. d. The handheld device will display Warning: Signal not detected if the Computer ® Collar has no output or the correction posts are not touching the test head contact pads. -
Page 32: Power Consumption
Computer Collar . This test will fail if completed in a magnetically noisy ® area. In order to communicate with the CF3000 the Computer Collar will except and process any magnetic noise resulting in a false failure. ®... -
Page 33: Testing A Power Cap
CF3000 Operating Instruction Testing a Power Cap ® ® Test the energy remaining in a Power Cap ® 1. From the Test-Head screen highlight Test Power Cap and press SELECT to test the ® remaining energy of a Power Cap ®... -
Page 34: Cf3000 Measurements
CF3000 Operating Instruction CF-3000 Measurements Function: The CF3000 is equipped with tools to allow the user to diagnose various situations that may cause ® a system to operate improperly. The ability to search for Invisible Fence signal will aid in Brand detecting and resolving random activations due to stray signals and signal bleeds. -
Page 35: Detect Field
The Detect Field mode will also display ® the exact set up of a neighboring Invisible Fence Brand system. 1. From the Measurements screen highlight Detect Field and press SELECT to enter the Detect Field mode. -
Page 36: Detect Interference
1. Standard View: Displays frequency detected and the strength of the magnetic noise. ® Frequencies that are within limits of a pet containment system, Invisible Fence Brand or competitor, will display the initials of the manufacturer or brand to alert of a possible neighboring system. -
Page 37: Advanced View
CF3000 Operating Instruction c. Adjusting the threshold – Displays all frequencies above the threshold line. i. Pressing the up arrow raises the threshold displaying only the higher strength frequencies. ii. Pressing the down arrow lowers the threshold displaying additional lower strength frequencies. -
Page 38: Measurement Wire
1. Plug the supplied test leads into the right-hand side of the CF3000 handheld device and clip to the loop wire. NOTE: Measurements through an LP device will add resistance to the loop. - Page 39 4. Press the right arrow to highlight the conductor type box and use the up or down arrow to select the type of conductor used in the install. 5. Press the SELECT button. The CF3000 will begin measuring then displays the results. 6. Press and release the BACK button to return to the desired screen.
-
Page 40: Additional Information
Additional Information: CF-3000 Status: Displays important information about the CF3000 handheld device. 1. From the Home Screen highlight CF-3000 Status and press SELECT. 2. Self Test: Completes a self diagnostic of the handheld device. Plug the test head into the right-hand side to the CF3000 handheld device. -
Page 41: Unit Status
CF3000 Operating Instruction c. The handheld will display a PASS or FAIL result for test completed. The LED will flash red with any failed result. d. Press the BACK button to return to the Status screen. 3. Unit Status: Displays firmware revisions, percentage of battery charge remaining and device serial number. -
Page 42: Lcd Control
CF3000 Operating Instruction 4. LCD Control: Allows brightness adjustment of the LCD backlight. a. From the Home screen highlight LCD Control and press SELECT. b. Use the right and left arrows to select the LCD brightness. c. Press the BACK button to set the brightness and return to the Home screen. - Page 43 CF3000 Operating Instruction c. Press and release the up or down arrow to scroll through time zones. d. Press the right arrow to highlight the daylight savings box. Press and release the up or down button to toggle between Standard Time and Daylight Savings Time.
- Page 44 Please see page 7 of this manual for instructions on how to gain access to the battery pack for separate disposal. The CF3000 Handheld Device operates on one 3.7 Volt Lithium Ion rechargeable battery. Replace only with an ®...
- Page 45 CF3000 Operating Instruction Notes: 800-578-DOGS (USA) (865) 777-5404 (International) ©2010 Radio Systems® Corporation All Rights Reserved. Protected by Patents: U.S.: #5,533,469 www.invisiblefence.com...
Need help?
Do you have a question about the CF3000 and is the answer not in the manual?
Questions and answers