
Summary of Contents for Antano Group LG2020
- Page 1 Uso e manutenzione Use and maintenance handbook MONTASCALE A RUOTE WHEEL STAIR LIFT LG2020 Rel. 02_161112...
-
Page 2: Table Of Contents
CONTENTS Sommario CE MARKING DATA ............................26 WARNINGS ................................ 26 General warnings ............................26 Declaration of Conformity ........................... 26 Pictograms..............................27 UNPACKING............................... 28 Environmental protection recommendations ..................... 28 SYSTEM DESCRIPTION............................ 28 Device components ........................... 29 ASSEMBLY ................................ 30 REGULATION..............................32 Adjusting the headrest .......................... -
Page 3: Ce Marking Data
CE MARKING DATA Numero di serie - Serial number Modello - Item ..Anno di costruzione - Production year ..ANTANO GROUP s.r.l Via Todi, 15 zi. Torre Matigge Portata massima - Maximum load ..06039 Trevi (Pg) Tel. 0742 381269 Massa complessiva - Total weight .. -
Page 4: Pictograms
they have been specifically instructed on the chair’s use. • Never approach a staircase if the passenger is not in a fully • The operators and those being transported must not smoke upright position, or the position of movement (see USE in order to prevent damage or risk of fire with respect to chapter). -
Page 5: Unpacking
UNPACKING When a trolley is used to move the packaged product, • Open the package and remove its content taking care use caution to avoid injuries caused by tipping. not to damage it. Once the product is completely unpacked, check to make sure it is not damaged. Any damage noted must be reported to the carrier within 24 hours. -
Page 6: Device Components
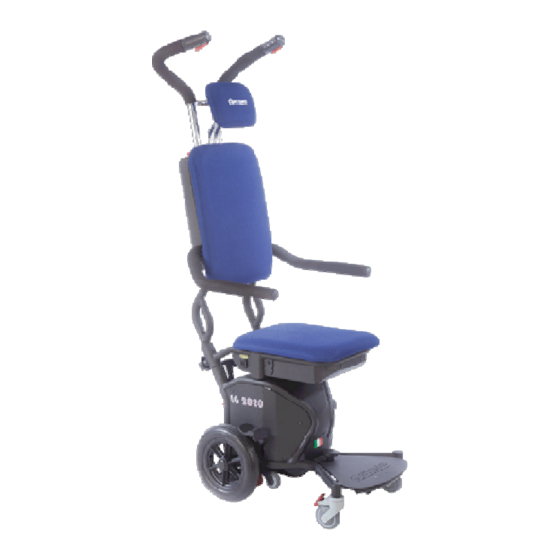
4.1 Device components Motorised basic structure Backrest Handlebar Stair climber operating key (*) 2.1 ASCENT button 10 Speed variator 2.2 DESCENT button 11 Battery charge indicator Seat 12 Battery-charger connector Step blocking wheels 13 Emergency push button 4.1 Step blocking wheel drives 14 Continuous cycle/single step selector switch Front wheel with brakes 15 Up/down mechanism... -
Page 7: Assembly
ASSEMBLY The device is supplied disassembled in three parts: machine body, handlebar and seat • Remove all the parts that compose the aid from the package • Couple the sit 2 to base 1. • Couple the handlebar (3) and assemble the flywheels (4) to secure the three elements of the aid. - Page 8 Machine body connector • Insert the connector, paying attention to the reference shown and then rotate it in a clockwise direction to lock it. • To disconnect the connector, press the button on the base and turn it anti-clockwise. Connect Disconnect Backrest connector •...
-
Page 9: Regulation
REGULATION Assembly and adjustment operations must only be carried out by authorised personnel 6.1 Adjusting the headrest • Loosen the knob and adjust the posi- tion. 6.2 Adjusting the footrest • Loosen the knob and adjust the position 6.3 Adjusting the handlebar •... -
Page 10: Technical Characteristics
TECHNICAL CHARACTERISTICS For data not indicated in this section, see the serial number plate affixed to the equipment 7.1 Dimensions 7.2 Technical data table Total eight of the device 44 kg - Weight of the base equipment A 24 kg - Weight of the seat B 10 kg - Weight of the backrest C... -
Page 11: Characteristics Of Staircase
7.3 Characteristics of staircase Staircase with landing Staircase with turn Spiral staircase... -
Page 12: Manufacturer's Intended Use
MANUFACTURER’S INTENDED USE Read the instruction manual INTENDED USE Daily use of the device is authorised only if all the safety components and parts are working properly. The device was designed to allow the ascent and descent of the stairs of a building with a passenger on board as well as transport on flat and gently sloping surfaces, with a stable bottom, as described in Chapter 7. -
Page 13: Using The Device
USING THE DEVICE Before using each day, always check the status of the device and the battery charge 9.1 Charging the battery The battery must only be charged using the battery-charger Charge status indications and cables supplied. The outlet of the electrical system to which the battery char- ger must be connected should be equipped with an efficient earthing system according to current regulations in force. -
Page 14: Handling On Flat Surfaces
9.2 Handling on flat surfaces The aid can be handled on flat, regular surfaces, without considerable roughness. To aid movement, press the rear levers (L). These lift up the step edge detector wheels (R). 9.4 Brakes The front wheels are equipped with a brake that is operated by foot. -
Page 15: Handling On Stairs
9.2 Handling on stairs Read the instructions manual The person who operates this device on stairs, both going up and down, must possess a certificate of qualification issued by the manufacturer or an au- Only wear closed shoes. thorised representative, only after having received direct theoretical and practical training and only after demonstrating the ability to safely perform all the operations Risk of crushing fingers in the mechanical transmission... - Page 16 To facilitate the positioning of the passenger, the armrests can be raised completely 7 Fasten the seat belts to ensure the passenger is in correct position. 8 Go near the stairs. 9 Adjust the height of the handlebar. 10 The operator must be positioned at least 2 steps above the aid’s wheel.
- Page 17 Ascending cycle (S1..S3) The arms make one rotation to the next logical step The arms continue to turn rai- sing the aid The rear wheels are about to reach the tread The rear wheels have reached the tread The arms stop, the step cycle is complete...
- Page 18 • Release the UP button and place yourself on the upper step, pulling the device towards the second step. • Repeat the cycle for the rest of the stairway The stairs have ended • Turn the key of the panel to O (OFF) and remove it to ensure that no one other than the qualified operator can use the device.
- Page 19 Attention! accompany the natural movement of the aid without resisting it; at the same time keep your hands firmly on the handlebar. 9 Firmly grip the handlebar and press the DESCEND button; hold down the button until the end of the cycle of 1 step (see next sequences).
- Page 20 The aid lowers until touching the next step The rear wheels have reached the tread The arms stop, the step cycle is complete • Release the DOWN button and place yourself on the lower step, pushing the device towards the next step. •...
-
Page 21: Routine Maintenance
10 ROUTINE MAINTENANCE The device requires routine maintenance as any other product in order to keep it in perfect working order, even after years of use. Remove food debris, hair and anything else that can accumulate, such as dust on a daily basis; a vacuum cleaner can be used for this. -
Page 22: Troubleshooting
11 TROUBLESHOOTING Operations which must be carried out by qualified personnel or the service centre as decribed on chap. 12 PART PROBLEM SOLUTION Wheels squeaking during movement • clean the wheels • lubricate • replace ( Commands No electrical command is accepted; the •... -
Page 23: Extraordinary Maintenance
12 EXTRAORDINARY MAINTENANCE Operations which must be carried out by qualified personnel or the service centre 12.1 Parts subject to wear and the criteria for their replacement Batteries Replacement 4 mm • Remove the key from the panel and put it in a safe place. - Page 24 Operations which must be carried out by qualified personnel or the service centre • Electrically disconnect the batteries making sure not to use metal objects • Replace both batteries and restore the electrical connections as indicated on the picture. • Reinstall all the parts in the reverse order as previously described. Fuses Replacement •...
-
Page 25: Guarantee
13 GUARANTEE The product is covered by a 24 month legal guarantee beginning from the date of delivery (legislative decree 24/2002) to the customer by Antano Group and CE Directive 1999/44), against any manu- facturing defect. During the guarantee period, wheelchair maintenance is carried out directly at the manufacturer’s he- adquarters, fully paid for by the manufacturer, or at service centres located throughout the country.
Need help?
Do you have a question about the LG2020 and is the answer not in the manual?
Questions and answers