Table of Contents
Advertisement
Advertisement
Table of Contents

Summary of Contents for Asiga MAX
- Page 1 Asiga MAX User Guide USER GUIDE Copyright ASIGA © 2017 VERSION 1.04 www.asiga.com...
- Page 2 Asiga MAX User Guide Index CHAPTER 1 – Asiga MAX at a Glance CHAPTER 2 – Getting Started CHAPTER 3 – Preparing a Build CHAPTER 4 – Starting a Build CHAPTER 5 – Web Interface CHAPTER 6 – Post-processing Parts CHAPTER 7 –...
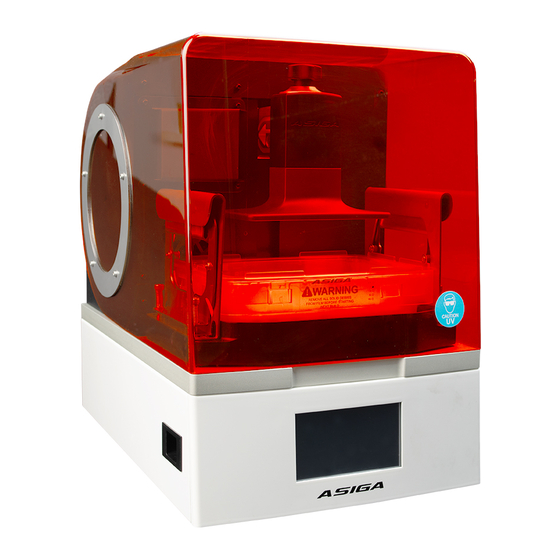
- Page 3 Asiga MAX User Guide CHAPTER 1 Asiga MAX at a glance These diagrams illustrate the main User controls on the MAX. Copyright ASIGA © 2017 VERSION 1.04...
- Page 4 Asiga MAX User Guide Copyright ASIGA © 2017 VERSION 1.04...
- Page 5 Asiga MAX User Guide Principle of Operation The MAX is a 3D printer which builds objects from CAD data. The objects are built from photopolymer resins which are liquid chemicals that can be solidified by exposure to light. A physical model is built by solidifying successive layers of photopolymer against each other.
- Page 6 Asiga MAX User Guide 4. A cross-sectional image of the object being constructed is projected onto the underside of the vat film, causing photopolymer to harden in the shape of the image 5. The model is lifted out of the vat to separate it from the vat film.
- Page 7 The SPS process actively forms layers of precise thickness regardless of the cross- sectional area of the model or the viscous behaviour of the photopolymer resin. As a result, models of high fidelity are produced. The MAX is ideal for direct manufacturing applications including medical prostheses and jewellery pattern production.
-
Page 8: Getting Started
Then lift out the MAX machine and place it on a flat table. Unwrap any protective film surrounding the MAX machine. Do not discard your box. Put it in a safe place should you need to transport your MAX machine for any reason. - Page 9 Asiga MAX User Guide Choose your Language Upon initial startup you will be given the option to select your language by scrolling through a list presented on the LCD screen. If the machine has already bene started, you can change the language in the menu: Settings >...
- Page 10 Alternatively, your reseller may provide you with the warranty code. You can operate the MAX without entering the warranty code. However, you can only complete a maximum of five builds. After this the warranty code needs to be entered to continue printing with the MAX.
- Page 11 Asiga MAX User Guide Install Build Platform The MAX vertical axis has a bracket for holding the build platform. Secure it in place by tightening the release knob. Zero Position Calibration Note: a video demonstration of the zero position calibration procedure is included on the USB stick which ships with your machine.
- Page 12 4. Loosen the build platform calibration screw. This can be done with a 4mm hex key hand tool which is included in the MAX Calibration Tool Kit. When the screw is properly loosened, the build platform should be able to move freely up and down and rotate around the horizontal axes of the machine.
- Page 13 Asiga MAX User Guide 7. Press “Next”. 8. Use the “Move Up” and “Move Down” buttons to lower the build platform to the lowest position. 9. Press “Next”. 10. Confirm the new zero position by pressing “Yes”. Copyright ASIGA © 2017...
- Page 14 Asiga MAX User Guide 11. Gently push the build platform flat against the glass exposure plate. Ensure that the edges of the build platform are not resting on the metal rim around the glass exposure plate. 12. While still applying pressure, tighten the calibration screw with the 4mm hex key.
- Page 15 “No” to leave it at the current position. Zero Position Encoders The MAX is equipped with four position encoders built into the corners of the glass base- plate. The position encoders should be zeroed after transporting the machine. The position encoders may drift so they should also be zeroed from time-to-time by the user.
- Page 16 Asiga MAX User Guide 2. Press “Zero Position Encoders” The empty square region shows a two-dimensional deflection map of the build envelope with a blue dot at the zero centre. Pressing the “Zero” button will show the following prompt: 5. Remove the build tray from the machine. There should be no objects in the build tray area or anything pressing on the machine.
- Page 17 Asiga MAX User Guide Build jobs for the MAX are prepared on a personal computer and sent to the MAX via a network connection. The MAX has two networking options: 1. Ethernet 10/100 port on the rear of the machine 2.
- Page 18 Wireless Direct. Install Composer Software Build jobs for the MAX are prepared on a personal computer using Asiga Composer™ software. Asiga Composer™ software is provided on the USB stick included with your MAX or can be downloaded from the Asiga website.
- Page 19 Asiga MAX User Guide CHAPTER 3 Preparing a Build Build jobs for the MAX are prepared on a personal computer using Asiga Composer™ software. Refer to the Composer User Guide for more information. Copyright ASIGA © 2017 VERSION 1.04...
- Page 20 Asiga MAX User Guide CHAPTER 4 Starting a Build Installing the Vat 1. Open the hood of the machine 2. Insert the vat with the vat sensor sticker located towards the back of the machine. 3. Grip the handles and pull up and tilt inwards until the teeth grip over the edge of the vat.
- Page 21 See ‘MAX LEVEL’ mark on Build Tray sticker. Clean the Vat Bottom Note: Refer to the video on this topic included on the USB stick that shipped with your MAX machine. Commencing a build when there is solid debris in the vat can cause damage to the vat film.
- Page 22 5. Remove the cured rectangle in one piece and dispose of it. Set the Chamber Temperature The MAX is equipped with an internal temperature controller which regulates the temperature of the build chamber. Temperature control is useful when building with some materials to control their viscosity, reactivity and solidification.
- Page 23 Asiga Composer Build Wizard is applied. Starting the Build Start the build on the MAX’s LCD screen with Print menu. There are either 3 or 4 options present: 1. New Job. Starts the next job in the build queue.
- Page 24 Asiga MAX User Guide Stopping and Pausing the Build A build can be paused by pressing the back arrow. When the build is paused you can raise or lower the build using the screen buttons. You can continue the build with the Resume button or abort the build with the Cancel button.
- Page 25 Asiga MAX User Guide CHAPTER 5 Web Interface The MAX runs an internal webpage server which is visible to web browsers on the same network. This Web Interface presents important control screens for interacting with the MAX. Accessing the Web Interface There are two ways of accessing the web interface: 1.
- Page 26 Asiga MAX User Guide The Queued Builds list shows the list of jobs that have been submitted to the printer in order of receipt. Selecting Print > Next Build from the front panel will print the first build in the Queued Builds list. Selecting Print > Select Build from the front panel will allow you to choose any builds from the queued builds list.
- Page 27 Asiga MAX User Guide Settings Tab The Settings tab is used to define the physical build extents of the MAX machine. Build X – Width of the projected image (mm) Build Y – Height of the projected image (mm) Build Z – Depth of the build volume (mm) Lock XY Aspect Ratio –...
- Page 28 Asiga MAX User Guide The measured X and Y span values are entered into the appropriate fields and the “Save” button is clicked to save the changes. Note that if the “Lock XY Aspect Ratio” box is ticked the entered value for Build X will automatically update the Build Y value and vice versa.
- Page 29 Asiga MAX User Guide Model Type – This will be “MAX” for a MAX printer Serial Number – This will be 12 hexadecimal characters (0-9, A-F). The MAC address of the wired Ethernet interface of the printer will be the same as the serial number. (e.g. a serial number of 0123456789AB corresponds to a MAC address of 01:23:45:67:89:AB).
- Page 30 The printer will keep the 5 most recently uploaded firmware files. Support Tab The Support tab provides contact details for obtaining support from Asiga for the printer and also provides an option to change the language of the web interface. The selected language is stored in a cookie in the web browser.
- Page 31 Asiga MAX User Guide CHAPTER 6 Post-processing Parts Parts build on the MAX need to be removed from the build platform, washed and post- cured. Removing Parts from the Build Platform Use a metal scraper or razor blade to remove parts from the build platform.
- Page 32 Full strength is attained when the parts are fully cured. This can be achieved by exposing the parts to ultraviolet light. An ultraviolet Flash unit is included with your MAX. The Flash unit will be either 110V AC or 220V AC depending on your region. CHECK THE VOLTATE REQUIREMENTS OF YOUR FLASH UNIT BEFORE USE AND VERIFY YOU ARE CONECTING THE CORRECT VOLTAGE.
- Page 33 Bottom Limit sets the lowest position of the vertical axis. This is set at the factory. There is no need for users to set the bottom limit unless the memory card of your MAX has been replaced. NOTE THAT INCORRECT SETTING OF THE BOTTOM LIMIT CAN RESULT IN DAMAGE TO YOUR MACHINE.
- Page 34 Asiga MAX User Guide 6. Remove the side panels of the machine. 7. Remove the 4 screws which hold the dust protection chamber in place. 8. Slide the dust protection chamber towards the front of the machine to access the lens.
- Page 35 Asiga MAX User Guide 10. Reassemble the machine once the best focus is achieved. The menu item Maintenance > LED contains options for: 1. Radiometer: Reading the internal radiometer value for the LED power. 2. Power Level: Sets the Power Level of the LED.
- Page 36 Asiga MAX User Guide To calibrate the MAX internal radiometer: 1. Go to menu item Maintenance > LED > Calibrate Radiometer. Click “Continue” at the warning screen. 2. Hold the radiometer head over the build aperture so that the sensor is in the build area.
- Page 37 Asiga MAX User Guide 3. Note the value the external radiometer is reading. 4. Enter the value the external radiometer is reading in the menu and press “Next”. Copyright ASIGA © 2017 VERSION 1.04...
- Page 38 5. Press Confirm to complete the calibration. Sensors The MAX Sensors screen is reached in the menu Maintenance > Sensors. The Sensors screen shows toggles for the Hood, Safety Tray and LED sensors. When the hood sensor is activated, jobs will not build if the hood is open. This can be disabled by deactivating the hood sensor.
- Page 39 The sensor Status screen is accessed via Maintenance > Sensors > Status. This screen shows a status block for every optical sensor in the MAX machine. When the sensor is activated the block is drawn in blue. When the sensor is not active the block is drawn in black.
- Page 40 This function may be used when the machine is sold or confidential build jobs are on the machine. Calibrate Deflection The MAX uses four position encoders to measure deflection of the glass window. The deflection is calibrated as follows: 1. Go to menu item MAINTENANCE > POSITION ENCODERS > CALIBRATE DEFLECTION.
- Page 41 Asiga MAX User Guide 2. Install a clean build platform into the macine. 3. Remove the resin vat from the machine. 4. Place a coin flat in the centre of the glass window. 5. Press “Continue”. The build platform will lower down towards the coin and contact it while recording the deflection.
Need help?
Do you have a question about the MAX and is the answer not in the manual?
Questions and answers