Table of Contents
Advertisement
Quick Links
Advertisement
Table of Contents

Summary of Contents for Rycote cyclone
-
Page 2: Table Of Contents
3 is the type of microphone connector that it comes fitted with, that is: XLR; LEMO or MZL connector. Most of the information in this User Guide applies to all 3 Cyclone sizes and to all model variants. Where the information is specific to only one size or model, this will be indicated as such. -
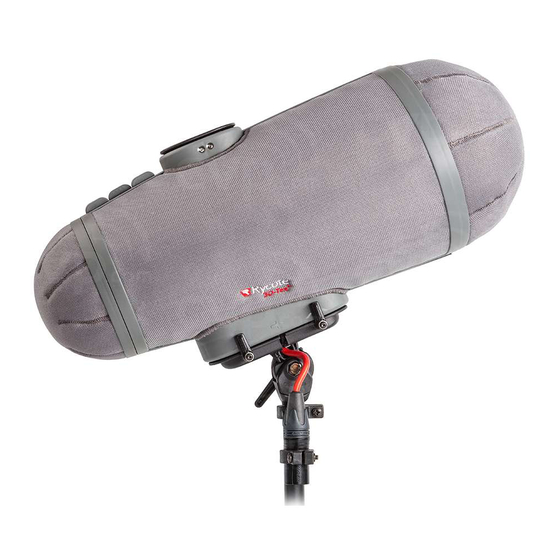
Page 3: Cyclone Basket And Suspension
Cyclone Basket and Suspension Figure 1. Cyclone Basket (Medium model shown) Windshield, Right Safety Catches Boom Adaptor Windshield, Left Release Tabs Basket Suspension (upper) Figure 2. Cyclone Suspension Figure 3. Cyclone Small (Medium model shown) Suspension Lyre Basket Suspension (upper) -
Page 4: Removing Windshield From Suspension
The Cyclone is supplied fully assembled. The two windshield sections which make up the basket are held together on the suspension assembly using magnets, and are further secured with four safety catches. 1. Undo safety catches on both sides of the 2. -
Page 5: Fitting A Microphone
1. Fit the microphone connector to the 2. Insert the microphone into the two Lyres® on microphone (Short XLR connector shown). the suspension. Depending on the microphone width, it may be easier to prize apart the Lyres with your fingers. The Lyres should be positioned to provide as even support to the microphone as possible. -
Page 6: Fitting Windshield To Suspension
1. Ensure all the safetly catches are open (pointing 2. Fit left side of the windshield to upper & lower downwards) on both sides. suspension. The magnets in the suspension & basket will ensure that they ‘ c lick’ together. 3. -
Page 7: Removing And Refitting The C-Arm
The C-Arm provides the upper suspension for the windshield. If you want to use the Cyclone without the windshield fitted (e.g. indoor use) you can remove the C-Arm completely to save weight and reduce overall size. 1. Whilst holding the C-Arm in one hand, use 2. -
Page 8: Changing Lyres
Cyclone Large and Cyclone Medium are pre-fitted with a pair of Universal Lyres of 72 shore hardness. An additional pair of softer Lyres (62 shore rating), for lighter microphones are also included, which you can fit instead of the pre-fitted ones, should you wish. -
Page 9: Offset Link And Boom Adaptor Assembly
Offset Link & boom adaptor assembly The Cyclone Small is fitted with a detachable Offset Link bracket, which provides mic-axis articulation for ideal microphone placement. Back Offset Link Plate Front (Cable Side) Offset Link Plate Offset Link Lever Ratchet Boom Adaptor Rubber Washer Boom Adaptor Plate &... -
Page 10: Removing The Offset Link
Removing the You may prefer to use your Cyclone Small without the Offset Link. If so, you can remove the Offset Link and reattach the boom adaptor directly to the base of the Offset Link lower suspension assembly. The following instructions show you how to remove the Offset Link and reattach the boom adaptor. -
Page 11: Reattaching The Boom Adaptor
Reattaching the boom adaptor 1. Firstly connect the Offset Link plates to either 2. Slide the boom adaptor over the Offset Link side of the suspension, ensuring that the smaller plates, making sure the ‘ c able side’ of the adaptor cut-off plate* is on the cable side (* see Part #2 is on the cable side of the suspension (as shown). - Page 12 Trusted by Professionals www.rycote.com 04/2016 Rycote Microphone Windshields Ltd Libby’s Drive, Slad Road, Stroud, Gloucestershire GL5 1RN, UK Email: tech_support@rycote.com · Tel: +44 (0) 1453 759338 FOR MORE INFO FOLLOW US ON:...
Need help?
Do you have a question about the cyclone and is the answer not in the manual?
Questions and answers