Table of Contents
Advertisement
Quick Links
Advertisement
Table of Contents

Summary of Contents for Amtek U560
- Page 2 Preface Copyright 2007 All Rights Reserved. The information in this document is subject to change without prior notice in order to improve reliability, design and function and does not represent a commitment on the part of the manufacturer. In no event will the manufacturer be liable for direct, indirect, special, incidental, or consequential damages arising out of the use or inability to use the product or documentation, even if...
- Page 3 Lithium batteries dangerous. Danger of explosion if battery is incorrectly replaced. Replace only with the same or equivalent type recommended by the manufacturer. Dispose of used batteries according to the manufacturer’s instructions. Under no circumstances should the user attempt to disassemble the power supply. The power supply has no user-replaceable parts.
- Page 4 This equipment generates, uses, and can radiate radio frequency energy and if not installed and used in accordance with the instruction manual may cause harmful interference to radio communications. However, there is no guarantee that interference will not occur in a particular installation. If this equipment does cause harmful interference to radio or television reception, which can be determined by turning the equipment off and on, the user is encouraged to try to correct...
- Page 5 Any changes or modifications (including the antennas) made to this device that are not expressly approved by the manufacturer may void the user’s authority to operate the equipment. Canadian EMI Compliance Statement This Class B digital apparatus meets all requirements of the Canadian Interference - Causing Equipment Regulations.
- Page 6 Outside the buildings with a power (WORSE *) maximum of 100 MW on the part 2400-2454MHz and with a power (WORSE *) maximum of 10 MW on the part 2454- 2483MHz Laser Compliance Statement for CD-ROM, DVD-ROM, CD- RW and DVD/CD-RW Combo Drives The CD-ROM, DVD-ROM, CD-RW and DVD/CD-RW Combo drive for this computer are laser products.
-
Page 7: Table Of Contents
Table of Content HAPTER ................1 EFORE TART ...........1 ET YOUR OMPUTER ACCLIMATIZE ITSELF ............1 LACEMENT OF YOUR OMPUTER ..............2 UITABLE PLACE TO WORK ..................3 NTRODUCTION ..............3 NPACKING THE OMPUTER ..................4 RONT .................6 EFT AND IGHT ...............7 OP AND OTTOM ..................8 ................10 ETTING TARTED... - Page 8 ..........25 YSTEM ESUMING PERATION .........25 SCREEN IS TOO DARK OR TOO BRIGHT ................25 EEPING SOUND ........26 HE SYSTEM CAN NOT SHUTDOWN PROPERLY HAT ARE THE MAJOR STEPS TO FOLLOW WHEN THE SYSTEM DOES NOT ...........26 TURN ON PROPERLY AFTER IT SHUTDOWN ............26 OW TO EXTEND BATTERY LIFE IRELESS...
-
Page 10: Before You Start
This manual will help you get the most from your computer. If you are a less experienced user, you should read through the manual carefully before using your computer. What to do Before You Work on your Computer Let your Computer acclimatize itself Rapid changes in temperature such as those from the cold outdoors to a warm office would not be suitable for your system. -
Page 11: Suitable Place To Work
Suitable place to work Your computer will run well under most conditions but avoid extreme temperatures and humidity levels. There are some things you can tolerate that the computer can’t – things like static electricity, dust, water, steam and oil. lithium-ion battery pack... -
Page 12: Introduction
Introducing your Computer Your computer features the latest advances in portable computing technology. The computer modular design provides maximum expandability without compromising portability. Please never try to disassemble the UMPC and we will not be responsible for any damage caused by this action. Unpacking the Computer The computer comes securely packaged in a shipping carton. -
Page 13: Front View
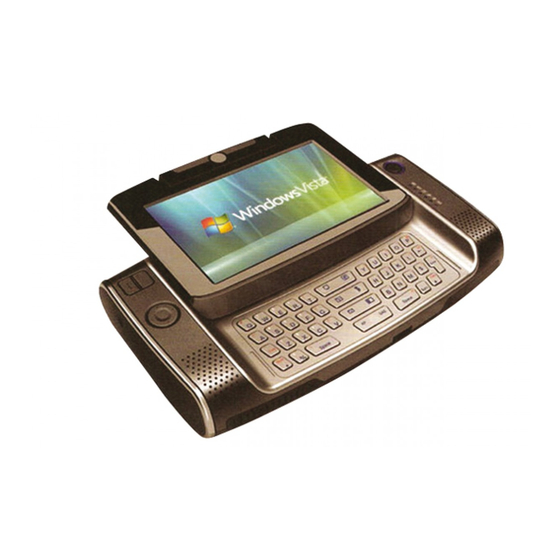
Getting to Know Your Computer Front View CMOS Camera This is where the built-in camera located where you can use for any video conferencing application. Mouse Left Key This is equivalent to the left key on an average mouse that you are using. - Page 14 LCD Display This system is equipped with a 4.8" LCD screen display (1024*600) 800*600. The brightness (cd/㎡): 280 nits (typ) Stick Point This is equivalent to the touchpad on an ordinary UMPC. LED Indicator Battery Indicator Charging: Orange, Full W/ DC: Green, Full W/O DC: OFF Power Indicator ON Mode: Blue, Standby Mode: Blinking Wireless Indicator...
-
Page 15: Left And Right View
Left and Right View Earphone Jack The stereo headphone jack (3.5-mm diameter) is where you connect the headphones or external speakers. Power/Hold Switch Slide the button up to the ON/OFF position and release the power switch for 1 to 2 seconds will turn on the computer (the LED will lit to indicate its present status). -
Page 16: Top And Bottom View
USB Port Your computer includes two Universal Serial Bus (USB) 2.0 ports. USB2.0 is the latest development in Plug and Play technology. Top and Bottom View Knob Hole These two holes directly hold the two knob on the docking station. -
Page 17: Rear View
Stand This stand will serve as supporting stand for this computer. Docking Port Use this port to connect to the system docking station. Ventilation Opening Please don’t block this opening that serve as cooling purpose for the system. DC IN Jack Plug the AC adapter into this jack. - Page 18 System Keyboard 44 Keys Universal built-in keyboard with 36 embedded Keys + 8 Keys Function Key.
-
Page 19: Started
Setting Up the Computer Remove the computer from its package. Insert the battery pack into the computer so the pack can start charging. Connect the computer to an external power source. Turn on the computer. Inserting and Removing the Battery Pack Inserting the Battery Pack Before inserting the battery, be sure the front side of the battery is facing the top side of the... -
Page 20: Removing The Battery Pack
Removing the Battery Pack Insert back the battery into the compartment and push down until the battery latch click sound to indicate it is lock. Connecting the Computer to an External Power Source To connect the computer to an external AC power source using the AC adapter: Plug the AC adapter cable into the AC power connector on the computer. -
Page 21: Operating On Battery Power
Operating on Battery Power Your computer comes with a rechargeable battery pack that lets you operate the computer without an external power source. When the battery pack is fully charged, you can operate the computer for approximately 2.2 hours/26Wh pack under typical condition. - Page 22 Using the Stand The stand of your UMPC is too delicate to withstand any force heavier than its actual weight. Be sure not to put any heavy external peripherals over it. Also be extra careful when you are operating the system using both your arm exerting too much force on it might also cause damage to the stand.
-
Page 23: Using The Computer
Adjusting the Screen Display External CRT Display You can connect an external monitor through the Docking Station. The Computer’s Hot Key Controls The computer provides you with special hot keys to execute all the major functions that you like to run on your computer. My Computer Button –... -
Page 24: The Battery Power System
Media Player Button – Press this button to execute the Media Player application. SAS Button – A computer without an attached keyboard must support an SAS hardware mechanism to generate the SAS which also known as “CTRL-ALT-DEL” or “CAD”. Function Specified Button – Press this button to execute the application you set using the “Shortcut Setting”. - Page 25 hours when the computer power is turned off.
-
Page 26: Battery Status
Battery Status Windows Vista has an applet in the Control Panel that will display an icon in the Windows taskbar indicating when the computer is running on battery power or is attached to the AC adapter. This applet also displays a meter that indicates how much charge is remaining in the battery. -
Page 27: Adjusting The Brightness
Battery Operated AC-DC Operated Some of the most popular functions can be accessed from this menu. Adjusting the Brightness The brightness can be adjusted using selection provided by the A-Menu. Scroll up to increase and scroll down to decrease the screen brightness of your system. -
Page 28: Battery Status
You can also adjust the volume of your system using this application. Scroll up to increase and scroll down to decrease volume your system. Battery Status Press on the battery icon to open up the Power Options Properties. -
Page 29: Ap Key Application
AP Key Application Select the “Start” A-Menu Shortcut Setting to open up the “Shortcut” Setting” mini window. Click on the “Browse” button to open up the “Open” Properties window. Locate on the program you want to set as the main function using the AP button. - Page 30 This setting will enable you to adjust the screen orientation. There are two points for you to adjust: 4 points and 9 points. Select on either one of the points and click on the “Calibrate” tab.
-
Page 31: D-Pad
Function Key Operation D-Pad Button Press Keyboard “Up Arrow” key Keyboard “Down Arrow” key Keyboard “Left Arrow” key Keyboard “Right Arrow” key Keyboard “Enter” key... -
Page 32: Control Keys
Equivalent each individual function mentioned above when executing some function in the BIOS Setup menu. Control keys Button Press My Computer key Open the IE key Display the resolution function Enable the A-Menu application. Open the Mail application Enable the Media Player application Enable the application you set using the “Shortcut Setting”... - Page 33 Fun + Increase the LCD display brightness There is no function for these key combination in DOS mode or BIOS Setup. “Num” Key Definition The “Num” key is designated in black color to input on the corresponding numeric keys. Press the “Num” key with the desired numeric key just the way you are using an ordinary numeric keypad.
-
Page 34: Troubleshooting
This chapter describes locating and solving problems that you may encounter while using your computer. General Hardware Problems / Possible Cause and Solution A few common hardware problems and suggested solutions are presented in the table below: A freeze on the system during program operation An error occur during program currently being used. -
Page 35: The System Can Not Shutdown Properly
The system can not shutdown properly Solution: Press and hold the power button for 4~6 seconds until the system shutdown manually. What are the major steps to follow when the system does not turn on properly after it shutdown The system will turn after connecting the AC adapter, this indicates the battery is in low status. - Page 36 Check the device driver is properly installed.
-
Page 37: The Signal Strength Is Excellent But Cannot Connect To The Network
Check that the device driver is properly installed. If the driver is not properly installed, you will find a yellow exclamation mark on the network icon by licking Start > Control Panel > System > Device Manager > Network Adapters. If there is a yellow exclamation mark, please reinstall the device driver with the system software Media. -
Page 38: The Umpc Could Not Resume After It Enter The Standby Mode
Unplug the adapter and take out the battery. Disconnect as well if there are any external devices connected (like CD- ROM or flash drive) Pour out the water that got inside the computer and use a soft cloth to remove the stain to avoid any more damage Use the fan to dry the whole system and any peripheral then send it to the closest service center for experienced personnel to diagnose and repair. -
Page 39: Display Problem
Operating System loses effect – the power saving mode of Microsoft operating system adopt ACPI mode (advanced Configuration and Power Interface), the power scheme will be handle by the OS thus affecting the power saving mode of the system Display problem Problem: Display LED too bright or too dark Solution: Adjust the LED brightness, press the hotkey... - Page 40 end of the screen to execute this function.
-
Page 41: Specification
Intel Processor A100 (600 MHz) and A110 (800 MHz) 400 MHz FSB, 512K L2 Cache Chipsets Core Logic: 945GU + ICH7-U VGA: GMA 950 Integrated Audio: High Definition Audio Memory 1x Micro DIMM Slot, Single Channel, DDR2 400 (Factory Option) Maximum Memory 1GB Maximum (512MB Default) BIOS... - Page 42 LCD Display 4.8" LCD (1024*600) 800*600, 1024*600 Brightness (cd/㎡): 280 nits (type) CMOS Camera 1.3M (Fixed): Rotating Audio Built In Stereo Speaker Internal Digital Microphone Stereo Head Phone (3.5 mm) Keyboard 44 Keys Universal Key Board Build In. (English Version) 36 Keys + 8 Keys Function Key Communication WLAN 802.11 B/G...
- Page 43 Accessory Kit AC-DC Adapter 19V Carry Bag Quick Guide 2 Cells standard Battery Options 1GB Memory Module (512MB Default) 4-Cells Extended Battery Pack Docking Station Regulatory Approval CE, FCC, VCCI, BSMI, CCC Safety UL, TUV, CB Report, CCC Contact Discharge 4KV, Air Discharge FCC ID, CE, TELEC, DGT, SRRC...
Need help?
Do you have a question about the U560 and is the answer not in the manual?
Questions and answers