Table of Contents
Advertisement
Advertisement
Table of Contents

Summary of Contents for Medi Capture MediCap USB100
- Page 1 MediCap ™ USB100 Medical Image Capture Device User Guide USB100-UG-E-070324-MC...
- Page 2 MediCap™ USB100 User Guide Precautions for Use WARNING: To reduce the risk of fire or shock hazard, do not expose this equipment to rain or moisture. CAUTION: To reduce the risk of fire or shock hazard and annoying interference, use the recommended accessories only.
-
Page 3: Important Safety Instructions
MediCap™ USB100 User Guide Important Safety Instructions 1. Read all of these instructions. 2. Keep these instructions. 3. Heed all warnings in these instructions. 4. Follow all of these instructions. 5. Do not misuse this apparatus. 6. Clean only with a dry cloth. 7. -
Page 4: Table Of Contents
Ordering Information ......................5 Technical Support ......................5 Front Panel........................6 Back Panel ........................7 Connections ........................8 Quick Start Guide......................9 Connecting the MediCap USB100 ..................10 Inserting a USB Flash Drive....................10 Capturing Images......................11 Two Types of Memory.....................11 Reviewing Images......................12 Deleting Images ......................12 Using the On-Screen Menus...................12 Saving Images to the USB Flash Drive................13... -
Page 5: Introduction
MediCap™ USB100 User Guide Introduction The MediCap™ USB100 allows you to easily capture digital medical images from virtually any analog medical imaging device that has standard BNC or S-Video output. To get started quickly with your USB100, review the front panel, To get started, connect the USB100 as shown on page 8 and insert back panel, and a MediCapture brand USB flash drive into the front panel. -
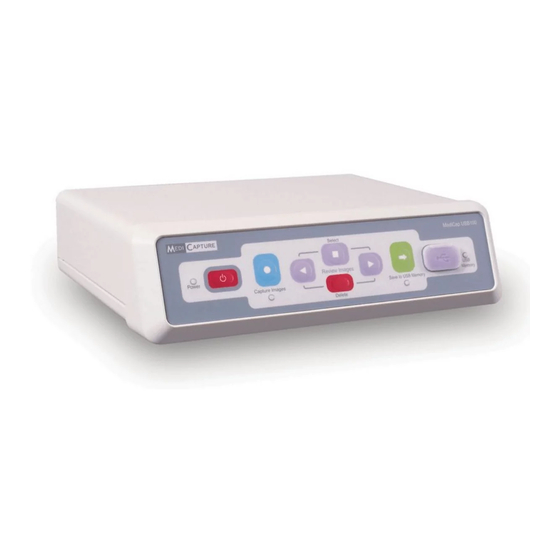
Page 6: Front Panel
MediCap™ USB100 User Guide Front Panel USB100-UG-E-070324-MC... -
Page 7: Back Panel
MediCap™ USB100 User Guide Back Panel USB100-UG-E-070324-MC... -
Page 8: Connections
MediCap™ USB100 User Guide Connections The unit is for exclusive interconnection with IEC60601 certified equipment in the patient environment and IEC60XXX certified equipment outside of the patient environment. A certified power supply cord set must be used with this equipment. The relevant national installation and/or equipment regulations shall be considered. -
Page 9: Quick Start Guide
MediCap™ USB100 User Guide Quick Start Guide Make sure the “Input 1. Connect the USB100 as shown on page 8 and turn it on. Select” and “PAL/NTSC” switches on the back panel are properly 2. Insert the supplied MediCap USB flash drive in the front panel. positioned. -
Page 10: Connecting The Medicap Usb100
Connecting the MediCap USB100 To connect the MediCap USB100, see the diagram on page 8. The MediCap USB100 is very easy to set up. It connects “in-line” between a monitor and a video source (for example, an ultrasound camera, surgical video camera, etc.) 1. -
Page 11: Capturing Images
MediCap™ USB100 User Guide Capturing Images Capturing images with your USB100 is simple. When you see an IMPORTANT: Images image on your monitor that you would like to capture, simply press are captured to “internal the Capture Images button on the front panel. The image will be memory”... -
Page 12: Reviewing Images
Delete button on the front panel. This will delete the image currently displayed on the monitor. Using the On-Screen Menus The MediCap USB100 displays helpful messages and menus on the monitor screen. When a menu is displayed, you can scroll through the menu choices by using the Back and Next buttons on the front panel. -
Page 13: Saving Images To The Usb Flash Drive
MediCap™ USB100 User Guide Saving Images to the USB Flash Drive Each time you press the Capture Images button, a still image is saved to internal memory located inside the USB100 box. When you finish your imaging session, you must press the Save to USB Memory button to copy the images from the internal memory to the USB flash drive memory before you remove the flash drive. -
Page 14: Saving The Same Images Onto Multiple Flash Drives
MediCap™ USB100 User Guide Saving the Same Images onto Multiple Flash Drives After saving images from the internal memory to a flash drive, you can remove the flash drive, insert another flash drive and save the same batch of images to that drive. In this way, you can save the same images to as many drives as you want. -
Page 15: Other Features
MediCap™ USB100 User Guide To install and use the Image Transfer wizard: 1. Insert the flash drive in the USB connector of your computer. It’s a good idea to regularly use the Image 2. On your computer, browse to the flash drive. To do so, Transfer Wizard to double-click on My Computer and locate the flash drive. -
Page 16: Appendix A: System Messages
USB100 and press the Save to USB Memory button again. If the flash drive still does not have sufficient memory, you will need to delete some images from internal memory by using the Review Images and Delete buttons on the MediCap USB100 front panel. USB100-UG-E-070324-MC... - Page 17 MediCap™ USB100 User Guide ERROR! Images NOT saved to USB Insert USB memory and press SAVE TO USB MEMORY button Description: This message will be displayed if you remove the USB flash drive before the images in internal memory have been saved. Action: Insert a MediCapture USB flash drive and press the Save to USB Memory button again.
-
Page 18: Appendix B: Specifications
DICOM, DICOM True Color, JPEG, BMP, PCX color, PCX grayscale Image Size 800 x 600 pixels Kit Contents MediCap USB100, USB flash drive, power cord, BNC video cable, S- video cable, BNC-to-RCA adapter, RCA-to-BNC adapter, User Guide Certifications Medical Equipment with respect to electrical shock, fire and mechanical hazards only in accordance with IEC 60601-1, UL 60601-1, CSA C22.2 No.601.1... -
Page 19: Appendix C: Medicapture Limited Warranty
MediCap™ USB100 User Guide Appendix C: MediCapture Limited Warranty MediCapture Inc. (“MediCapture”) warranties the product(s) listed below to be free of defects in materials and workmanship for a period of one (1) year. Should warranty service be required, the warranty period will be extended by the number of days required to restore normal operation and return the product(s). - Page 20 USB100-UG-E-070324-MC...
Need help?
Do you have a question about the MediCap USB100 and is the answer not in the manual?
Questions and answers
Donde compro un USB 100