Table of Contents
Advertisement
Quick Links
Owner's Manual
• This Owner's Manual provides important information on proper handling, operation, and maintenance. FAILURE TO FOLLOW
THE INSTRUCTIONS, PRECAUTIONS, OR SAFETY TIPS IN THIS MANUAL AUTOMATICALLY VOIDS ALL WARRAN-
TIES, EXPRESS OR IMPLIED.
• FAILURE TO COMPLY WITH THE INSTRUCTIONS, PRECAUTIONS, AND SAFETY TIPS IN THIS MANUAL CAN RE-
SULT IN DEATH, SERIOUS BODILY INJURY AND PROPERTY LOSS OR DAMAGE FROM HAZARDS OF FIRE, EXPLO-
SION, BURN, ASPHYXIATION, CARBON MONOXIDE POISONING, AND / OR ELECTRICAL SHOCK.
• Read and thoroughly understand this Owner's Manual before using the heater in any way, including unpacking, assembling, fuel-
ing, inspecting, lighting, operating, adjusting, turning off, cooling down, moving, or storing the heater.
• Please keep this Manual for the user's need and reference.
• Do not allow anyone who has not read and understood this Owner's Manual to assemble, inspect, light, operate, adjust, turn off,
cool down, refuel, move, or store the heater.
• The requirements of local authorities having jurisdiction shall be followed.
• The installation of the unit shall be in accordance with the regulations of the authorities having jurisdiction.
Contents
1. Special precautions ........................................... 2
2. Names of components ...................................... 6
3. How to use .......................................................... 7
3-1. Preparation for operation ......................... 7
3-2. Operating procedures ............................... 9
3-3. How to connect the Control Device ....... 10
3-4. Use of the Heat Shielding Mat ................. 11
3-5. Operation with Portable Generator ........ 11
IMPORTANT
4. Inspection ......................................................... 11
4-1. Daily inspection ........................................ 12
4-2. Periodic inspection .................................. 13
5. How to replace the Nozzle & Fuse ................. 13
6. How to store the heater ................................... 14
7. Troubleshooting ............................................... 15
8. Specifications .................................................. 16
9. Safety labels ..................................................... 17
WARRANTY POLICY ............................................ 18
Advertisement
Table of Contents

Related Manuals for Shizuoka Seiki Co. VAL6 MPX

Summary of Contents for Shizuoka Seiki Co. VAL6 MPX
-
Page 1: Table Of Contents
Owner’s Manual IMPORTANT • This Owner’s Manual provides important information on proper handling, operation, and maintenance. FAILURE TO FOLLOW THE INSTRUCTIONS, PRECAUTIONS, OR SAFETY TIPS IN THIS MANUAL AUTOMATICALLY VOIDS ALL WARRAN- TIES, EXPRESS OR IMPLIED. • FAILURE TO COMPLY WITH THE INSTRUCTIONS, PRECAUTIONS, AND SAFETY TIPS IN THIS MANUAL CAN RE- SULT IN DEATH, SERIOUS BODILY INJURY AND PROPERTY LOSS OR DAMAGE FROM HAZARDS OF FIRE, EXPLO- SION, BURN, ASPHYXIATION, CARBON MONOXIDE POISONING, AND / OR ELECTRICAL SHOCK. • Read and thoroughly understand this Owner’s Manual before using the heater in any way, including unpacking, assembling, fuel- ing, inspecting, lighting, operating, adjusting, turning off, cooling down, moving, or storing the heater. • Please keep this Manual for the user’s need and reference. • Do not allow anyone who has not read and understood this Owner’s Manual to assemble, inspect, light, operate, adjust, turn off, cool down, refuel, move, or store the heater. • The requirements of local authorities having jurisdiction shall be followed. • The installation of the unit shall be in accordance with the regulations of the authorities having jurisdiction. Contents 1. Special precautions ........... 2 4. Inspection ............11 2. Names of components ........6 4-1. Daily inspection ........12 3. -
Page 2: Special Precautions
Thank you for having bought our Infrared Oil Heater “VAL6”. Special precautions This Manual explains necessary precautions that must be strictly followed for proper and safe op- ◆ eration. Danger, Warning, and Caution. Please read Precautions are divided into 3 categories and understand well the details and meanings of each category. means that failure to follow the given precaution (s) “DANGER” may lead DANGER to death, serious injury and/or major fire. means that failure to follow the given precaution (s) “WARNING”... - Page 3 To Help Ensure Safe Operation, Comply with the Following Precautions * It is important that the safety precautions listed below are understood and followed prior to first operation of the heater. These precautions must also be followed thereafter. DANGER Never use gasoline, for any purpose, for example, for cleaning or as fuel, in Use of gasoline connection with, or around, operation or storage of the heater, as a fire and/or prohibited...
- Page 4 To Help Ensure Safe Operation, Comply with the Following Precautions CAUTION To avoid a fire, please keep all flammables more than 2.5m (8.2ft.) away from Keep flammable ma- the front of the radiation disk, and more than 2m (6.56ft.) away from all sides terials away from the (left/right and top/rear) of the heater.
- Page 5 To Help Ensure Safe Operation, Comply with the Following Precautions CAUTION When cleaning the heater, use gloves, to avoid any injury to hand or fingers. Use gloves Use of gloves while operating and moving the heater is also recommended. Make sure the flame After shutting off the heater, make sure that the flame is extinguished and the is extinguished and power disconnected before leaving the heater unattended.
-
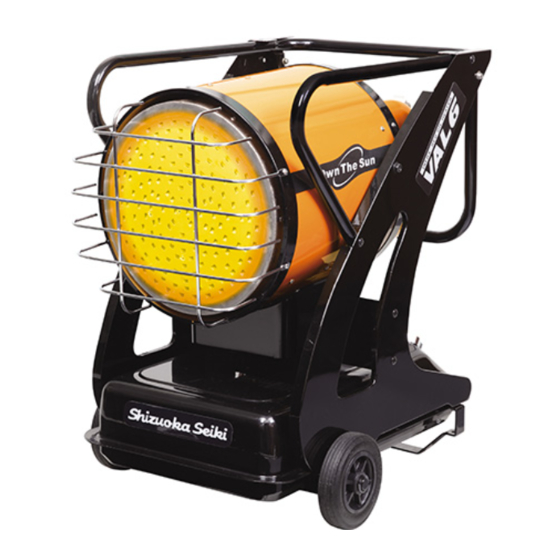
Page 6: Names Of Components
Names of components 677.6 521.8 q Radiation disk i Fuel Gauge w Casing o Fuel Tank Cap e Handle !0 Suction Pipe r Guard !1 Return Line t Burner Cover !2 Filter Element y Blower !3 Burner Section u Fuel Tank !4 Tip-over Switch ◆... -
Page 7: How To Use
◆ Switch Section @3 Operating Switch This ignites or extinguishes the flame. (Refer to pages 9.) @4 Change-over Switch This chages over combustion in two step. @5 Operating Lamp This is lit while (the heater is) operating and cooling down. @6 Misfire Lamp This is lit when the flame is extinguished irregularly. @7 External Thermostat Connector When the flame is extinguished, turn “OFF” the operating switch. Then turn “ON” the operating switch again after the cause of misfire is solved. Description of Safety Devices Automatically extinguishes the flame when motion or an impact is detected during operation. - Page 8 • Please refuel only while the heater is turned off and completely extinguished. • Use only the electric power (voltage and frequency) specified on the model plate of the heater to operate the heater. Using electrical power different from the specifications may result in fire, electrical shock, and/or damage. • Please confirm the ground/earth cable is properly connected, to prevent electrical shock. CAUTION • When disconnecting the electric power cord, be sure to always pull the plug out by it- self. Do not pull out the plug by pulling on the power cord. Also, do not allow or cause excessive force to be exerted on the cord at any time to avoid damaging it and causing a fire or shock hazard. The heater should not be operated with the power cord in a taut or tightened position to further avoid damage to the cord, accidental unplugging of the electricity, and fire and/or shock. ■ Refueling Observations • Please use “kerosene” or “Fuel-Oil no heavier than No.2 (Diesel)” and do not use poor quality or foul fuel, to help avoid ignition, operating, and other problems. Remove the fuel cap and insert a handy Wipe off any fuel that has spilled onto the suction pump into the fuel tank.
-
Page 9: Operating Procedures
Make sure that the operating switch is Extension Cord Size Requirement “OFF”, then plug the heater’s power • 6 to 10 feet (1.8 to 3 meters) long, use 18 plug into approved, grounded, three-wire AWG (0.75 mm ) rated cord extension cord. -
Page 10: How To Connect The Control Device
■ Shut-Down Operation • After the operation is shut down, please make sure that the flame is completely extin- CAUTION guished before leaving the heater unattended or moving or storing it. Observations • Before you disconnect the power plug from the AC outlet, please make sure that the fan motor is stopped. • Never disconnect the power plug while the heater is operating (cooling operation), it will cause nozzle to be clogged. Turn “OFF” the operating switch, and the Operating Switch “OFF” heater flame will be extinguished, then the cooling operation will also automatically stop after about three (3) minutes. ●... -
Page 11: Use Of The Heat Shielding Mat
3-4. Use of the Heat Shielding Mat To avoid unexpected fire or trouble, NEVER Heat shielding mat use the heater on combustible flooring un- less the heat shielding mat, which is avail- able as an option, is used. 3-5. Operation with Portable Generator • Before operating the heater from a portable generator, please confirm that the genera- tor has been properly connected to the ground earth. To operate the generator without WARNING... -
Page 12: Daily Inspection
4-1. Daily inspection ■ Inspection of the filter and drainage of water from the fuel tank Checking the filter element Pull up Remove the suction pipe from the fuel tank. Filter Suction Pipe If the filter is dirty, replace it with a new one. Return the suction pipe to the fuel tank and Pull off firmly secure. -
Page 13: Periodic Inspection
■ Inspection and cleaning of the flame monitor Observations • When removing the flame monitor, hold it by its main assembly; do not pull out the cord. Remove the burner cover and pull out the flame monitor, and check whether or not its lens is dirty/foul. Pull out If the lens is dirty/foul, clean the surface of Flame Monitor the lens with a soft cotton swab or cloth until it is clear. -
Page 14: How To Store The Heater
■ Replacing a nozzle Unscrew two screws of the burner cover Put the burner unit back with three nuts re- and take the burner cover off. moved. Disconnect the red wire of overheat protec- Put the red wire back. tion at the back of the burner base. Put the burner cover back with two screws removed. -
Page 15: Troubleshooting
Troubleshooting ■ When you face problems with your heater, please refer to this check- list before consulting with your dealer. In case satisfactory results do not result by referring to the table, or you have problems not described in this table, please contact your dealer. While consulting with him, please describe the problem you have, together with model name and serial number of your heater. (For finding the heater’s serial number, please refer to page 17.) Phenomenon Possible Cause Remedy Power cord is not connected with an Please connect the power cord with an AC outlet, and The heater does not start. -
Page 16: Specifications
Specifications VAL6MPX5 When igniting : 110 W Model Type Power Consumption Type Radiated / Direct-fired When burning : 145 W High intensity discharge Ignition System Electric Fuse High : 59.4 dB Kerosene or Fuel-Oil no heavier Fuel Operating Noise Level than No.2 (Diesel) Low : 57.8 dB High : 0.48GAL/h , 1.55kg/h... -
Page 17: Safety Labels
Safety Labels ● Safety labels provide important information for safe use of the heater. So, please do not remove or soil them. ● If any of the labels is unreadable or removed, please ask your dealer for a new one and replace with the new one. Caution Label Danger Label Caution on Refueling Label / Maintenance Label... -
Page 18: Warranty Policy
VAL6 Series Heaters by SHIZUOKA SEIKI WARRANTY POLICY VAL6 Infrared Heater series SHIZUOKA SEIKI warrants that its heaters and component parts will be free from defects in material and work- manship for a period of 24 months from date of purchase, when properly installed, operated, and maintained in accordance with the installation and Maintenance Instructions, safety guides and labels contained with each unit. If any component proves defective in either material or workmanship during the limited warranty period, Shizuoka Seiki, at its option, repair the defective part or equipment, or replace it with a new part or equipment. Proof of purchase and warranty qualification must be established at time of return. *A copy of the bill of sale must be provided at time of return. - Page 19 Memo...
- Page 20 USER REGISTRATION Please enter the following temporary ID & Password and complete the user registration form on our website. By completing your registration, you will obtain your own ID & Password. This allows you to download the owner's manual and/or parts list from our website.
Need help?
Do you have a question about the VAL6 MPX and is the answer not in the manual?
Questions and answers