Table of Contents
Advertisement
Advertisement
Table of Contents

Subscribe to Our Youtube Channel
Related Manuals for Promag TR510

Summary of Contents for Promag TR510
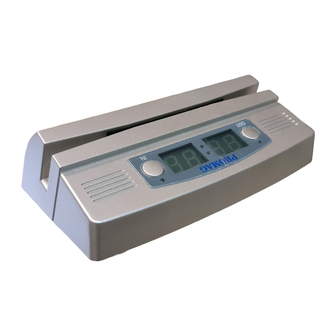
- Page 1 TR510 EXPRESS Time Recorder V1.5-0...
-
Page 2: Table Of Contents
The Normal mode is entered by powering the TR510 up while not pressing the IN button. Switching the TR510 on while holding the IN button or both IN and OUT buttons down forces the unit into the FMM. The FMM mode of operation cannot be exited other than by switching the TR510 off and back on again. -
Page 3: Installing The Tr510
(see Section 4). PC interface The TR510 supports two different interfaces: RS232 for single-terminal communications, and RS485 for multi-terminal communications. Only one TR510 can be attached to the PC’s serial port using the RS232 interface. Up to units interconnected using... - Page 4 It is recommended that you keep the length of each “bus stem” (i.e. the cable that is used to attach a certain TR510 to the bus) as short as possible, ideally under 10 cm (see the drawing below).
- Page 5 For multi-terminal RS485 communications, you’ll need to assign a unique (and non-zero!) machine number to each Terminal on the network. Assigning machine numbers The TR510 offers a fast and convenient way of assigning machine numbers in the range from 0 to 10. To assign a new machine number: •...
- Page 6 OUT button). Bell relay The TR510 features a built-in bell relay. The relay is capable of controlling a low-power external bell. There are two modes for bell schedule, one is Everyday mode another is Week mode. Only one table in Everyday mode, a daily bell schedule of up to 32 different bell times can be defined in Everyday mode.
- Page 7 TR510 User’s Manual pre-scheduled event table entry: ‘time’ field and corresponding event mode ‘IN/OUT’ field. When time up to the scheduled time, the TR510 will automatically switch event selection at IN or OUT by your setting in pre-scheduled event table.
-
Page 8: Using The Tr510
TR510 will go back to scheduled event (IN or OUT) when finish the card reading. If user does not has his ID-card to be read after press a button, TR510 will automatically go back to scheduled event after 5 seconds Time-out. - Page 9 TR510 User’s Manual database in this situation. Communications with the TR510 from the PC side is still possible, however. This gives you an opportunity to access the TR510 online and attempt to correct the problem.
-
Page 10: Communications Protocol
The TR510 communications protocol is based on the GNET protocol specification. Communications parameters are 19200-8-N-1. Communications between the TR510 and the PC takes place in the form of commands sent by the PC and replies from the TR510. Commands and replies are packets of data. - Page 11 TR510 User’s Manual Table below lists all possible error codes: Illegal (invalid) command (command code or data is wrong) Record number is out of range (requested record doesn’t exist) Command failed (hardware problem or invalid internal data) Log (data) memory is full (this message reply in Extended mode) Access has been denied (terminal is not in Extended mode) Summarized below are all supported commands.
- Page 12 Self-test takes place on the next power-up, not immediately. Note 2. The TR510 have 3 group registers. Group-1 is for accessing registers for “LED mode”, “bell duration”, “32 entries of bell table times field (Everyday mode)”, “32 entries of bell table enable/disable field (Everyday mode)”, “event lock mode”, “Relay function”, “event table times field (32 entries)”, “event table...
- Page 13 NN is a machine (terminal) number in Hex form (00H-FFH), 00H is a “universal” number (see below for details). ‘D’ is a special command. It is used to select a particular TR510 terminal. All terminals power up in a “deselected” state. Each terminal ignores all incoming commands until it receives the D-command whose machine number is either equal to the machine number of this terminal, or 00.
- Page 14 TR510 User’s Manual Since 00 is a universal machine number, it works with any terminal. Use it only when you have a single terminal connected to the host. Universal machine number also comes handy during initial terminal setup (to assign a unique machine number to the terminal prior to placing it on a multi-terminal network).
- Page 15 SYYYYMMDDhhmmss Reply YYYY-year, MM- month, DD-date, hh-hour, mm-minutes, ss- seconds This command is used to set the TR510’s internal clock. Date/time supplied must be valid. Incorrect data (like 31 of February) will be rejected (error 04). Get date/time (‘T’, 54H)
- Page 16 Note: It will take 25 seconds to restore all factory defaults when turn power- up at first time for TR510 after received ‘R’ command, in the meanwhile LED will display “INIT”; please wait for this initialization procedure to complete: Set group-1 registers (‘C’, 43H)
- Page 17 RR- register number (group 2) in Hex form (00…FFH), reg_data is the data for the register to be set This command is used to set one of the TR510 “group-2 registers”. Registers are actually functioning parameters (Settings) with respect to access bell table ‘time’...
- Page 18 RR- register number (group 3) in Hex form (00…FFH), reg_data is the data for the register to be set This command is used to set one of the TR510 “group-3 registers”. Registers are actually functioning parameters (Settings) with respect to access bell table ‘enable/disable’...
- Page 19 TR510 will wait 3 seconds for receiving command ‘E’, if ‘E’ command has received, TR510 erases database then unlock itself, user’s card can be read again; or until 3 seconds Time-out TR510 still has not received ‘E’ command, however it will unlock itself but does not erase database.
- Page 20 (i.e. which button was pressed), and the date and time of record creation. The TR510 verifies all database records before sending them out to the PC. This is done because the FLASH memory may actually contain a garbage data.
- Page 21 Reply This command is never replied to This command is used to force the TR510 into a special Test mode. Self-test takes place on the next power-up, not immediately. Details of TR510’s operation in the Test mode are provided in Section 6. Note, that Test mode destroys database memory contents in such a way that the data cannot be recovered even with the M-command.
- Page 22 MM- login status (00: logged out extended-mode, 01: logged in extended- mode), cc-checksum This command gets the current login status of TR510. Use this command to check if TR510 is in Extended mode or not before use other extended commands.
- Page 23 TR510 will send back error code “8”. Host should acknowledge that the captured record has received successfully by command ‘a’ (61H), or requires TR510 to send the captured record again by command ‘r’ (72H) when data receiving failure. Returned data string contains the record number, ID-code of the ID-card that was used to create this record, event code (i.e.
- Page 24 However, host must send this command to TR510 to acknowledge the data has received successfully. After send captured data to host, TR510 will wait host to send this command for 5 seconds, during this 5 seconds TR510 will reject any card reading. Therefore, host shall acknowledge this command as soon as possible.
- Page 25 TR510 User’s Manual This command is used to display 4 digits message on TR510’s LED display for a duration time. The message code and its meaning is defined by user, only numeric can be defined, do not define alphabet. The code range is from 0000 to 9999 in string type.
- Page 26 TR510 User’s Manual Possible error codes: 07 Command Reply NN- punch times in Hex form (00H-0AH) This command is used to retrieve the device’s punch times. Punch times provide a way to use device as stand alone work when device was lost control from network.
-
Page 27: Registers
4. Registers The TR510 feature 3 groups of programmable “registers”. Basically, registers are the TR510’s functioning parameters (Settings). Group-1 registers can be written to using the C-command, and read from using the B-command; Group-2 registers can be written to using the P-command, and read from using the Q-command;... - Page 28 MM- display mode (00: wall-mount operation, 01: desktop operation), cc- checksum This group 1 register is used to set the LED display mode. Because TR510 can be used both as a wall-mount and as a desktop device, the LED data must be displayed in either orientation.
- Page 29 ADDcc DD- Bell duration in seconds, in Hex format (00H-FFH), cc- checksum The TR510 features a relay that can be used for external bell control. Bell schedule can be programmed using bell table group 1 registers (02H-21H, 22H- 41H). This register specifies the number of seconds the bell will be activated for each time it is enabled.
- Page 30 RR- register number (group 1) in the Hex form (22H-41H), SS- state (00: disabled, 01: enabled), cc- checksum The TR510 features a relay that can be used for external bell control. In Everyday mode only one bell table can be set for everyday use. Up to 32 different bell times can be specified for which the bell will be activated.
- Page 31 EE- event selection mode (00: free selection by the User, 01: fix to OUT, 02: fix to IN, 03: scheduled selection), cc- checksum This setting allow User to set the TR510 at one of 3 event selection modes: set the event at free mode (IN or OUT by user selection), set event selection mode at fix to IN only or OUT only, or set at scheduled selection mode.
- Page 32 RR- register number (group 1) in Hex form (44H-63H), hh- hour, mm- minutes, cc- checksum The TR510 features an event schedule table. Up to 32 different scheduled times can be specified for which the event selection will be activated. Each event table entry consists of two fields: ‘time’...
- Page 33 RR- register number (group 1) in the Hex form 84H, MM- bell table mode (00: everyday mode, 01: 01week mode), cc-checksum This group-1 register is used to set the bell table mode. TR510 have two bell table modes: Everyday mode and Week mode, Everyday mode has only one bell table which have 32 different bell times can be specified for everyday to activate the bell.
- Page 34 87H will not be changed. If set the date of start-time behind end-time TR510 will consider the date of start-time as next year date. Note: February 29 will be denied to set as start-time or end-time by TR510. Daylight Saving, enable/disable (group-1 register 87H)
- Page 35 Prefix String is set, the TR510 will compare each User Card with this String and reject the Cards that do not match, for example: If Prefix to match is set to “123” then the TR510 will accept Cards such as “1234”, “123679”, “123”. The terminal will reject the Cards with codes like “14377”...
- Page 36 1), starting from which the portion of an ID-code will be extracted. The valid range for this setting is from 1 to 37. The TR510 will reject any User Card with the ID-code with the number of characters in it smaller than current From Character value.
- Page 37 ID-Card code. This way you can adjust the format of the data generated by the TR510 to the requirements of some specific PC software. You can also use this Setting to “hide” a certain portion of the ID-Cards code.
- Page 38 RR- register number (group-2) in Hex form (00-DFH), hh- hour, mm-minutes, cc- checksum The TR510 features a relay that can be used for external bell control. Up to 7x32 different bell times can be specified for one week to activate the bell.
- Page 39 TR510 User’s Manual The TR510 features a relay that can be used for external bell control. Up to 7x32 different bell times can be specified for one week to activate the bell. These 7x32 bell times are programmed into 7 tables from Sunday to Saturday,...
-
Page 40: Firmware Management Mode
FMM itself has two sub-modes of operation: FMM/download mode and FMM/check mode. FMM/download is entered by keeping the IN button pressed while the TR510 is powering up. FMM/check mode is entered by holding both IN and OUT buttons pressed while the TR510 is powering up. - Page 41 “FLLD” (FLASH Load): • When receiving the file, the TR510 will blink its IN LED (the LED is on while the TR510 is receiving or expecting to receive a block of data from the PC; the LED is off while the TR510 is programming the data received into its internal FLASH memory) •...
- Page 42 Finally, there is a timeout error that occurs when you start the download but PC doesn’t send any data (or the TR510 cannot receive the data sent by the PC). This happens when you either set communications parameters of the...
-
Page 43: Test Mode
6. Test mode The TR510 provides a hardware Test mode that can be initiated by issuing a Z-command (see Section 3). Warning! Hardware test destroys the database contents (not just deletes it logically), so the data cannot be recovered even using the M- command! The test mode also sets a so-called Reset flag: the TR510 will be completely reinitialized on the next power-up after the test. - Page 44 This indicates that the test sequence has been completed successfully. You can still continue testing the buttons and the reader at this point. The TR510 will behave as if in the Normal Mode of operation, but no records will be added to...
-
Page 45: Appendix A. Possible Errors
This Section lists all possible error messages that may be generated during the TR510’s normal operation. The table below does not apply to the Test and FMM modes of the TR510 (see Sections 5 and 6 respectively for complete details on errors generated in these modes). -
Page 46: Appendix C. Specifications
TR510 User’s Manual Appendix C. Specifications Display: 4 x 7-segment LED Magnetic card reader: ISO Track 2, 75 bpi Barcode reader: Visible or IR, numerical Code39 RFID card reader: 125KHz, ASK, 64bits, Manchester encoding RFID reading range, ISO card-sized tag...
Need help?
Do you have a question about the TR510 and is the answer not in the manual?
Questions and answers