Table of Contents
Advertisement
Advertisement
Table of Contents

Related Manuals for Valor Fitness BD-7


Summary of Contents for Valor Fitness BD-7
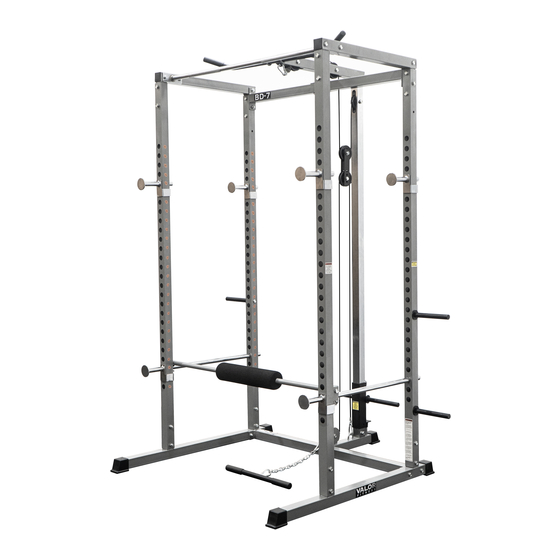
- Page 1 Power Rack with Lat Pull BD-7 Owner's Manual VA09062015...
- Page 2 SAFETY & PRECAUTIONS IMPORTANT: READ ALL PRECAUTIONS CAREFULLY BEFORE USING THIS PRODUCT. RETAIN OWNER'S MANUAL FOR FUTURE REFERENCE. Note : This item is shipped in an unusual shaped box. Please hold on to box until you feel there's no need to return product. Place the manual and warranty information in a safe secure place in your home or office.
-
Page 3: Parts List
PARTS LIST BD-7 Power Rack with Lat Pull • Attached to Header Card Description Code Q'ty M10 x 70 bolt 10300059 M10 x 65 bolt 10300058 M10 x 45 bolt 10300053 M10 x 20 bolt 10300048 M10 nut 10300167 10 washer... - Page 4 PARTS LIST BD-7 Power Rack with Lat Pull • Attached to the Frame Description Code Q'ty 26-50-6 buffer washer 10400184 25 spring clip 10400005 25 handle 10400088 6050 tube bushing 10400054 50 foot cover 10400045 50 tube plug 10400024 25 tube plug...
- Page 5 PARTS LIST BD-7 Power Rack with Lat Pull • Packed in the box Lat pull shart Front upright frame 26 Bottom base frame 11660100 11660010 11660020 qty 1 qty 2 qty 2 Rear upright frame 11660180 qty 2 Upper cross frame...
- Page 6 Valor Fitness BD-7 Assembly Instructions Note: The following step by step is a guide to walk you through what may be the best way to proceed. The Assembly Instructions will guide you through the critical parts to assemble in sequence but may also leave out some items that can be assembled by visual.
- Page 7 Valor Fitness BD-7 Assembly Instructions Step #2: Uprights Locate the four Upright Frames ( #23 Front Upright Frames, qty 2 ) and ( #24 Rear Upright Frames, qty 2 ). Attach the two Upper cross beams #27 on both side.
- Page 8 Valor Fitness BD-7 Assembly Instructions Step #3 : Top Frame Attach the two top cross beams to secure both sides. This will be the Rear Cross Beam ( #29) and the front Chrome Pull Up Bar (#28). Attach the four Plate Storages (#41) to the two Rear Upright Frames (#24).
- Page 9 Valor Fitness BD-7 Assembly Instructions Step #4: Lat Pull Section Attach the Lower Beam #34 to the lower Rear Cross Beam #29. Attach part #25 Chrome Lat Pull Shaft to the part #34. Slide the Plate Carriage #35 over the top of the Chrome Beam and lower it to the bottom.
- Page 10 Valor Fitness BD-7 Assembly Instructions Step #5: Pulley and Cables Start with the top cable frist. Once you have this in place, attach the Pulley Brace #36 in place on the top cable. Gravity will hold the brace in place while you thread the lower cable.
- Page 11 Valor Fitness BD-7 Assembly Instructions Cable Assembly Start Stop Stop Start PLEASE DO NOT RETURN PRODUCT TO STORE. CALL OUR CUSTOMER SERVICE DEPARTMENT FIRST AT (727) 895-9525. www.ValorFitness.com 3450 Morris Street North, St. Petersburg, Florida 33713 Phone: (727) 895-9525 Fax: (727) 895-9502...
- Page 12 Valor Fitness BD-7 Assembly Instructions Step #6: Safety Bar and other PLEASE DO NOT RETURN PRODUCT TO STORE. CALL OUR CUSTOMER SERVICE DEPARTMENT FIRST AT (727) 895-9525. www.ValorFitness.com Phone: (727) 895-9525 Fax: (727) 895-9502 E-mail: info@ValorFitness.com...
- Page 13 Valor Fitness BD-7 Assembly Instructions From this point forward, if there are any plastic parts that were not attached at the factory, then locate the part on the diagram and where it will be placed on the unit. Please call 727-895-9525 if you have any questions or if you come across a difficult section during the assembly process.
Need help?
Do you have a question about the BD-7 and is the answer not in the manual?
Questions and answers