Table of Contents
Advertisement
Quick Links
Advertisement
Table of Contents

Related Manuals for iSymphony V1BLUE


Summary of Contents for iSymphony V1BLUE
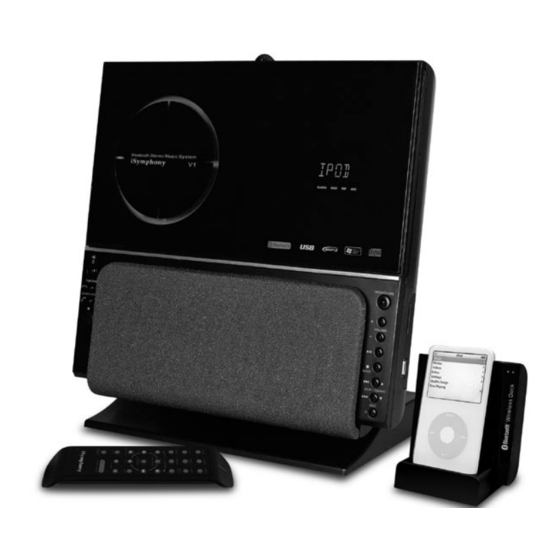
- Page 1 V1BLUE Bluetooth Stereo Music System...
-
Page 2: Precautions For Unit
17. OVERLOADING - Do not overload wall outlets, extension cords, or integral convenience receptacles as this can result IMPORTANT SAFETY INSTRUCTIONS in a risk of fire or electric shock. 18. OBJECT AND LIQUID ENTRY - Never push objects of any kind into this product through openings as they may touch TO PREVENT FIRE OR SHOCK HAZARD, DO NOT USE THIS PLUG WITH AN EXTENSION CORD, dangerous voltage points or short-out parts that could result in a fire or electric shock. -
Page 3: Table Of Contents
Thank you for purchasing the iSymphony V1 CD Micro Music System with TUNER and USB/SD recorder. residue on the furniture. To prevent any damage to your furniture we strongly recommend that you The V1 is the world’s first compact CD audio system, a card slot for SD, MMC cards and a convenient... -
Page 4: Connections
BASIC SYSTEM SETUP 4) Select the correct iPod dock adapter When connecting an iPod to this iPod Dock, please ensure that the correct adaptor plate Follow these 7 steps to complete basic system setup. is used. FAILURE TO DO SO MAY RESULT IN DAMAGE TO THE iPod. This wireless iPod Dock comes with 4 removable dock adapters to 1) Set up and connect AM antenna, connect and extend FM antenna ensure the iPod fits properly. -
Page 5: Location Of Controls
LOCATION OF CONTROLS LOCATION OF CONTROLS FRONT AND LEFT OF MAIN UNIT REAR AND RIGHT OF MAIN UNIT 14 15 AUX IN PHONES 19. AC Power Socket 22. SD/MMC CARD Slot 20. AM Antenna Socket 23. USB Slot 21. FM Antenna Socket 24. -
Page 6: Remote Control
REMOTE CONTROL OPERATING INSTRUCTIONS Make sure that you have fully extended the FM antenna wire and connected the AM antenna. Make sure that you have installed batteries in the remote control handset. Make sure that the system is connected to an AC outlet that is always powered. Do not connect the system to an AC outlet controlled by a wall switch. -
Page 7: Audio Controls
AUDIO CONTROLS COMPATIBLE STORAGE DEVICES Volume Controls To increase or decrease the system volume press the VOLUME + or This system supports playback of music from CD discs as well as USB and flash memory card devices. VOLUME – buttons on the remote control or VOLUME Control on the front Supported Memory Card Formats panel. -
Page 8: Loading And Removing A Disc
LOADING AND REMOVING A DISC 1) Press the OPEN/CLOSE button on front panel to open the CD door. 2) Load a disc into the player with the printed label facing out. 3) To remove a disc, press the OPEN/CLOSE button and remove the disc from the tray only when it has fully opened. -
Page 9: Inserting And Removing Flash Devices
INSERTING AND REMOVING FLASH DEVICES CD OPERATION Normal Playback Flash devices are inserted into compatible openings on the right of the unit. Press the FUNCTION button to select CD function. Press the OPEN/CLOSE button on front panel to open the CD door. SD/MMC Load a disc into the player with the printed label facing out. - Page 10 Repeat Playback (On Remote Control Only) Press the PLAY/PAUSE button to begin playback. The Repeat function in this system allows you to continuously repeat a single track, or the entire disc. The Repeat function can be activated during playback or while the player is stopped. One Track Repeat Select the track to be repeated and begin playback.
- Page 11 6. Press the PLAY/PAUSE button to begin programmed playback . INTRO Scan Play back (On Remote Control Only) This feature allows you to play just the first 10 seconds of each track on the disc. This may be useful when The PRG indicator remains 5 seconds on display.
- Page 12 PLAYING MP3 & WMA CDS Press the PLAY/PAUSE button to start playback. Most of the normal CD operations described in this manual also apply to MP3/WMA CDs. However there are a few differences in MP3/WMA CD playback functions, and these are described on the following pages.
- Page 13 MP3/WMA CD Intro Scan and Random Playback Modes (On Remote Control Only) MP3/WMA CD Programmed Playback These functions operate the same way for MP3/WMA CDs as they do for normal CDs. When programming the tracks on an MP3/WMA CD you must also select the Directory Number of the tracks being programmed.
-
Page 14: Memory Card Operation
MEMORY CARD OPERATION USB OPERATION Playing MP3/WMA Audio Files Stored On SD/MMC Memory Cards Playing MP3/WMA Audio Files On Portable USB Storage Device Note: The memory card slot on this system enables playback of songs only in MP3 and WMA formats Note: The USB port on this system enables playback of songs only in MP3 and WMA formats (without (without Digital Rights Management (DRM)). -
Page 15: Bluetooth Operation
Getting Started There Bluetooth connectivity of your V1 enables it to share audio with many Bluetooth capable devices including the iSymphony bluetooth Wireless Dock, mobile phones, Bluetooth Controls and Messages personal computers and PDAs. V1 supports the following Bluetooth profile and functionality:... - Page 16 Please refer to page for details. Headphones are Please refer to the phone user manual for details. You will recognize the iSymphony main unit by its Bluetooth receiving devices, as is V1, and connections between two receivers are not permitted under Bluetooth name “iSymphony V1”.
-
Page 17: Wireless Ipod Dock Operation
Set the connecting device to search for Bluetooth devices and follow the instructions on the device’s other equipment. To “DC IN screen. Please refer to the device user manual for details. You will recognize the iSymphony main unit When the iPod dock is not going to be 10V” jack To AC by its Bluetooth name “iSymphony V1”. -
Page 18: Speakerphone Operation
iPod Dock Operation Dock Adaptor Compatibility Ensure the wireless iPod dock is paired and connected to the main unit. Select iPod/BLUETOOTH mode on the main unit using the FUNCTION button. Press PLAY on the iPod, main unit or remote. The music playback will start. Controlling Music Playback The AVRCP Remote Control connection allows you to control all of the iPod’s functions from the remote 30GB... -
Page 19: Resuming Connections
Using the dock with other BT receivers: To transfer back, press and hold ANSWER again. Stereo support only: Display shows TRANSFER - Headphone stereo To hold the incoming call, press the ANSWER button once. - Other stereo device Display shows HOLD - PC To end the call, press FUNCTION/ (red hang up symbol), on the main unit or on the remote or... -
Page 20: Radio Operation
RADIO OPERATION Hints For better Reception Press the FUNCTION button to select the Tuner function. The FM lead wire antenna on the back panel should be extended to its full length. You may also AM or FM frequency will appear on the display. have to vary the direction of this antenna until you find the position that provides the best reception. -
Page 21: Other Functions
OTHER FUNCTIONS Presetting Stations In The Tuner Memory You can store up to 45 of your favorite stations (30 FM / 15 AM) in the tuner memory for easy recall at any Setting the Clock (On Remote Control Only) time. When the AC power is connected, “AM 12:00”... -
Page 22: Connecting External Devices
CONNECTING EXTERNAL DEVICES SLEEP Timer (On Remote Control Only) This system includes a programmable Sleep Timer that allows you to fall asleep to between 10 and 90 AUXILIARY INPUT JACK minutes of music and then shuts the power ‘off’ automatically. To set up the sleep timer: This system includes an AUX IN Jack. -
Page 23: Wall Mounting
CONNECTING EXTERNAL DEVICES WALL MOUNTING This unit is designed to be optionally wall mounted. Wireless iPod Dock External Connections PARTS (included) This wireless iPod dock includes a LINE OUT jack for connection to external equipment, such as a TV or external amplifier and an S-VIDEO OUT jack for connection to a TV that support an S-VIDEO input. -
Page 24: Care And Maintenance
CARE OF THE CABINET iSymphony will pay for the return shipping charges for products that are under warranty and received in If the cabinet becomes dusty wipe it with a soft dry dust cloth. Do not use any wax, polish sprays , or this manner. -
Page 25: Technical Specifications
TECHNICAL SPECIFICATIONS 1. General Power requirements 120V AC, 60 Hz Power consumption 110W (operation) 23W (standby) Dimensions of main unit 300 (W) x 320 (H) x 170 (D) mm Weight of main unit 5.25 Kg 2. Amplifier section Power Output 30 Watt 3. - Page 26 Rev.1.1...
Need help?
Do you have a question about the V1BLUE and is the answer not in the manual?
Questions and answers