Table of Contents
Advertisement
www.jiyiuav.com
USER MANUAL
Ver. 1.00
Last updated: May 7. 2015
Thank you for choosing P2 Pro flight controller, hope you will have a
good flight with P2 Pro. We strongly recommend you read this
manual carefully before you install P2 Pro flight controller. The
following instructions will help you to make your P2 Pro flight
controller working perfectly.
Note: this manual shall be used together with the P2 Pro assistant
software, if there is any discrepancy between this manual guide
and the assistant software, the assistant software shall prevail.
If you meet any difficulty during the usage, please contact with JIYI
Robotic Co. Ltd. at support@jiyiuav.com
Advertisement
Table of Contents

Summary of Contents for Jiyiuav P2Pro
- Page 1 Note: this manual shall be used together with the P2 Pro assistant software, if there is any discrepancy between this manual guide and the assistant software, the assistant software shall prevail. If you meet any difficulty during the usage, please contact with JIYI Robotic Co. Ltd. at support@jiyiuav.com...
-
Page 2: Table Of Contents
Content: 1. Disclaimer..................3 2. Technical Terms and Abbreviations..........3 3. Packing List..................4 4. Installation Guide................4 4.1 Frame Type................4 4.2 Flight Controller Installation........... 5 4.3 GPS Installation................5 5. Wire Connect Guide............... 6 5.1 Connection................6 5.2 Wiring Diagram................7 6. -
Page 3: Disclaimer
1. Disclaimer First of all, thank you for using JIYI product. This is not a toy, please read the manual carefully before you use this product. Upon reading this, you’re deemed to agree with the disclaimer, this products is not suitable for people aged below 18 years old. -
Page 4: Technical Terms And Abbreviations
2. Technical Terms and Abbreviations Channel Fail Safe (Loss Control Protection) JIYI JIYI Robotics Co. Ltd. 3. Packing List JIYI P2 Pro Flight controller x 1 GPS/ Compass Module x 1 GPS Stand x 1 LED/USB Module x1 POW Module x1... -
Page 5: Flight Controller Installation
Hexa-rotor Y type and IY type d.) Octo-rotor + type, X type and X8 type 4.2 Flight Controller Installation In order to get the excellent flying experience, Install the P2 Pro flight controller to the weight center of the aircraft, ensure the flight controller is install horizontally on flat surface, the arrow on controller should points to the nose of aircraft. -
Page 6: Wire Connect Guide
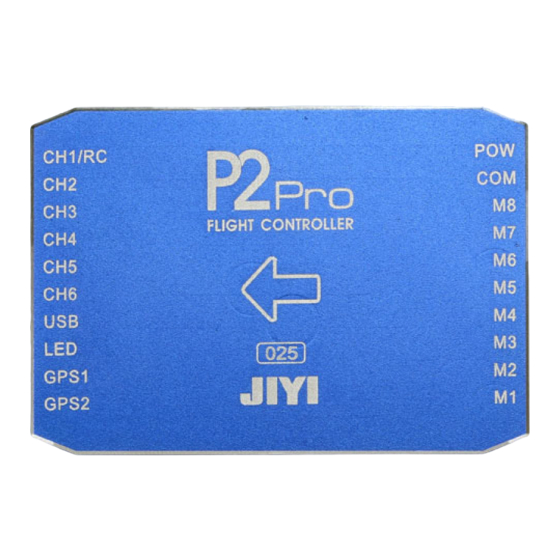
5. Wire Connect Guide 5.1 Connection P2 Pro flight controller connect ports definition as below: Aileron control Connect to POW Module Elevation control Connect to OSD and datalink Throttle control Connect to no 8 ESC Rudder control Connect to no 7 ESC... -
Page 7: Wiring Diagram
5.2 Wiring Diagram P2 Pro flight controller wiring as below: * The arrow should points to the nose of aircraft. Please set A, E, R and * Ensure the flight controller is installed T channel in your in flat surface and horizontally. -
Page 8: Configuration And Preparation
6. Configuration and Preparation 6.1 Driver and Assistant Software Installation 1. Visit to JIYI official website: www.jiyiuav.com, download the software according to your product. Unzip the file to your specific folder 2. Open the folder you just unzipped, find “driver” folder and open, install the driver according to your operation system. -
Page 9: Aircraft Type Selection
6.3 Aircraft Type Selection Choose your aircraft mixer type, and click “Save” button. -
Page 10: Remote Controller Calibration
6.4 Remote Controller Calibration After selection of frame type, click “Radio Controller” to enter into RC calibration. Please pay attention to the direction of each channel, especial ELE and THR direction is different in our software. P2 Pro supports PPM, PWM and S-BUS receiver, choose relevant receiver type, and then click “Calibrate”... -
Page 11: Accelerometer Calibration
3. Please make sure the transmitter sticks’ moving direction of each channel is the same the same as software shown. 6.5 Accelerometer Calibration: Reminder: The accelerometer calibration must be performed before first usage of flight controller. If you experience below condition, it is suggested to re-calibrate the accelerometer sensor. -
Page 12: Battery Setting
& down (total 6 faces) on a leveling surface in sequence. Total 6 surface of calibration. Diagram for reference below: Left Right Front Back Down Caution: In order to get the best calibration results. Every direction calibration must be leveling. If any surface is not in leveling position (vertically &... -
Page 13: Compass Calibration
“Calibrate”. Caution: Please set a reasonable voltage level for low voltage alarm to avoid any damages caused by the aircraft low power. - Page 14 JIYI P2 Pro flight controller Compass calibration method is easy. First, switch the CH6 to “Go Home” mode, put the throttle stick to bottom, rudder to left, aileron to left, elevator to top. For US mode controller (left hand throttle) as shown in pic 1. For Japanese Mode Controller (right hand throttle) as shown in pic 2.
-
Page 15: Firmware Upgrade
Caution: GPS/Compass device is sensitive to ambient environment. In order to get the best flight experience, it is advisable to calibrate the compass again when you change the flight location. 6.8 Firmware Upgrade In order to get the best flying experience, JIYI will release the latest firmware from time to time, please update the latest firmware timely. -
Page 16: Stability Sensitivity Setting
6.9 Stability Sensitivity Setting To pursue the stability and reliability, you can adjust parameter in Gain. Under gain, you can adjust the Roll, Pitch and Yaw. The adjustable range 1-10, the default setting of flight controller is adjusted based on aircraft 450mm. If you aircraft frame is bigger than 450mm, or the aircraft is swinging or shaking when flying, you need to adjust the roll sensitivity and pitch sensitivity to a higher value. -
Page 17: Flight Mode
7. Flight mode 7.1 Disarm & Arm After completed the calibration, click on “FC test” and click “Test” button. If no further error notification, you may proceed for arming. If any error message shown, you need to re-calibrate it before you’re able to arm. -
Page 18: Gps Flight Mode
Caution: 1. GPS/Compass module is not working in Stable mode flight. 2. The throttle control way is different between Stable mode and GPS mode, please pay attention to throttle control when switching between these 2 modes. -
Page 19: Smart Circling Mode
(but throttle is not working). After the aircraft landed, the motor shall spin slowly and stop. User shall put the throttle at minimum level, the flight controller will automatically disarm after 3 seconds. Caution: 1. The precondition of Go Home is GPS module records the home point location (The location of arming) successfully. - Page 20 Smart Circling Mode Channel Setting Description Control the Stick left and right control the circling rate circling speed and direction Control the Stick up and down control the circling radius circling radius Control the Same as GPS mode flying altitude...
-
Page 21: Lost Control Protection (Fail Safe)
7.5 Lost Control Protection (Fail Safe) P2 Pro flight controller support lost control protection (fail safe). First of all, your receiver must support FS setting, and you set your remote controller correctly according to your remote controller manual. In the good GPS satellite signal condition, once the receiver lost the signal, the P2 Pro Controller shall activate the auto pilot and return to home location (no matter in stable mode or GPS mode). - Page 22 Caution: it is advisable that beginner user shall not change to the sport mode during the flight. Suggest switch to this mode once the user flying become skillful.
-
Page 23: Appendix
Appendix Appendix 1: Product Specification General Characteristic Function: PPM, PWM, S-BUS receiver support Superior Stable flight against interference Gentle throttle setting Precise spot GPS hovering Low voltage protection Lost control protection Peripheral Equipment Multi-Rotor Quad-rotor I4, X4 / Hex-rotor I6, X6, IY6, Y6 /... -
Page 24: Appendix 2 : Led Light Indicator And Meaning
Max Tilt Angle: 45° Max Yaw 150°/s Angular Velocity Ascent/Descent 6m/s Wind <8m/s (17.9mph/28.8km/h) Resistance Built in Flight Attitude Mode mode: GPS Mode Smart Circling Mode Failsafe Mode Low Voltage Protection One key take off, Click and fly, Waypiont... -
Page 25: Appendix 3 Jiyi Technical Suppport
Appendix 3 JIYI Technical Suppport If you have any problem during your usage, please contact JIYI for technical support. You can download relevant information from JIYI official website. JIYI official website: www.jiyiuav.com Technical support: support@jiyiuav.com Again, thank you for choosing JIYI P2 Pro!
Need help?
Do you have a question about the P2Pro and is the answer not in the manual?
Questions and answers