
Subscribe to Our Youtube Channel
Summary of Contents for Cyber Gadget Retro Freak CY-RF-A
- Page 1 Instructions 2017/03/23 〈v2.5 English〉 Retro Freak CY-RF-A / CY-RF-B / CY-RF-C / CY-RF-AMZA / CY-RF-AMZB / CY-RF-BBK / CY-RF-CBK...
-
Page 2: Table Of Contents
Index <Warning> Read all the warnings prior to use Button Mapping ――――――――――――― ――――――――――――――――――――――――――――――――――――――――――――――――――――――――――――――――― Packaged Contents Hotkey Configuration ――――――――――――――――――――――――――――――――――――――――――――――――――――――――――――― ――――――――――――――――――――――――――――――――――――――――――――――――――――――― Component Names Display/Audio Output Settings ―――――――――――――――――――――――――――――――――――――――――――――――――――――――――――――――― ――――――――――――――――――――――――――――――――――――――― Connect Retro Freak System Settings ―――――――――――――――――――――――――――――――――――――――――――――――――――――――――― ――――――――――――――――――――――――――――――――――――――――――――――――――――――――――――――― Starting Up Retro Freak In-game Menu ――――――――――――――――――――――――――――――――――――――――――――――――――― ――――――――――――――――――――――――――――――――――――――――――――――――――――――――――――――――――――... -
Page 3: Warning> Read All The Warnings Prior To Use
■The use of this product is subject to the terms and hand ■Erased or corrupted Save Data or installed games conditions on the license with CYBER gadget Co., Ltd. are not supported by this product’ s warranty If you can not agree with the terms and conditions, ■Do not use other AC adaptor other than the supplied... -
Page 4: Packaged Contents
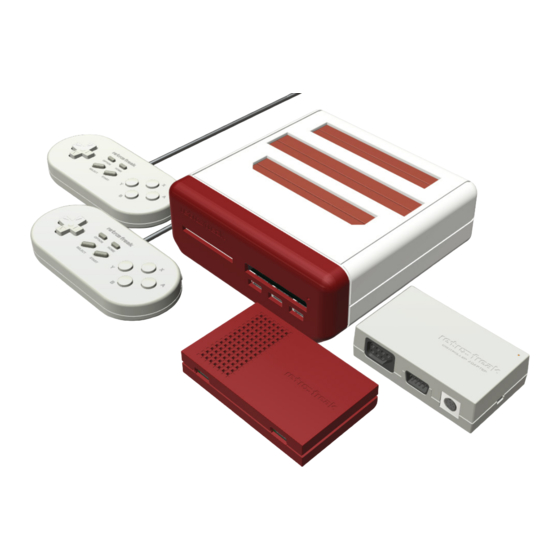
Packaged Contents ■CY-RF-A / CY-RF-B / CY-RF-C ■CY-RF-AMZA / CY-RF-AMZB ■CY-RF-BBK / CY-RF-CBK 1 Retro Freak Main Console 1 Retro Freak Main Console 1 Retro Freak Main Console (Docked into the cartridge adapter) (Docked into the cartridge adapter) (Docked into the cartridge adapter) 1 Cartridge Adapter 1 Cartridge Adapter 1 Cartridge Adapter... -
Page 5: Component Names
Component Names Cartridge Adapter When you unbox Retro Freak, the console is docked MD slot into the cartridge adapter. To play cartridge games, (MD/GEN) leave the console in the adapter. Installed games may SFC slot be played with either the console docked or undocked (SFC /... -
Page 6: Connect Retro Freak
Connect Retro Freak Connection Overview ■Using the Retro Freak console alone microSD slot ① Connect a TV or monitor and the system with HDMI HDMI cable HDMI TV micro or monitor cable microSD (Sold separately) ② Use the USB port in the front of the Retro Freak Retro Freak AC Adapter console to connect a controller... -
Page 7: Starting Up Retro Freak
Starting Up Retro Freak ① Follow the direction given in the previous page to ③Read the End-User Agreement carefully and select ⑤Read up the detail about fresh rate on display and connect the console. Then, hold the power button, [Agreed] [Do not agree], then press [A] button. change the setting of TV if necessary. -
Page 8: Update Retro Freak (Normal Update)
Update Retro Freak (Normal Update) ① Insert microSD into the console, and select [Write ③Connect to the Retro Freak Customer Support ⑤ Initiate downloading [retrofreak-update.bin] Firmware Update Request to microSD] under [System website, then open to the Retro Freak Update Data clicking [Download] button. -
Page 9: Update Retro Freak
Update Retro Freak (Normal Update) [Updates for accessory] ⑦ Updating takes a few seconds to minutes ⑨After the restart, accept the End User Agreement *Do not turn off the system or pull out the microSD to complete the update If the update data contains updates for the cartridge during this process. -
Page 10: (When It Includes System Update)
Update Retro Freak (When it includes System Update) ① Download an update file (zip file) from Retro Freak ④The update process will take a few seconds to ⑥ After the restart, accept the End User Agreement Customer Support website and unzip the folder. minutes. -
Page 11: Basic Controls [Standard Controller]
Basic Controls [Standard Controller] ● Retro Freak Standard Controller Any controller plugged into USB port 1 to 3 is available to use in Retro Freak’ s Main Menu. By default, USB 1 *Connect a Retro Freak Standard controller in USB port 1 for the system’ s initial setup. is set to Player 1, USB is set to Player 2 in a game. -
Page 12: Basic Controls [Other Controllers]
Basic Controls [Other Controllers] ●USB Controller ●PlayStation 3 & PlayStation 4 Controllers You can connect a USB controller or PS3/PS4 Controller to a USB port on either the Retro Freak console or <MAIN MENU> To use a PS3/PS4 controller, connect it to a USB port cartridge adapter. -
Page 13: Basic Controls [Controller Adapter]
Basic Controls [Controller Adapter] ●TurboDuo/PC Engine The following controller types can be used with Retro For the controllers usable with the Controller Adapter, Freak by connecting to Controller Adapter (CY-RF-4). please see following button information. <MAIN MENU> When using the Controller Adapter, connect to the D-pad : Move cursor ●NES/AV Famicom... -
Page 14: Playing A Game
Playing a Game ① Insert a game cartridge in its corresponding slot ②Wait for loading to complete, then select [Play] [Ejecting a Cartridge] on the cartridge adapter while the screen displays start the game. Eject a cartridge when display is on Main Menu, Main Menu. -
Page 15: Using Cartridge Convertor
Using Cartridge Convertor ●Gear Convertor (CY-RF-5 / CY-RF-5BK) ●NES Cartridge Convertor (CY-RF-6) ①Face a label of a game cartridge front and insert it into Gear Convertor. Each slot is for following: Right : GG slot Ⅲ Game Gear : Cartridge slot SG-1000, Mark III, and Othello Multivision Left : Card slot... -
Page 16: Unable To Read Cartridge
Unable to read Cartridge A game title will be displayed when a cartridge was If the cartridge was not recognized even with re- If cleaning didn’ t help recognize the cartridge, the recognized and successfully loaded. If warning or insert, clean the cartridge connector with a dry cartridge may not be compatible to run on this system, error was displayed, the cartridge may not be properly cotton swab or use a specialized cleaning agent such... -
Page 17: Quit A Game/Turn Off The System
Quit a game/Turn off the system ●Quit a game ●Turning off the power [NOTE] Select [BACK MAIN MENU] under [In-game menu] in game Method 1: Select [OFF] with cursor in the MAIN MENU Retro Freak doesn’ t need to be turned off while *[In-game menu] is displayed by pressing the HOME simultaneously holding the reset button;... -
Page 18: Using Microsd
Using microSD ●Eject microSD Retro Freak doesn’ t need microSD to run an cartridge ①Insert a microSD card with its label facing up game or save a game, however using microSD will Push in the microSD card until it makes a clicking allow a user to access additional features such as sound installing a game, cheat functions, and other various... -
Page 19: Microsd Directory
microSD directory [Cheats]* ● Cheat codes for Cheat Function will be saved in [microSD] [RetroFreak] [Cheats] micro (ルート) this folder. Root [Games] [Games] ● Installed games are saved in this folder. [Patch] [Patch]* ● This folder will be referred when a patch was selected. [Saves] [Snapshot] [System]... -
Page 20: Install A Game
Install a game ●Playing an installed game ① You can install a cartridge game if a microSD ①Select a type of game system in microSD menu ③ Wait for loading to complete, and press [A] to card is inserted in the console. After inserting a cartridge, a prompt will be displayed asking if you select [Play] wish to initiate the install. -
Page 21: Main Menu
MAIN MENU ④ ⑤ ① Auto Screenshot Displays a screenshot of the most recent gameplay screen ⑥ ② Game Information ① ② Displays distributer and release date only for games that were distributed in Japan ③ ③Game Save Status ⑦ Displays the location, either the console or microSD, of the game’... -
Page 22: Game Lists
Game Lists ① microSD menu ③ ② Displays installed game titles ② Game Lists Lists of installed game titles. It is displayed in ① alphabetical order by default. ③ Sort Menu Open the sorting menu by pressing [SELECT] button in this Game Lists display. -
Page 23: Cheat Function
Cheat Function ① List of Cheat Codes ① Displays the available cheat codes. Toggle a cheat code on and off by selecting the code and pressing the [A] button. : On (Use the Cheat Codes) : Off (Don’ t use the Cheat Codes) ②... -
Page 24: Game Setting
Game setting Select Patch ● Select a patch file for emulator to apply. Low-latency audio [post v1. 1] ● Enabling this would lower audio latency to the 1/3 of normal speed, and minimize the lag between sounds and displays. Turning this OFF would lower the quality of audio and may cause the sound to break. -
Page 25: Controllers
Controllers Controller to Player Mapping ● Allow you to assign individual controllers to each game system. By default, USB port 1 is Player 1; and USB port 2 is player 2. To allow other combinations, using more than three controllers for multiplayer mode, or connect multiple controllers to the Controller Adapter as individual players, set the controller player mapping here. -
Page 26: Controller To Player Mapping
Controller to Player Mapping Default setting for controllers are recognized as ①Select a game system that you want to play using ②Use the controller you want to assign to the selected Player 1 for a controller connected to USB port 1, and Left/Right buttons player, and press “A”... -
Page 27: Button Mapping
Button Mapping This menu is to check overviews of button mapping for ②To remap button bindings, scroll the screen to go ④ Select a button you want to reassign and press each game system, and allows a user to remap each to [Manage Profiles] and then [Add new profile] “A”... -
Page 28: Hotkey Configuration
Hotkey Configuration The following features can be assigned as an in-game ①Select a system and controller you want to assign ③ Select [Set] and hold a button you want to assign hotkey. Hotkeys can be assigned individually by a the hotkey to. until the counter hits 0. -
Page 29: Display/Audio Output Settings
Display/Audio Output Settings Aspect Ratio Display overscan Sound enhancement ● ● ● Select the aspect ratio from [Normal], [Stretch], Display the overscan area without cropping it out Enhance the depth of the left and right sound and [Zoom]. channels Force Original Resolution ●... -
Page 30: System Settings
System Settings Console Region Periodically backup saved data [post v1.3] Write firmware update request to microSD ● ● ● Change the region of the system to [Japan], [USA], Periodically backup saved data while an gameplay. Export [retrofreak-update-request.dat] file that’ s or [Europe]. -
Page 31: In-Game Menu
In-game Menu Cheats master toggle ● Toggle the activated Cheat Function’ s on/off during game play Save state slot ● ③ Change the slot used to store save states. Slots are from 0 to 99, total 100 slots. (pre-v1.6 would be from 0 to 9, total 10 slots.) You can select a slot individually from slot 0 to slot 9 and save. -
Page 32: Storage Management
Storage Management ① Storage Manager (internal) Displays storage manager for saved data in the ① ② Retro Freak system ② Storage Manager (external) ③ Displays storage manager for saved data in microSD ④ ③ Game Saves ⑤ Displays manager for saved data. By selecting a game title, it’... - Page 33 Storage Management ●Manage Saved Data [Copying Saved Data] ① Select [Game Saves] by pressing [A] either from the ③Select a game title which you want to manage its When [Copy] selected Saved Data console or microSD storage manager. Saved Data management, the copied data would be saved in the other storage unit.
- Page 34 Storage Management ●Manage screenshots ●Manage Game Data ① Select [Screenshots] from microSD manager, press ①Select [Installed Games] from microSD manager, press [A] ② Select an image and press [A] to show [Display] or ②All the installed game titles will be displayed. [Delete] Select a game data and press [A] to [Delete] 34/34...
Need help?
Do you have a question about the Retro Freak CY-RF-A and is the answer not in the manual?
Questions and answers