Table of Contents
Advertisement
Quick Links
Advertisement
Table of Contents

Summary of Contents for Toppro T2208
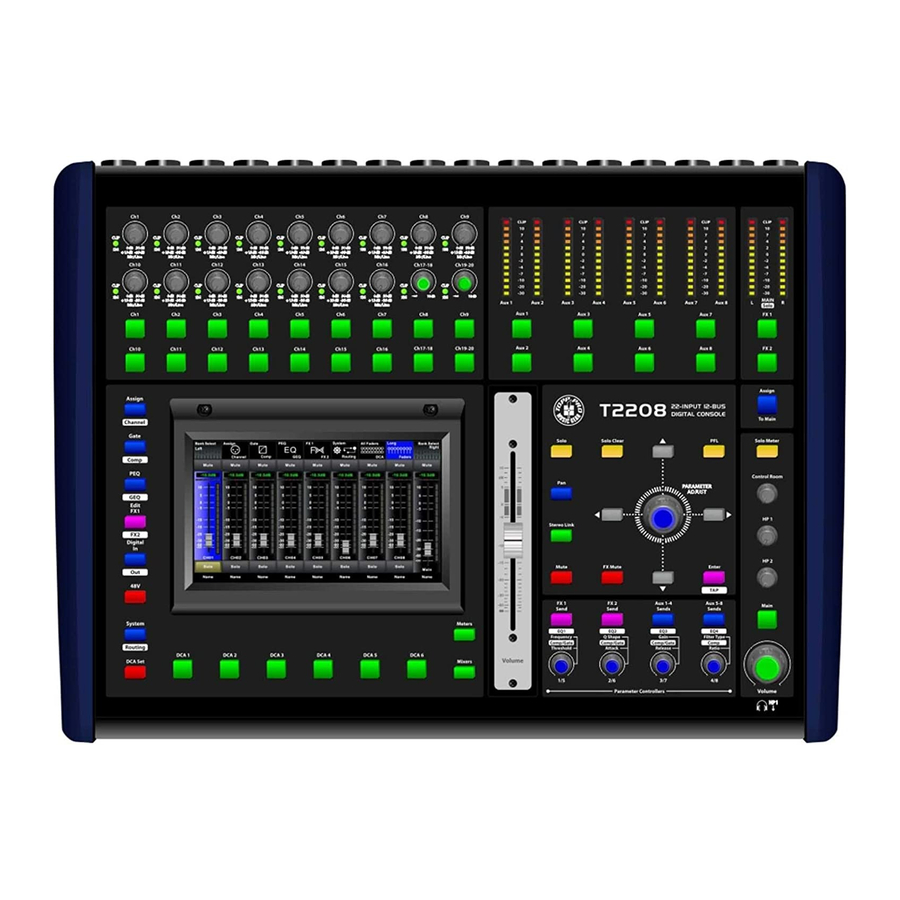
- Page 1 T2208 16 mic preamplifiers with dedicated trim control Volume...
-
Page 3: Important Safety Instructions
Important Safety Instructions * T2208, are mixers for professional use. They can be used in following electromagnetic environment: residential, commercial and light industrial, urban outdoors. They are the apparatus not intended for rack mounting. * The peak inrush currents equal to 8.33 A. -
Page 4: Table Of Contents
Index 4. LED meters Page7: 1. Select button Page8: 5. Mixer/Long Faders button Page9: 6. Meters button 7. Assign/Channel button Page10: 8. Gate/Comp button 9. EQ button Page11: 10. FX1-2 button 11.Digital In/Out button Page12: 12. 48V Phantom button 13. System/Routing button Page13: 14. - Page 5 Table of contents 1 Introduction 2 Summary of features 3 Useful data 4 Software Update 5 Control Function Buttons and Knobs 7--17 Rear Panel 17--18 6 DSP Control Mixer interface Long Faders interface Assign interface Channel interface Gate interface COMP interface PEQ interface GEQ interface FX1-2 interface...
-
Page 6: Introduction
31-band GEQ, compressor, gate, delay, polarity; DSP effects; aux buses; subgroups; sensitive LED metering; load/save/copy mixer setting; remote control, USB in and more, the T2208 helps you creating a wonderful show. It is easy to operate though it has powerful function. -
Page 7: Software Update
Since function of T2208 will also change when you update the software, this manual can help you familiar with the basic function, for the precision, please refer to the real T2208 digital mixer. Note: When you update the firmware, all the parameters you had saved in the mixer may be destroyed. - Page 8 Control 5. Mixer/Long Faders button Press this button twice, it will switch between Mixer and Long Faders function. ˙Mixer Press this button, you will see mixer page on LCD screen, where you can control all the input and output channels’ level, solo and mute, as well as DCA group level control, the window is as below.
-
Page 9: Assign/Channel Button
Control 6. Meters button Press this button to enter meters check page, as below picture show, for the details, please refer to corresponding introduction in section 6. Bank Select Assign Gate FX 1 System All Faders Long Bank Select Left Right Channel Comp... -
Page 10: Eq Button
Control 8. Gate/Comp button Press this button twice, it will switch between Gate and COMP function. ˙Gate Noise gate attenuates signals that below the threshold and allows signals to pass through only when they are above a threshold setting. The window is as below. For the detail operation, please refer to introduction in section 6. -
Page 11: Digital In/Out Button
Control 10. FX1-2 button Press this button twice, it will switch between FX1 and FX2 function. This page can show and editor the setting of internal effects. Each of the FX owns 12 program effects. The window is as below. For the detail operation, please refer to introduction in section 6. -
Page 12: System/Routing Button
It will illuminate when phantom power is activated. Please notice that only the condenser microphone needs phantom power. Note: Please do not supply phantom power to any device which do not need phantom power otherwise the device and T2208 may be damaged. Assign FX 1... -
Page 13: Dca1-6 Buttons
Control Bank Select Assign Gate FX 1 System All Faders Long Bank Select Bank Select Assign Gate FX 1 System All Faders Long Bank Select Left Right Left Right Channel Comp FX 2 Routing Faders Channel Comp FX 2 Routing Faders Parameter CH01... -
Page 14: Link Button
Control 16. Assign to Main button Press the input channel button, then press this button, can quickly assign the input channel to main. 17. Solo button Press this button will send its channels or buses to the control room outputs. It will illuminate as has been pressed and enabled. -
Page 15: Fx1-2 Select Buttons
Control ˙Link & DCA: After link, the channels can also be grouped to DCA as stereo channel, but not able to cancel the link in DCA. On the contrary, if the channel has been grouped to DCA, it can not link at all, but its paired channel can link. - Page 16 Control 28. FX1/FX2 send Press the input channel and then press this button, can assign the channel to use FX1/FX2 effects. And the default level is mute, so you should tune the knob below the button to take effects. 29. Aux1-4/Aux5-8 sends Press the input channel and then press this button, can assign the channel to use AUX1-4/5-8.
-
Page 17: Rear Panel
The line-level input is a 1/4-inch, balanced TRS connector. Each channel of the T2208 has a line-level input. The microphone-preamp circuit will be bypassed if the Line-level Input has been engaged. - Page 18 But the return goes to the digital bus directly. So if a de-esser has been inserted on the vocalist's channel, the de-esser will get an unprocessed, amplified signal. The processed signal will return to the T2208's digital bus to add DSP setting and sent through Aux and FX buses… 41. Aux Outputs1-8 These are balanced mono outputs for each auxiliary.
-
Page 19: Dsp Control
× √ × 6.1 Mixer interface Once you turn on the T2208 switch, the Mixer interface will come to your eyes at first if you have preseted, now let’s see what you can get in this interface. -10dB -10dB -10dB... - Page 20 DSP Control Meter beside the fader indicates the input signal level activity .This long fader can control level of all input and output channels in this screen, but for one selected channel at one time, all its control will change synchronized with the selected channel.
-
Page 21: Long Faders Interface
DSP Control 6.2 Long Faders interface Bank Select Bank Select Assign Gate FX 1 System All Faders Long Left Right Channel Comp FX 2 Routing Faders Mute Mute Mute Mute Mute Mute Mute Mute Mute -10.5dB -10.5dB -10.5dB -10.5dB -10.5dB -10.5dB -10.5dB -10.5dB... -
Page 22: Assign Interface
DSP Control 6.3 Assign interface The 20 main inputs and internal FX returns can be assigned to any or all of the outputs, Aux sends and main outputs. In this page, Aux 1-4 and AUX5-8 can switch to each other by touching a switch icon in System page. - Page 23 DSP Control Slide the fader to change selected input channel audio. Parameter Mute The fader function is the same with Fader on the panel, Aux 1 -10.5dB -10.5dB which can control input signal’s level, they will change synchronously. Meter beside it indicates the signal level activity. Pan above fader indicates value of pan setting.
- Page 24 DSP Control When switch to AUX 5-8, the corresponding page is as below picture show, this function enable output assignments to be more. Bank Select Bank Select Assign Gate FX 1 System All Faders Long Left Right Channel Comp FX 2 Routing Faders DCA Assign...
-
Page 25: Channel Interface
DSP Control 6.4 Channel interface Assign Gate FX 1 System All Faders Long Bank Select Bank Select Right Left Channel Comp FX 2 Routing Faders Left Right Mute Parameter Polarity Aux 1 -10.5dB -10.5dB INV. Delay Time Gate Compressor 0.0mS Delay Threshold Threshold... -
Page 26: Gate Interface
DSP Control Touch the switch ON to enable EQ function, it will illuminate and synchronize with ON/OFF control in EQ page. Please set values in EQ page because it is not adjustable here. This page can only show the values. You can also load a preset, please refer to load introduction section for the detail operation, the loaded state will show in the middle box. - Page 27 DSP Control Touch the switch in this window, you can engage and disengage the Gate for the selected channel. It will illuminate to indicate that the Gate has been touched and enabled. The LCD display shows the Gate setting in real time. Its parameters can change by adjusting Threshold, Attack &...
-
Page 28: Comp Interface
DSP Control 6.6 COMP interface Bank Select Bank Select Assign Gate FX 1 System All Faders Long Left Right Channel Comp FX 2 Routing Faders Parameter Mute Aux 1 Threshold Default Comp -10.5dB -10.5dB 0.0dB Level LIMIT (dB) (dB) CLIP Attack 50mS Release... -
Page 29: Peq Interface
DSP Control Touch it to set the compressor for the selected channel. Release sets the length of Release time the compressor takes to return to its normal gain once the signal level drops 100mS below the threshold. Release can be set from 10 to 1,000 milliseconds. Touch it to set the compression ratio for the selected channel. - Page 30 DSP Control Touch the switch to engage or disengage the equalizer for the selected channel. It will illuminate to indicate that the equalizer has been touched and enabled. The LCD display shows the EQ setting in real time. Its parameters can adjust by sliding the curve on the screen directly or using up &...
-
Page 31: Geq Interface
Load Save Channel The T2208 features MAIN Stereo, AUX Mono, 31-band, 1/3 octave graphic EQs. The 31 bands range from 20Hz to 20 KHz. There is 1 MAIN Stereo GEQ, 8 AUX Mono GEQs in 24-bit/48 kHz sample rate. 11 12... -
Page 32: Fx1-2 Interface
DSP Control Touch Load, Save to realize corresponding function. Load Save Select Touch this control in this area to enter page of corresponding channel. Channel Touch ON/OFF switch, it will illuminate and enable the GEQ Default function. Compare with ON in other page, the different is that even you don’t turn on it, the GEQ parameter is adjustable, but won’t function. - Page 33 DSP Control Touch this control to mute current FX effect. Mute The T2208 includes 12 kinds of adjustable effects which can help to realize the effect that you want to show your audience. Preset Description Parameter Simulate an acoustic space of the Pre Delay;...
-
Page 34: Digital Input Interface
DSP Control 6.10 Digital Input interface Only channel 1-16 are given digital input. You can select which channels input from option module, and which channels input from analog. The screen will give clues if no digital card inserted in, and the Digital in function can not enable either. -
Page 35: Digital Output Interface
DSP Control 6.11 Digital Output interface When you select a channel as digital output, OFF will switch to ON, the background of ON will illuminate. The screen will give clues if no digital card inserted in, and the Digital Out function can not enable either. - Page 36 DSP Control Press one of these buttons DCA1-6 either the panel or screen, this will light indicating DCA1 it is ready to be edited either to add or delete channels. Drums Each DCA group can be renamed as needed. For it you only have to touch the Drums respective box DCA holding it down until the screen shows you the keyboard.
-
Page 37: Meters Interface
DSP Control 6.13 Meters interface This page gives you a overall review of all input and output channels and buses’ meters status, Long Bank Select Bank Select Assign Gate FX 1 System All Faders Right Left Channel Comp FX 2 Routing Faders Ch01... -
Page 38: Routing Interface
DSP Control 6.14 Routing interface You can select input channels of Main 1-20, FX1-2 and USB in and route them to output channels of Main 1-20, Aux 1-8 and FX1-2. For example, below window shows Aux 1 routing function. In this page, you can route input channels in LCD screen to Aux1 output. -
Page 39: System Interface
Meters All Faders T1DSP_Firmware_1_V1.0 T1DSP_Firmware_2_V1.0 Password T3MCU_Firmware_1_V1.0 Fader Lock Setting Calibration Mixer T0MCU_Firmware_2_V1.0 Device Name: T2208 Current Scene Selected Channel Default Default Default Default Text in these box show current corresponding preset you have saved. Shortcut To Digital Routing Meters... - Page 40 Default password is “1111”. Super password is “2208”, which means you Mixer can tap it to unlock your T2208 every time you forget your password. Please note messages on the screen when operation. Touch this button to change password of the system. Input an old password and a Password new password.
-
Page 41: Load Interface
DSP Control 6.16 Load interface In this interface you can load Scene, Effect, GEQ or DSP channel setting too. The chosen preset can be deleted by pressing Delete. Please notice the instruction that is shown on the LCD display. Load 001.-----Empty----- Scene 002.-----Empty-----... -
Page 42: Copy Interface
DSP Control The preset can be recalled to the same channel with exactly the same DSP setting and other setting like Solo, Mute, Post..., but with the channel's own DSP setting if recall to other channels. For example, if you select Channel 6 and save the setting as scene preset 6. If you select the Channel 6 and press the Load button to load the scene preset 6, then, the Channel 6 will be exactly same as the scene preset 6. -
Page 43: Save Interface
DSP Control 6.18 Save interface Save 001.-----Empty----- Scene 002.-----Empty----- Page DSP Channel 003.-----Empty----- 004.-----Empty----- 005.-----Empty----- 006.-----Empty----- Down Page 007.-----Empty----- 008.-----Empty----- Preset Name Default Save Press this button to save the selected channel's and bus's DSP channel setting as DSP presetting for future use. -
Page 44: Hookup Diagram
Hookup Diagram... -
Page 45: Technical Information
Technical information... -
Page 46: Block Diagram
Block Diagram... -
Page 47: Guarantee
Guarantee... - Page 48 Notes...
-
Page 49: Notes
Notes... - Page 50 Notes...
- Page 51 Notes...
Need help?
Do you have a question about the T2208 and is the answer not in the manual?
Questions and answers