Table of Contents
Advertisement
Advertisement
Table of Contents

Summary of Contents for Elko Sound Player - 2
- Page 1 DAB/DAB+ and FM Digital Radio with Bluetooth...
-
Page 2: Important Safety Instructions
Important Safety Instructions 1. Read these instructions. 2. Keep these Instructions. 3. Heed all Warnings. 4. Follow all instructions. 5. Do not use the speaker near water. 6. Clean only with dry cloth. WARNING: TO REDUCE THE RISK OF FIRE OR ELECTRIC SHOCK, DO NOT EXPOSE THIS SPEAKER TO RAIN OR MOISTURE. -
Page 3: Fcc Information
FCC Information This equipment has been tested and found to comply with the limits for a Class B digital device, pursuant to Part 15 of the FCC Rules. These limits are designed to provide reasonable protection against harmful interference in a residential installation. This equipment generates, uses and can radiate radio frequency energy and, if not installed and used in accordance with the instructions, may cause harmful interference to radio communications. -
Page 4: Table Of Contents
Contents Important Safety Instructions ..................... 2 FCC Information ........................3 Contents ............................ 4 Unit Front View .......................... 5 Unit Rear View ........................... 6 Remote Contorl overview ......................7 Getting Started ........................... 8 DAB Mode ..........................9 Selecting another DAB/DAB+ Station ................... 9 Updating Station List ...................... -
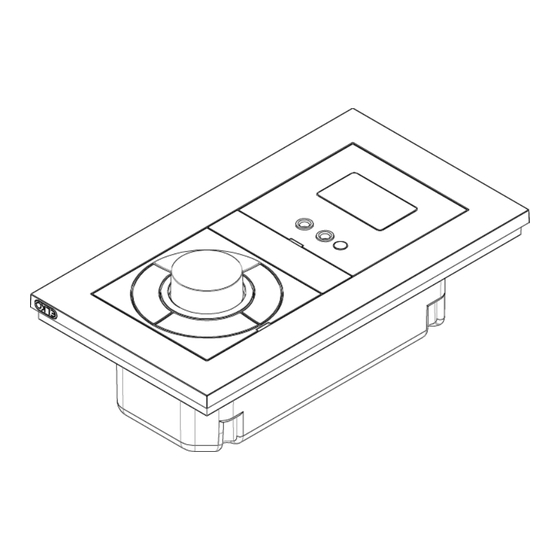
Page 5: Unit Front View
Unit Front View LCD display AUX IN1 socket Headphone socket Connect to a 3.5mm audio cable(not Remote control sensor supplied) in Auxiliary In 1 mode. INFO/POWER button BACK button Press and hold to turn on radio or Press to return to previous menu screen. switch radio to standy. -
Page 6: Unit Rear View
Unit Rear View AUX OUT socket Connect to a 3.5mm audio cable(not supplied). AUX IN2 socket Connect to a 3.5mm audio cable(not supplied) in Auxiliary In 2 mode. SERVICE port Please leave this software upgrade port for service professional. -
Page 7: Remote Contorl Overview
Remote Contorl overview PRESET button Press and hold to store preset stations. Press to recall preset stations. BASS +/- buttons Press to adjust bass value. VOLUME+/- buttons Press to adjust volume level. MUTE button Press to mute radio. ... -
Page 8: Getting Started
Getting Started Carefully remove your radio from the box. You may wish to store the packaging for future use. What you can find inside of your package Main unit Instruction Manual Power adapter Adjusting the Antenna Extend the antenna to ensure you receive the best reception possible in both DAB and FM radio modes. -
Page 9: Dab Mode
DAB Mode When you turn on the radio it will automatically search and store all the available stations. You should conduct an additional Full Scan to ensure all stations are picked up and stored. It is also recommended every few months to run a new scan to pick up any new DAB/DAB+ that may have begun broadcasting after purchasing your DAB radio. -
Page 10: Drc (Dynamic Range Control) Value
DRC (Dynamic Range Control) value You can set the compression level of stations to eliminate the differences in dynamic range or sound level between radio stations. Note: Set DRC to off indicates no compression; Set DRC to low indicates little compression; Set DRC to high shows maximum compression. -
Page 11: Fm Mode
FM Mode Selecting FM Mode 1. Press MODE/MENU button repeatedly to select FM mode. 2. For initial use, it will start at the beginning of the FM frequency range (87.50MHz). Or it will play the last FM station you were listening to. 3. -
Page 12: Viewing Station Information
Viewing Station Information There is a diversity of station information transmitted by broadcast, and this radio also offers a shortcut for you to view them. To view currently playing station information, press the INFO/POWER button repeatedly the display will show the information through Radio Text, Program type, Program info, Audio info, Time and Date. -
Page 13: Aux In Mode
Aux in Mode AUX IN allows for quick and easy connection to an MP3 player or other external audio sources. Before connecting to the mains socket, use a 3.5mm audio cable (not supplied) to connect to your external audio device through the AUX IN1 socket on the front of unit or AUX IN2 socket on the rear of unit Connect power adapter to mains socket, press and hold INFO/POWER button to switch on unit. -
Page 14: Bluetooth Mode
Activate your Bluetooth device and select the search mode. 'ELKO Sound Player' will appear on your Bluetooth device. Select 'ELKO Sound Player' and enter “0000” for the password if necessary. Display will show ◄ when connection is successful. To disconnect the Bluetooth function, switch to another function on the unit or disable the function from your Bluetooth device. -
Page 15: General Operation
General Operation Storing Preset Stations Note: This is the same for DAB/DAB+ and FM Radio stations. Your radio can store up to 12 of your favourite DAB/DAB+ and FM stations as preset stations. This will enable you to access your favourite stations quickly and easily. 1. -
Page 16: Setting Time
Setting Time 1. Press and hold MODE/MENU button, turn SCROLL/SELECT knob to select Time menu, and then press SCROLL/SELECT knob to view options as below: Set Time/date: Manually set-up both Time and Date „Update from DAB‟ or „No update‟ Auto update: „Set 24 hour‟... -
Page 17: Setting Backlight
Setting Backlight Press and hold MODE/MENU button, turn SCROLL/SELECT knob to select Backlight menu, and then press SCROLL/SELECT knob to confirm. Turn SCROLL/SELECT knob to select „Power on' or 'Standby', then press SCROLL/SELECT knob to confirm. Turn SCROLL/SELECT knob and then press it to set backlight level. High Power On ... -
Page 18: Troubleshooting
Keep the unit away from Fluorescent Lamps (TL) engines etc. other electrical equipment Bluetooth function is disabled on your Ensure the Bluetooth Cannot find "ELKO Bluetooth device. function is activated on Sound Player" on The connection is disconnected. your Bluetooth device. -
Page 19: Specification
For more information, please contact the local authority or your retailer where you purchased the product. ELKO AS, Eyvind Lyches vei 10, 1338 Sandvika, NORWAY. Phone 004767215459. www.elko.no. ELKO AB, Hammarby Kaj 14, 121 17 Johanneshov. Phone 0046 8 449 27 27. www.elko.se...
Need help?
Do you have a question about the Sound Player - 2 and is the answer not in the manual?
Questions and answers