Table of Contents
Advertisement
Advertisement
Table of Contents

Related Manuals for Spectrum WatchDog 2900ET

Summary of Contents for Spectrum WatchDog 2900ET
- Page 1 2000 Series Weather Stations PRODUCT MANUAL Model #’s 2900ET, 2800, 2700, 2550...
-
Page 2: Quick Start
QUICK START 1. Check the Box Pg 5 Verify all components are included 2. Set up Anemometer & Install the Pg 8 - 9 Station 3. Configuring the Weather Station Pg 13 - 17 Setting the logging interval, sensor type, geographic data, and degree day calcu- lation 4. -
Page 3: Table Of Contents
CONTENTS General Overview, Package Contents Specifications Anemometer Setup Station Installation Connection Options Configuring the Weather Station Configuring the Weather Station with SpecWare Configuring the Weather Station with the Keypad Setting the Logging Interval Setting the Sensor Type Setting Geographic Data for the ET Report Setting the Degree Day Calculation Method Other Keypad Operations Setting the Date and Time... -
Page 4: General Overview, Package Contents
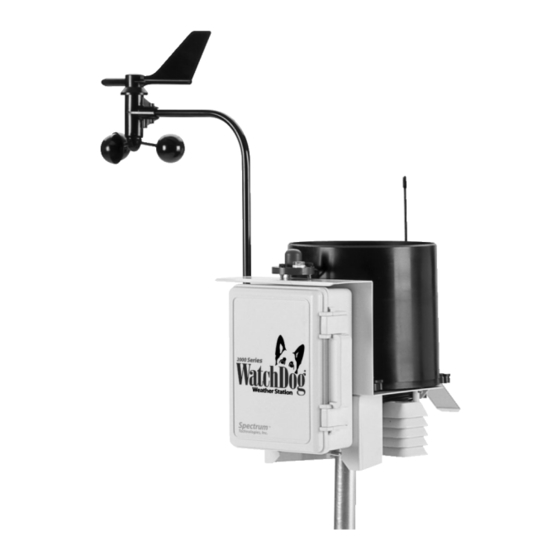
General overview Thank you for purchasing a WatchDog 2000 Series Weather Station. The stations are completely weath- erproof and feature 12-bit resolution for higher accu- racy. The stations can be accessed at different times by multiple users because the data is not cleared from memory following a download. -
Page 5: Station
Package Contents Your 2000 Series Weather Station package should con- tain the following components: Manual Weather Station Parts Box Wind Vane Wind Cups 4 AA Batteries Ground Screw Allen Wrench Mounting Hardware - used to attach station to Pole Other tools needed, but not included: Phillips screwdriver Ground screw bottom clamp Specifications... -
Page 6: Specifications
1-1500 W/m ±5% Radiation * In 2016, Spectrum introduced a new T/RH sensor (3613WD). The cable for this sensor emerges from the bottom of the radiation shield rather than the side. A station must be running firmware v. 7.8 or high- er to be compatible with this sensor. - Page 7 External Sensors The following table lists the available optional sensors. All sensors include a 6-foot cable with pin-type connector. To connect an external sensor to the logger, plug the sensor cable into the logger port that has been programmed for that particular sensor.
-
Page 8: Anemometer Setup
Anemometer setup Apart from the anemometer, WatchDog Weather Station comes fully assembled and ready to mount. The anemometer arm is attached to the enclosure back plate with clamps. After positioning arm, screws should be tightened to secure it in place. A plastic envelope containing a screw and a star washer are included with the station. -
Page 9: Station Installation
Station Installation The weather station should be located in an open, unobstructed, grassy area to ensure accurate measurement of wind, rainfall, sunlight, and evapotranspiration. Mounting hardware is provided to attach the weather station to a 4” x 4” treated wooden post or to a mast/pole up to 1.25 inches in diameter. -
Page 10: Connection Options
Connection Options The WatchDog weather station communicates with a PC through either the Computer or AUX port which are lo- cated under the LCD and keypad. The communication options are separated into 3 main categories. Direct Communication There are 3 options for connecting directly to the station. 1. -
Page 11: Station
It is common for this battery to be charged by solar panels so that station does not need to be visited on a frequent basis. Contact Spectrum Tech- nologies for additional details on these options. DataScout Modem (Cellular or WiFi) The DataScout modem sends data to the SpecConnect Web Utility. -
Page 12: Configuring The Weather Station
Configuring the Weather Station The 2000-Series weather station does not have a button or switch for powering up and down. Instead, the device is operational whenever the batteries are installed. The stations are shipped with default log- ging settings that can be modified with SpecWare software or with the station’s keypad. -
Page 13: Configuring The Weather Station With Specware
Configuring the Weather Station with SpecWare The 2000-Series weather stations can be configured in the WatchDog Manager screen of SpecWare software (see SpecWare9 User’s Guide for details). Click new station. Configuration through the software is necessary to change the station name, enable/disable Disease Models or set parameters for the Alarm Output Module. -
Page 14: Configuring The Weather Station With The Keypad
Configuring the Weather Station with the Keypad For the 2000 Series weather stations, SpecWare software is not necessary to configure the station. The keypad can be used to select all essential configuration options. Con- figurable parameters are; sensor type, logging interval, Degree Day calculation method and latitude and altitude (model 2900ET only). -
Page 15: Setting The Sensor Type
Setting the Sensor Type Although the keypad can be used to assign a sensor to an external port, this should only be done when initially starting the station, re-starting a station whose memory has been cleared, or for adding a sensor to a previously unused port. -
Page 16: Setting Geographic Data For The Et Report
Setting Geographic Data for the ET Report In addition to temperature, relative humidity, wind speed and solar radiation data, the Penman-Monteith algorithm used by the 2900ET statopm uses the station latitude and altitude to compute reference ET. These are input as fol- lows: 1. -
Page 17: Setting The Degree Day Calculation Method
Selecting the Degree Day Calculation Method The weather station has 2 options for calculating Degree Days (see Degree Days/Chill Hours, p. 31). The weather station must measure air temperature for this option to be available. The desired method is selected as follows: 1. -
Page 18: Other Keypad Operations
Other Keypad Operations The most common use of the keypad is to view the weather station’s current sensor readings, calculated pa- rameters, and archived data. Pressing the Display key once brings the LCD display to life. The screen will initial- ly display descriptive information about the station. -
Page 19: Setting The Date And Time
Setting the Date and Time It is necessary to use the keypad to set the date and time for the data being stored in the long-term memory. This is the only keypad function that is reflected in the logged data that can’t be handled via a software connection. 1. -
Page 20: Setting The Display Units
Setting the Display Units This option determines whether the LCD will show data in English or metric units. 1. Press Display. Select Parameter 2. Press Set. To Be Set (↑↓) 3. Use arrows to scroll to DISPLAY UNITS ‘Display Units’. Press SET 4. -
Page 21: Setting The Degree Day Counter
Setting the Degree Day Counter The weather station can be programmed to compute De- gree Days for a selected base and upper temperature. This feature is distinct from the Degree Day report in SpecWare. 1. Press Display. Select Parameter 2. Press Set. To Be Set (↑↓) 3. -
Page 22: Setting The Chill Hour Counter
Setting the Chill Hour Counter The weather station can be programmed to compute Chill Hours for a selected base temperature. This feature is distinct from the Chill Hours report in SpecWare. 1. Press Display. Select Parameter 2. Press Set. To Be Set (↑↓) 3. -
Page 23: Configuring The Wireless Radio Address
Configuring the Wireless Radio Address The numerical address of the remote transceiver must be entered into SpecWare software to facilitate wireless communication. The weather station can set the address to be the same as the station’s serial number. 1. Press Display. Select Parameter 2. -
Page 24: Resetting The Rain Counter
Resetting the Rain Counter The weather station maintains two rain counters (see LCD Screens, p. 28); rain since midnight and total accu- mulated rainfall. The second counter can be reset to zero at any time. For example, to track weekly rainfall accumu- lations, the counter could be zeroed every Monday morn- ing. -
Page 25: Daily Archive
Daily Archive The weather station features an archive that allows you to look at historical data for that location without download- ing the data. The archive is regularly updated whenever the data logger is actively collecting data. The daily ar- chive retains the last 30 days of data. -
Page 26: Battery Replacement
Battery Replacement The 2000 Series weather stations are powered by 4 AA batteries. This will provide enough power for 1 year of continuous use with lithium batteries, or 10 months with alkaline. The battery compartment is accessed by remov- ing the thumbscrews on the upper cover of the WatchDog (above the LCD). -
Page 27: Clearing The Loggers Memory
Clearing the Logger’s memory The memory of the 2000-Series weather station is not automatically cleared when the station is downloaded or the batteries are replaced. The station can be cleared manually through SpecWare software. This may be de- sired if, for example, the station is being shut down for the season or is being moved to a new location. -
Page 28: Lcd Screens
LCD Screens The following figures give examples of some of the various weather station LCD screens. Not all screens will be available on all models. -Initial information screen 2900 v6.9 SN3971 This is the first screen that appears Codes: P003 B000 when the Display button is pressed. - Page 29 -Relative Humidity/Dew Point Air RH 23.6% This screen shows the current relative Dew Point 36.0 humidity as well as the dew point tem- perature. -Daily High and Low Values HI 74 F 01:58 PM For temperature and RH, a screen is LO 66 F 03:05 AM available that displays the current high...
-
Page 30: Degree Days/Chill Hours
Degree Days/ Chill Hours Degree Days Temperature is a key factor contributing to the development of plants, insects and plant diseases. Degree Days are a way to quantify the amount of heat that is available, which is a function of the time the tem- perature is within a given temperature range. -
Page 31: Rain Collector Adjustment
Rain Collector Adjustment If rain collector is not reading correctly (or at all) 1. 1. Launch the logger or weather station so you can see the rain measurements on the LCD (this step is not necessary if the rain collec- tor is attached to a WatchDog 2000 Series Mini or Weather Station). -
Page 32: Warranty
This product is warranted to be free from defects in material or work- manship for one year from the date of purchase. During the warranty period Spectrum will, at its option, either repair or replace products that prove to be defective. This warranty does not cover damage due to im-...
Need help?
Do you have a question about the WatchDog 2900ET and is the answer not in the manual?
Questions and answers