
Summary of Contents for Phase II Plus PHT-1800
- Page 1 Model No. PHT‐1800/PHT‐1840 & PHT‐1850 Operation Manual 21 Industrial Avenue Upper Saddle River NJ 07458 (201) 962‐7373 www.phase2plus.com...
-
Page 2: Table Of Contents
Effective: December 6, 2011 1 Overview 3 1.1 Advantages 1.2 Main Application &Testing Range .............. 3 1.2.1 Main Application .................... 3 1.2.2 Testing Range ...................... 3 1.3 Technical Specifications .................. 3 1.4 Configuration ...................... 4 Warranty Policy: 1.5 Working Conditions .................... 5 All portable and stationary material testing instruments manufactured for/by 2 Structure Feature &Testing Principle Phase II shall be free from defects in material and workmanship for a period 2.1 Structure Feature ...................... 6 of 1to 5 full years(depending upon model)from date of purchase. Parts found 2.1.1 D Type Impact Device .................. 6 to be defective shall be replaced or repaired at Phase II’s sole discretion. 2.1.2 Different Types of Impact Device .............. 7 Products found by Phase II to be misused, abused or neglected are not 2.2 Main Screen ........................ 7 covered under this warranty. Parts not covered by this warranty are normal 2.3 Keypad Definitions .................... 8 wear and consumable items such as (but not limited to) impact balls, impact 2.4 Leeb Hardness Testing Principle . - Page 3 6 Maintenance & Servicing 17 6.1 Impact Device Maintenance ................ 1 7 6.2 Instrument Maintenance Program .............. 1 8 6.3 Fault Analysis & Evaluation ................ 1 8 6.4 Notice of Transport and Storage Conditions APPENDIX ..........................18 Table 1 ..........................18 Table 2 ..........................20 Table 3 ..........................21 Table 4…………………………………………………………………………………………24 Main Headquarters: U.S.A Phase II Machine & Tool, Inc. 21 Industrial Ave Upper Saddle River, NJ. 07458 USA Tel: (201) 962‐7373 Fax: (201) 962‐8353 General E‐Mail: info@phase2plus.com BEIJING, CHINA Phase II Measuring Instruments (Beijing) Ltd. Room 301, Bldg 2 Qing Yuan Xi Li, Haidian District, Beijing 100192,China Tel:+86‐10‐59792409 Fax:+86‐10‐59814851 General E‐mail: info@phase2china.com.cn MEXICO Phase II de Mexico Calle A No. 4 Promer Piso Col. San Marcos Azcapotzalco C.P 02020 Mexico Tel: 011‐525‐5538‐39771 Fax: same General E‐mail: phase2mexico@hotmail.com VENEZUELA Phase II Herramientas Universales EDCM. CA. Av. Francisco Lazo Marti CC Plaza Santa Monica PB Local Santa Monica, Caracas 1040 Venezuela Tel: 212‐690‐28‐21...
-
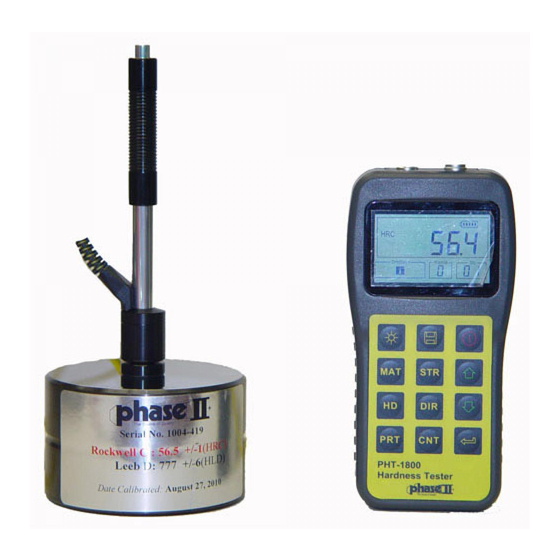
Page 4: Overview
1 Overview Windows 8 Installation Patch: For all PHT‐series portable hardness testers 1.1 Advantages Wide measuring range. Based on the principle of Leeb hardness testing theory. 1, Connect the tester to PC via USB cable. Power up the instrument. Capable of measuring Leeb hardness of all metallic materials. 2, Run zadig_2.1.2.exe Large screen LCD, showing all functions and parameters. With background light. Seven impact devices are available for special application. Automatic identification of impact device upon plug in. Test at any angle, even upside down. Direct display of hardness scales HRB, HRC, HV, HB, HS, HL Large memory could store 100 groups (Relative to average times 1‐32 ) of information including single measured value, mean value, impact direction, impact times, material and hardness scale etc. - Page 5 PHT‐1800 Data Output Software Installation: Table 1‐1 Type of Hardness value of Leeb Error of No. impact standard hardness displayed Repeatability Insert CD into drive on your computer device block value Window will pop up 760±30HLD ±6 HLD 6 HLD Run AutoRun.exe 530±40HLD ±10 HLD 10 HLD Follow prompts to load program, make sure your 760±30HLDC ±6 HLDC 6 HLD 530±40HLDC ±10 HLDC 10 HLD designation drive is set to C: 878±30HLDL Once completed a “Datapro for Hardness icon will ±12 HLDL 12 HLDL 736±40HLDL appear on desktop 766±30HLD+15 Launch the program using the Datapro for Hardness D+15 ±12 HLD+15 12 HLD+15 544±40HLD+15 icon on desktop shortcut...
-
Page 6: Configuration
1.4 Configuration Table 1‐2 Optional 12pc Support Ring Set No. Item Quantity Remarks Part No. PHT1500‐300 Standard Main unit Configuration D type impact device With cable Standard test block Cleaning brush (I) Small support ring Alkaline battery AA size Manual Instrument package case Optional Cleaning brush (II) For use with G type Configuration impact device Other type of impact Refer to Table 3 and devices and support Table the rings... -
Page 7: Structure Feature &Testing Principle
Table 3 2 Structure Feature &Testing Principle 2.1 Structure Feature Type of impact DC(D)/DL D+15 device Impacting energy 11mJ 11mJ 2.7mJ 90mJ 11mJ Mass of impact body 5.5g/7.2g 7.8g 3.0g 20.0g 5.5g Test tip hardness: 1600HV 1600HV 1600HV 1600HV 5000HV Dia. Test tip: 3mm 3mm 3mm 5mm 3mm Material of test tip: Tungsten Tungsten Tungsten Tungsten synthetic carbide carbide carbide carbide diamond HARDNESS GAUGE... -
Page 8: Different Types Of Impact Device
2.1.2 Different Types of Impact Device Table 2: Leeb to Tensile Strength Conversion Chart: This is an Approximation only! No. Material HLD Strength σ (MPa) Mild steel 350~522 374~780 High‐Carbon steel 500~710 737~1670 Cr steel 500~730 707~1829 Cr‐V steel 500~750 704~1980 Cr‐Ni steel 500~750 763~2007 Cr‐Mo steel 500~738 721~1875 DC C D D+15 DL G Cr‐Ni‐Mo steel 540~738 844~1933 2.2 Main Screen Cr‐Mn‐Si steel 500~750 755~1993 Below is the main display screen: Super strength steel 630~800 1180~2652 Average Memory Icon Stainless steel 500~710... -
Page 9: Keypad Definitions
Instruction of the Main Display Screen: 85~65 Material The present presetting material. : 85~80 Impact direction The present impact direction. : Hardness scale : Hardness scale of the present measured value. HRC Grey cast 93~33 92~32 Battery information : Shows remaining battery capacity iron Measured value Display present single time measured value without showing : ( average icon or display the present mean value (with average icon prompting). “‐ ), HI‐” means over conversion value or measure range. “‐LO‐” means lower than HRC conversion value or measure range. -
Page 10: Leeb Hardness Testing Principle
Release the impact body after use. Press key to store present group of measured value into memory. This NEVER USE LUBRICANT OR CLEANERS ON IMPACT DEVICE! operation is only valid after displaying the mean value. Press key and could display single measured value. 6.2 Instrument Maintenance Program Press key could switch on or off the background light of LCD. When testing in the Rockwell C hardness scale your error amount should not exceed 2 Rockwell C points. Changing the spherical test tip or impact body Press key to set the impact direction. should be considered. Press key to change the impact times in one group. The impact times item ... -
Page 11: Preparation
5.9 EL Backlight 3 Preparation With the EL background light, it is convenient to work in darker conditions. 3.1 Instrument Preparation and Inspection Press key to switch on or switch off the background light at any moment as you need after power on. Since the EL light will consume more power, turn on it only Calibration of the instrument is performed by using a standard calibrated test block. when necessary. The error and repeatability of displayed value should be within +/‐6HL points (D 5.10 Auto Power Off device) The instrument and impact device must be calibrated using a standard The instrument features an auto power off function designed to conserve hardness block prior to first usage or having reset the instrument system. -
Page 12: Preparation Of The Sample Surface
4) Use the key and the key to view each single measured data in that group 3.3 Preparation of the Sample Surface while viewing details. 5) Press the key to return to previous screen at any time during data logging. Preparation for sample surface should conform to the relative requirement in Appendix Table 3. 5.6.2 Deleting selected file/Group The user may require deleting a file from the instrument memory. The procedure Test surfaces should be at or close to room temperature for optimal is outlined in the following steps. performance Press the key to activate the data logging function. The memory icon will appear. It will display the current file name, the test parameter of the group data ... -
Page 13: Testing Program
Mild steel Cr‐Mo steel AVOID any object that has a strong Magnetic Force. High carbon steel Cr‐Ni‐Mo steel Cr steel Cr‐Mn‐Si steel Cr‐V steel Super strength steel 4 Testing Program Cr‐Ni steel Stainless steel 4.1 Start‐Up 5.3 Hardness/Strength testing Insert the plug of the impact device into the socket of impact device on the instrument. Press key to switch between hardness testing and strength testing (бb). Note: Only D and DC type of impact device has the function of strength testing. So Press the key to power the unit on. The instrument ready for testing. hardness testing is the only selection if the impact device is not D or DC type. 4.2 Loading In hardness testing, Press key to change the hardness scale. The Pushing the loading‐tube downwards until contact is felt. Then allow it to slowly supported hardness scale includes: HL, HV, HB, HRC, HS and HRB. -
Page 14: Read Measured Value
Table 4‐1 Type of Distance of center of the Distance of center of the Impact two indentations indentation to sample Device edge Not less than (mm) Not less than (mm) D、DC The instrument can be turned off by pressing the key. The hardness tester has memory that retains all of its settings even when the power is off. D+15 5.2 Material Setting Press key to change the material to the one you want to preset. Hardness scale defaults to HL automatically after material presetting changed. Please select material first, then select hardness scale.
Need help?
Do you have a question about the PHT-1800 and is the answer not in the manual?
Questions and answers