Advertisement
Quick Links
Advertisement

Related Manuals for C.E.C. TUBE53


Summary of Contents for C.E.C. TUBE53
- Page 1 ����� ����� ����� �����...
-
Page 2: Important Safety Instructions
• Specifications ……………………………………………………………………18 Thank you for purchasing the TUBE53. Please refer to this Owner’s Manual to use your TUBE53 safely, and in the best pos- sible way. It is recommended that you keep the carton box and the packing material available for future transportation needs. - Page 3 Clean only with a dry cloth. Do not block any ventilation openings. Install in accordance with the manufacturer’s instructions. Do not install the TUBE53 near any heat sources such as radiators, heat registers, stoves, or other apparatus (including amplifiers) that produce heat.
- Page 4 TUBE53 itself, its power-supply cord, or plug has been damaged in any way, when liquids have been spilled onto the TUBE53, when foreign objects have fallen into the TUBE53, when the TUBE53 has been exposed to rain or moisture, when the TUBE53 does not operate normally, or when the TUBE53...
- Page 5 • Do not expose the TUBE53 to drips or splashes. • Do not place any objects filled with liquids, such as vases, on the TUBE53. • Do not install the TUBE53 in a confined space, such as within a book case or similar piece of furniture.
-
Page 6: Handle With Care
2. To avoid noise from your speakers, turn your system components on or off in the following order: Power on: Turn on other devices connected to the TUBE53’s inputs first, before turning the TUBE53 on. Power off: Turn the TUBE53 off first, before turning off any connected devices. - Page 7 TUBE53, hampering its performance. If this happens, leave the TUBE53 unused in the room for 1 to 2 hours (depending on the amount of condensation), so as to bring the TUBE53’...
- Page 8 2. AC power cord 3. Owner’s Manual Note: Keep the carton box and packing material available for future transportation needs. The AC power cord is for use with the TUBE53 exclusively, and should not be used for other devices. � �...
- Page 9 Press the POWER button to turn the TUBE53 on. The LED above the button will light up. Note: It takes 2 to 3 minutes for the TUBE53 to stabilize once its power is on. To turn the unit off, move the VOLUME knob to the minimum and press the POW- ER button again.
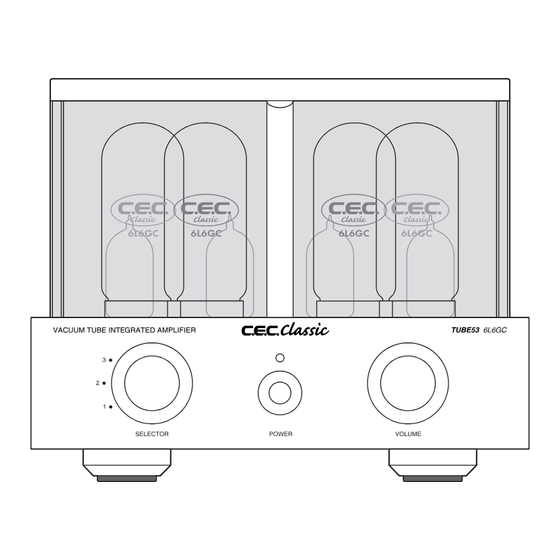
- Page 10 ����� � ������ ������ ��� AC LINE Connect the supplied AC power cord to the AC LINE inlet. RIGHT INPUT/LEFT INPUT Line in audio signal input jacks equipped with unbalanced RCA connectors. Use in- terconnect RCA cables to connect inputs 1 / 2 / 3 to an external source with an RCA line output, such as a CD player, tuner or tape deck.
- Page 11 6Ω or lower. Note: When connecting speaker cables, the TUBE53 should be powered off. Screw the terminal caps tightly when using banana plugs. Insert the spades or wire into the terminal pole and screw the caps tightly.
- Page 12 The vacuum tubes should be considered expendables. The tubes used in the TUBE53 are designed to last fi ve years or longer under normal operating conditions. Should a fi lament be broken, or should you experience a malfunction (such as noise), you can replace the vacuum tube(s) following the procedure described below.
- Page 13 Pull the broken vacuum tube out, lifting it straight up from the unit. Insert a new vacuum tube into the socket, making sure the pins are lined up adequately. Check that the tube is plugged in fi rmly and completely. Note: Avoid handling the vacuum tube with bare hands.
- Page 14 Replace the top cover on the unit and fi x the 5 screws gradually, in the order instructed in the diagram below. Caution: Do not screw too tightly or unevenly. Extreme or uneven tightening may cause the glass side panels to crack due to excessive pressure. �...
- Page 15 Ensure that there is plenty of space between the TUBE53 and other devices and/or walls. • If you wish to install the TUBE53 in an audio rack, ensure that there is at least 15cm of clearance above the unit’s top cover. It is recommended that you install the TUBE53 on an audio rack or board of sufficient mass, so as to prevent vibrations from reaching the...
- Page 16 • The TUBE53 should not require any periodic maintenance, and contains no user serviceable parts except for the vacuum tubes and fuse. If the surface of the TUBE53 is soiled, wipe with a soft cloth or use diluted neutral cleaning liquid. Be sure to remove any fluid completely. Never use thinner, benzene or alcohol as these may damage the surface of the unit.
- Page 17 If you suspect a malfunction in the unit, please check the following chart before calling your dealer. No power Check the connection at the both ends of the AC power cord. Make sure there is power at the wall outlet. Replace the fuse at the AC inlet if it is broken.
- Page 18 Output Power 2 x 20W (8ohm) Frequency Response 20Hz ~ 20kHz + / -0dB S/N Ratio more than 90dB less than 0.5% (8ohm / 1kHz) Input Terminal 3 x RCA Input Sensitivity 400mV Input Impedance 100k ohm Output Terminal 1 (8 ohm or 6 ohm) Tube 4 x 12AU7, 4 x 6L6GC T6.3AL 250V for 120VAC or T3.15AL 250V for...
- Page 20 0703-A...
Need help?
Do you have a question about the TUBE53 and is the answer not in the manual?
Questions and answers