Advertisement
Quick Links
T440 Simple Projector Controller user's manual version V124 (part A)
(Ed Schoell rev: Mar 27th 2017)
The T440 is a wired (RS232) remote controller for video
projectors and flat panels, allowing simple
On-Off control, channel/source selection and optionally, audio
level control or freeze/mute functions.
Ease of setup and installation has been an important design
criterion, and this has been achieved by providing a data-base
of pre-coded projector code families in all units, so all have
identical software (which is field up-dateable). At install time,
or whenever options (or projectors) are changed in a room, the
changes are made by selecting device families with the
"Program select" hex switches on the back of the unit.
The range of keyboards at the end of this manual is coded for
identification, and this code number is set on the "Kbd Select" hex switch.
A DIP switch allows installers to quickly select several extra options.
Several variables can be setup at install time, allowing for variable warm-up and cool-down times, timeout time for
automatic turnoff, and allocation of a wide range of computer or video channels to the front-panel keys.
Except for a major code upgrade for totally new devices, a laptop is never needed at install/setup time. There is ¼
Mbyte of memory in the unit for data-base storage. A boot loader is included in the CPU, located in upper memory, so
no special programming dongles are needed; it just needs a PC with a serial port (or a USB to serial adaptor.)
Operation of the T440
A number of coloured LEDs are associated with keys, and these are steady or flashed to signal to the user the current
state of the system. Pressing keys moves the operation through these various states.
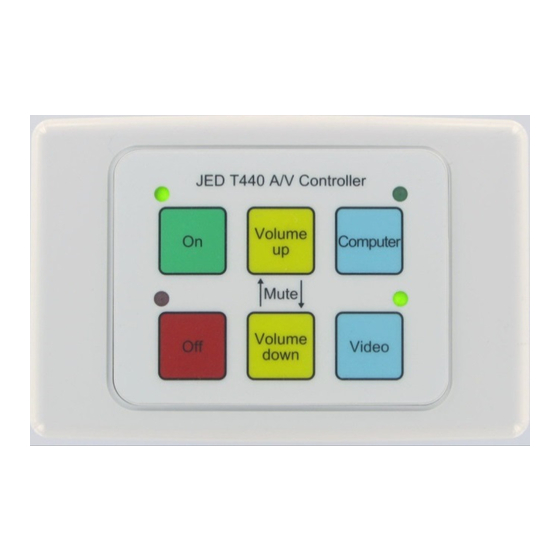
There are two groups, or "styles" of keyboards:
• Separate ON and Channel keys: This has one Green, ON key and Blue, Channel keys (Video, Computer).
In rev 22, it is possible to toggle between two computer or two video channels with either key; and
• Combo On/Channel keys: This group has one or three Green keys which are marked with a Channel function as
well as "/ On".
Operation of the T440
Rear view and T440 connections
Setting up the T440 switches
Setting keyboard code
Selection switch for options
Selection of program/projector
Setting of T440 constants
Code 6 two-key kbd setup
Key masking with Constant:4
Screen control (relay) interfaces
USB Sw/Power ON relay interface 8
Timer/PIR in and closedown timer 9
Jed Micro Pty Ltd
5/173 Boronia Rd, Boronia, Victoria 3155 Australia
Phone: +61 3 9762 3588
www.jedmicro.com.au
Table of Contents
1
OPT3: AUX/PIR in for rem. On/Off 9
3
Serial 2 access to T440 setup info 10
4
Factory reset of constants
4
Readout of version number
4
OPT1: Swap Video:1 & Video:2
5
OPT5: Swap Comp:1 & Comp:2
5/6
OPT4: Set Comp1/2, Vid 1/2 video 11
7
OPT7: Detection of proj. shutdown 12
7
OPT8: T441/T461 audio control
8
OPT8: PTN DPA-22 audio cntrl. 12/13
Configuring the T440: Proj. codes 13
Configuring the T440:Relays/USB 13
T440 User's manual Part A, © JED Micro Pty Ltd 2015
email: jed@jedmicro.com.au
PTN WVGA2A VGA/audio/USB 14
Configurating User flags:Aspect 14/17
11
Setting default source channel
11
Master/Slave connections 2 x T440 19
11
Reprogramming of the CPU
11
Wiring the T440
Trouble-shooting the T440
Keyboard codes
12
Wiring diagram
17
21
23
23
25
26
Page 1
Advertisement

Subscribe to Our Youtube Channel
Summary of Contents for Jed Micro Pty T440
- Page 1 OPT8: PTN DPA-22 audio cntrl. 12/13 USB Sw/Power ON relay interface 8 Configuring the T440: Proj. codes 13 Timer/PIR in and closedown timer 9 Configuring the T440:Relays/USB 13 T440 User’s manual Part A, © JED Micro Pty Ltd 2015 Page 1...
- Page 2 (above or to the left of the OFF key) blinks once. (There is no blink if no T441/T461 response is detected.) Turnon With “Separate On Key” keyboard: Pressing the ON key starts the T440 warm-up cycle. This will send the “start-up” code to the projector.
- Page 3 At the far left is the power input, in the range of 9 to 25 volts. Current is under 50mA but depends on voltage; • Optional: Relay drive out, intended for screen control. Optional: IR transmitter output: (Code 1 keyboard only); • T440 User’s manual Part A, © JED Micro Pty Ltd 2015 Page 3...
- Page 4 This is done using the “Kbd select” hex switch, and selecting the code of the keyboard style. This allocates the key closures to T440 functions, and makes the T440 design extremely flexible in application. At the end of this manual is a table of keyboard drawings and their codes.
- Page 5 Selection of the program/projector SW2 and SW3, the “Program select” switches shown in the T440 rear view, are normally used to select a family and/or make of projector. These switches are read on Reset (pressing the “Reset” switch) or power on, and determine what codes are sent to the projector as front panel keys are pressed.
- Page 6 On/Off Constant:12 On/two relays selected by high/low nibble for Video 1 commands to Constant:13 On/two relays selected by high/low nibble for Video 2 T441/T461or T440 User’s manual Part A, © JED Micro Pty Ltd 2015 Page 6...
- Page 7 Relays for screen control (Relays 1, 2) and hardware 439/ power (i.e. audio system) or dipper control via Relay 3. When this option is used, the switches used for channel setting option on a T430 are allowed on a T440. This table, for a KB1 keyboard (“On”...
- Page 8 (This was added because some screen control systems (e.g. Somfy IB+ 1 AC Motor Controller WM/PCB 100-240 V AC) do not allow the common line to the grounded to the T440 common. The older Somfy CD4 did allow this.) Constant:9 value...
- Page 9 PIR detector. When the PIR senses a person in its sensor beam, the relay opens, and the PIR input pin is pulled up by a resistor on the T440. This clears the counter in the same way a key-press does, and the counter restarts.
- Page 10 NOTE: These functions are only enabled when OPT3 switch is turned ON. If this switch is turned OFF, the T440 ON keys(s) can be used, allowing easy setup of default channels and other testing. Then turn OPT3 switch ON to engage these control functions (and disable the ON key(s)). After an Aux/PIR initiated turn-on, the starting channel is the saved, (last used) one before turnoff.
- Page 11 If a T440 installer wishes to check the program version, examine switch settings and meanings, Constant settings, keyboard settings etc., a test/debug mode can be entered. To do this: Connect a T440/460 “reprogramming” cable from the “Second” T440 serial port, (i.e. a Phoenix to DB9 cable) to a •...
- Page 12 OPT7: Detection of projector shutdown If Option Sw7 is ON, then the projector will be polled by the T440 every 5 seconds for its run state. If the projector has been turned OFF (either manually via the projector-top buttons, the projector IR remote or because of a timeout with no signal, etc) the T440 will detect this and will also follow state to show the OFF LED glowing.
- Page 13 OPT8: JED T441 or T461 audio control (Needs Constant:$F= 00 (default) The T440 software supports the use of the T441/T461 to give absolute control of audio switching and level. These are used if Option Switch 8 is ON. When connected, and the OFF key pressed, the green ON LED flashes momentarily.
- Page 14 Input4 := A9 + 00 + 01 + 00 + 00 + 05 + 05 + 9A; // Input D or DVI to be the string used for the Computer1 key on a T440, simply put its index (i.e. "4") into the “Constant:0” location (as shown on page 4 of the manual, using a switch setting of E0 on the Program Select switch and 00000100 on the Options switch).
- Page 15 It is setup by loading Constant:$F with a value of 20. It has a simple mode of operation: Channel 1 is selected with a Computer:1 channel on the T440, and Channel 2 is selected with Computer:2. Coms OK shows a green flash on the ON / top left LED after pressing the OFF button.
- Page 16 LED after pressing the OFF button. The control software for driving the Apart Concept1 or T1 from a T440 is enabled by setting a value of 35 decimal into Constant:F. The T440 driver turns the unit On and Off, sets channels as per the following table, and sets audio volume by channel in 20 steps, corresponding to a -80 (off) to 0 dB range of 4dB per step.
- Page 17 Configuring the T440: Setting up using UserFlags[0 ... F] (loaded at $D0->$DF) At Rev 3.11, the ability of setting up aspect ratios via flags at D0 hex to DF hex was added. UserFlags are addressed in memory in the same way as Constants covered earlier: The flags $0 … $F are selected with the program/projector selection switches SW2 and SW3.
- Page 18 Part B of the T440 manual, and is still usable with these control flags, to send a “Roll Aspect Ratio” command to channels that have had it enabled for; Absolute Aspect Ratio: This mode sends absolute aspect setting commands to the projector or panel. Because it is more precise, this software allows individual aspect ratios to be enabled selectively channel by channel.
- Page 19 A) … keyboards with combo-keys (Computer/On, Video/On, TV/On) select the channel selected by the combo key pressed, and so cannot be setup with a default source.) This setup allows setting a default channel for the T440. This is setup with two OPT bits in UserFlags[A] Right-most two bits from UserFlags[A] are used...
- Page 20 OPT7 and OPT8 used from this function. Configuring the T440: Setting up Master / Slave between two T440s. From version V064 it is possible to connect two T440s together via the second serial ports so that they work in tandem.
- Page 21 AV Downloader 1.1. A reload takes under a minute, and the connection to the 4-pin connector on the back of the T440 “second” serial port is via the same “download” cable the T460 uses. (This is the connector usually used for the T441/T461 serial cable.) Only Rx, Tx and Gnd connections are needed.
- Page 22 “T440Vxxx.hex” file. (xxx is the current version number). P files are for projector support, F files are for Flat Panel support. Save it in the “T440 hex files” data directory just created on your PC: i.e. “C:\JED downloads\T440 hex files” Click on the JED AV Downloader 1.1...
- Page 23 (See page 4 diagram) Most commonly, CAT5 cable is used for T440 to projector wiring. It is important to use the CAT5 as a series of pairs, where there is an active line (solid colour) paired with a twisted mate (same colour with white). Please make sure the ground pins of signal cable pairs are connected at both ends, particularly with RS232 TX and TX lines.
- Page 24 If a selection item in the projector menu called “Auto-search” exists it should be set to OFF (as we are commanding sources from the JED controller). T440 User’s manual Part A, © JED Micro Pty Ltd 2015 Page 24...
- Page 25 Four key, code A Six key landscape, code B-L Six key Vertical, code B-Vert Eight-key TV controller, Code E Also available in silver keys/background as Code BLM T440 User’s manual Part A, © JED Micro Pty Ltd 2015 Page 25...
- Page 26 JED MICROPROCESSORS P/L DRAWN NUMBER 24/04/08 Original 173 BORONIA ROAD T440 Wiring Detail 24 April 2008 DATE BORONIA 3155 SHEET SCALE VICTORIA AUSTRALIA NUMBER PROJECT FILE NAME www.jedmicro.com.au T440 User’s manual Part A, © JED Micro Pty Ltd 2015 Page 26...
Need help?
Do you have a question about the T440 and is the answer not in the manual?
Questions and answers