Table of Contents
Advertisement
Advertisement
Table of Contents

Related Manuals for Flightline FL-M1000A


Summary of Contents for Flightline FL-M1000A
- Page 1 VHF Air BAnd TrAnsceiVer FL-M1000A/FL-M1000e instruction Manual...
- Page 2 RF interference claims are correct at time of going to suppression. printing, however they are subject to change without notice. Flightline does not accept liability for any error or omission. This manual remains the copyright of Flightline.
-
Page 3: Table Of Contents
cOnTenTs inTrOdUcTiOn ........4 Frequency list (Example of frequency Introduction ..........4 versus display when using 8.33 Khz Part names and functions ......5 step) ............ 33 MP-1000 microphone .......7 Supplied accessories ......34 Display ............8 Recalling the Pri channel ......10 BAsic OperATiOn ......11 Basic usage ..........11 Turning the power on or off ....12 Adjusting the audio volume ....12... -
Page 4: Introduction
As with all air Air Band radios, successful communications start with the installation. Thank you for purchasing this quality After unpacking the transceiver verify all product from Flightline. parts against the parts list. The Display provides a 30-degrees field of view This transceiver has been designed and from right and left, and from upper side. -
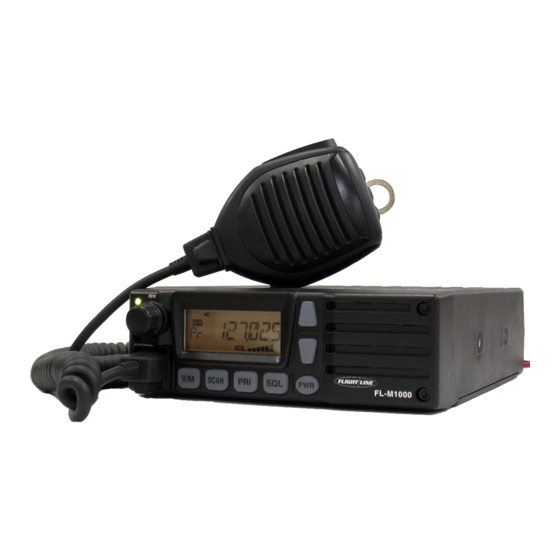
Page 5: Part Names And Functions
inTrOdUcTiOn part names and Functions Front panel SCAN FL-M1000 q Tx/rx indicator t pWr button • Indicate Red in transmission, Green in • Short press: indicates voltage of power Receiving. source. • Long press: turn the radio ON/OFF. w rotary encoder y sQL button •... - Page 6 inTrOdUcTiOn !0 Microphone connecter • Connect the supplied Microphone (do not connect other microphone to prevent trouble)
-
Page 7: Mp-1000 Microphone
inTrOdUcTiOn Mp-1000 Microphone q Volume Up/dOWn r Microphone • Decrease audio volume by press the v • Speak into the circled area when button, and increase by c button talking. w Monitor Button note: • Press the button makes the radio in There is a microphone element in the monitor mode. -
Page 8: Display
inTrOdUcTiOn display q Low battery indicator y Memory indicator • The “L” will indicate when the voltage of • The “MR” icon will indicate when the power source becomes less than 11.7 radio is displaying a memory channel. Volt. u LOcKOUT indicator w Busy indicator •... -
Page 9: Rear Panel
inTrOdUcTiOn rear panel q Antenna connector • Connect an Antenna with PL-259 type (50 ohms, SWR: less than 3.0) w power cable • Connect a Battery (12 V or 24 V). Do not connect the other type. e external speaker Jack •... -
Page 10: Recalling The Pri Channel
inTrOdUcTiOn recalling the pri channel You can recall a Priority Channel by pressing the PRI button when the radio is in VFO mode or in Memory Channel mode. press the pri button • The channel will be changed to Priority Channel and the “Pr” will be displayed instead of memory channel number. press the pri button again to return to previous channel... -
Page 11: Basic Operation
BAsic OperATiOn Turn the rotary Knob to select Basic Usage desired frequency. • The TX/RX Indicator will become Green if the radio receives a signal. press the pWr button more than two seconds. Wait a signal from transmitting your partner. Monitor the frequency is not busy before transmission. Hold the microphone about 1 to 3cm away from your mouth. -
Page 12: Turning The Power On Or Off
BAsic OperATiOn Turning the power On or Adjusting the Audio Volume press and hold the pWr button press the c button to increase more than two seconds to turn the audio level. radio On. • The LCD will be activated and Frequency will be displayed on the LCD. press and hold the pWr button more than two seconds to turn the radio OFF. -
Page 13: Adjusting The Squelch Level
BAsic OperATiOn Adjusting the squelch note: The audio will be muted when Level receiving week signal if the SQL level is set too big. press the sQL button • The Display will change to Squelch You can change Audio level while in Setting mode. Squelch Setting mode. Turn the rotary Knob slowly direction to clockwise. -
Page 14: Changing The Channel
BAsic OperATiOn changing the channel change MHz/kHz for Variable Frequency Frequency on the LCD will be changed by turning the Rotary Knob in VFO mode. You can switch between MHz and kHz for Channel Number on the LCD will be changing frequencies in VFO mode. -
Page 15: Dimmer
BAsic OperATiOn dimmer Transmitting The brightness of LCD Backlight can be confirm that the channel is not changed. busy before transmitting. confirm the radio is switched On. Keep away your mouth from the microphone about one inch. short press the rotary Knob. • The brightness will be changed as press and hold the pTT switch. -
Page 16: Memory And Scan Operation
MeMOry OperATiOn There are various functions such as scanning the Memory Frequency Scanning on VFO mode, Memory Scanning on Memory mode or This function is Scanning for memorized dual watch the specific two frequencies. channels. Please refer page 20; how to memorize a frequency. -
Page 17: Scanning With The Priority Channel
MeMOry OperATiOn Priority Memory Scan scanning with the priority channel 250 ms The Priority Channel will be checked 250 ms Pri Ch every 250 msec during the radio is in VFO scanning or Memory Scanning. 250 ms confirm the radio is in VFO mode or Skip Memory mode. -
Page 18: Priority Watch
MeMOry OperATiOn press the scAn button to stop the priority Watch “priority Watch”. The “Priority Watch” is to watch the current channel (displayed frequency or memory channel) and Priority Channel alternately. confirm the radio is in VFO mode or Memory mode. select a desired frequency or memory channel to make the priority Watch. -
Page 19: Other Memory Operations
MeMOry OperATiOn Other Memory Operations There are advanced feature for Scanning, On hook scanning and Lock Out Memory. On hook scanning, Lock Out Memory • On hook scanning The Scan will start when the microphone is ON Hook, and will stop when OFF Hook. -
Page 20: Memory Operations
MeMOry OperATiOns This section shows how to memorize switching the VFO and frequently using frequency as Memory Memory Mode Channel. Memorizing a Frequency The operating mode can be changed between VFO mode and Memory mode. select a frequency that is going to press the V/M button. -
Page 21: Erasing A Memory
MeMOry OperATiOns erasing a Memory setting the priority Memory The memorized frequency can be erased. Memorize a frequency that is most press and hold the V/M button frequently using as Priority Channel. You more than two seconds in VFO can recall the Priority Channel easily mode. -
Page 22: Recalling The Priority Channel
MeMOry OperATiOns note: recalling the priority It is available to memorize as priority channel channel if displaying the “PR” by turning the rotary knob at the step 3. The Priority Channel can be easily recalled by just pressing PRI button even when the radio is in VFO mode or Memory Channel mode. -
Page 23: Naming The Memory Channel (Memory Tag)
MeMOry OperATiOns press the c button to move second naming the Memory digit. channel (Memory Tag) You can name the memory channel. The name will be displayed instead of frequency when you recall the memory channel if Memory Tag feature is enabled. enter the name tag by repeating the press the V/M button during the step 4 and 5. -
Page 24: Setting The Lockout Memory Channel
MeMOry OperATiOns setting the Lockout Memory channel This section indicates how to delete (lockout) a memory channel from the memory scan list. press the V/M button during the radio is in VFO mode. • The “MR” icon and the Memory Number will appear on the LCD. select a Memory number that you want to skip for Memory scan by rotary knob. -
Page 25: Advanced Operation
AdVAnced OperATiOn emergency call changing the settings It is easily recall an Emergency Channel The following functions can be changed; (121.5MHz) when the radio is in VFO Beep tone, External speaker setting, mode, Memory mode and on the Priority Internal speaker setting, Time out timer, Channel. -
Page 26: Changing The Each Settings
AdVAnced OperATiOn changing the each settings The each setting can be changed individually. Internal speaker setting Turn the radio On with press and holding the V/M and sQL buttons. • The “SET” icon with setting status will be displayed. select the setting number (and the number becomes flashing). Time out timer press the rotary knob. -
Page 27: Appendix
Appendix Please contact your dealer about installation. connecting installing place The radio must not be installed in the place where driving is obstructed. - Page 28 Appendix connections q connect an Antenna and the Antenna connector • The Antenna that has PL-259 type connector (50homs, SWR: less than 3) is available to connect. w connect power cable to Battery of the vehicle • The available voltage of the Battery is 12V or 24V, do not connect the other type. e connect a speaker (3rd party’s one) to external speaker Jack •...
-
Page 29: Mounting
Appendix Mounting The radio can settle on/under the dashboard using supplied bracket. • The bracket must be fixed with supplied screws. • Otherwise the bracket cannot be fixed tightly or inside of the radio may get serious damage. -
Page 30: Optional Headset Adapter
Appendix Optional Headset Adapter When using an optional headset, such as those from the David Clark Co. via the adapter, the transceiver outputs your transmitted voice to the headset for monitoring. connection PTT switch Use a PTT switch with a 3.5 mm diameter plug, if required. - Page 31 Appendix installation The optional HEADSET ADAPTER install as follows. q Turns the power OFF, then disconnect the dc power cable. w Unscrew the 4 screws, then remove the bottom cover. e insert the connector as shown below. r Mount the phone plug attachment together with the mobile mounting bracket with 2 supplied screws.
-
Page 32: Specifications
Appendix specifications General Frequency range: ........118.000 to 136.975 MHz Channel spacing: ........*8.33 kHz / 25 kHz Mode: ............AM (6K00A3E) Number of memory channels: ....99 Acceptable power supply: ......13.8 V or 26.4 VDC (Negative ground only) Usable temp. -
Page 33: Step)
Appendix Frequency List (example of Frequency Versus display when Using 8.33 kHz step) Operating Frequency channel speacing (kHz) displayed Frequency 118.00000 118.000 118.00000 *8.33 118.005 118.00833 *8.33 118.010 118.01667 *8.33 118.015 118.02500 118.025 118.02500 *8.33 118.030 118.03333 *8.33 118.035 118.04167 *8.33 118.040 118.05000... -
Page 34: Supplied Accessories
Appendix supplied Accessories (1) MP1000 Microphone ..................1 (2) Microphone hanger and screw set ..............1 set (3) Microphone cable ....................1 (4) DC power cable (3 m(1 ft))with 10A Fuse ............1 (5) Mounting bracket kit ................... 1 Mounting bracket ....................1 Bracket bolt ...................... - Page 35 User and Installation manual(s). It shall be at Flightline sole discretion to decide if a defect is a result of material or workmanship failure. T H e WA r r A n T i e s A n d r e M e d i e s c O n TA i n e d H e r e i n...
- Page 36 Flightline 12830 E. Mirabeau Parkway Spokane Valley, WA 99216 Toll free tel.: 1-800-235-3300 Toll free fax: 1-800-828-0623 http://www.edmo.com Flightline 2009 All Rights Reserved Printed in Japan April 2009 00M70AC851010...
Need help?
Do you have a question about the FL-M1000A and is the answer not in the manual?
Questions and answers