
Related Manuals for Cabletech URZ0112


Summary of Contents for Cabletech URZ0112
-
Page 1: Network Camera
NETWORK CAMERA BEDIENUNGSANLEITUNG OWNER’S MANUAL INSTRUKCJA OBSŁUGI MANUAL DE UTILIZARE URZ0112... - Page 3 BEDIENUNGSANLEITUNG I. SICHERHEITSANLEITUNGEN Lesen Sie diese Anleitungen sorgfältig vor der ersten Benutzung und heben diese auf für späteres nachschlagen. 1. Schützen Sie dieses Produkt vor Feuchtigkeit, Feuchtigkeit, Wasser und anderen Flüssigkeiten. Vermeiden Sie die Verwendung / Speicherung in extremen Temperaturen. Setzen Sie es nicht direktem Sonnenlicht und Wärmequellen aus.
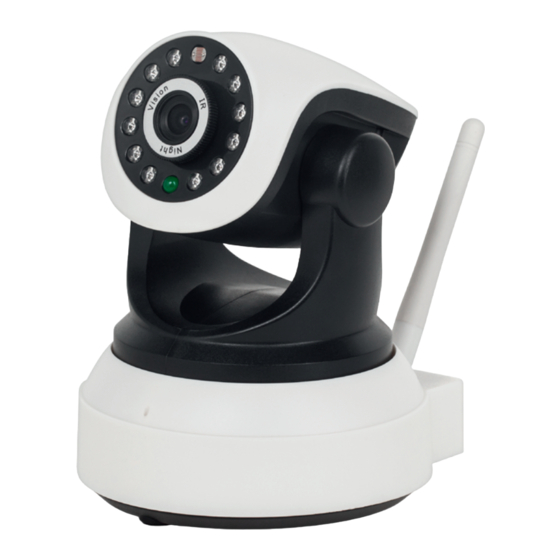
- Page 4 BEDIENUNGSANLEITUNG II. PRODUKTBESCHREIBUNG 1. IR Sensor 2. IR Licht 3. Kameralinsen 4. Anzeige (Video-Aufnahme) 5. Lautsprecher 6. Wi-Fi Antenne 7. Mikrofone 8. Montageschraube 9. Taste RESET 10. Audio- Ausgangsbuchse 11. LAN Steckplatz 12. SD Kartensteckplatz 13. I/O Alarm Anschluss 14. DC 5 V Anschluss...
-
Page 5: Montage
BEDIENUNGSANLEITUNG III. GERÄTEBEDIENUNG 1. MONTAGE Verwenden Sie den mitgelieferten Handgriff, um die Kamera zu montieren. Achten Sie darauf, das dass Gerät richtig und sicher befestigt ist. Verbinden Sie das Netzteil an den Anschluss an der Rückseite des Gerätes. Stecken Sie den anderen Stecker des Netzteils in die Steckdose. Verbinden Sie die Kamera mit dem Router über Ethernet-Kabel. - Page 6 BEDIENUNGSANLEITUNG 4. BENUTZEN (SMARTPHONE) Wenn die Installation abgeschlossen ist, erscheint das Anwendungssymbol in der Anwendungs-Liste. Anwendung ausführen. Wenn Sie die Anwendung zum ersten Mal benutzen, Klick auf ADD DEVICE (Neue Kamera hinzufügen). Am Bildschirm erscheint das Konfigurationsfenster. Drücken Sie SCAN ID um den Barcode des Gerätes zu scannen, oder SEARCH um die Kamera über das Netzwerk zu suchen.
- Page 7 BEDIENUNGSANLEITUNG Echtzeitvideo Klicken Sie auf die Kamera in der Kameraliste, um Echtzeit-Video anzuzeigen. Klicken und ziehen (links / rechts / oben / unten), um PTZ Richtung zu steuern. Drücken und halten auf dem Bildschirm, um die Steuerungstasten-Paneels anzuzeigen. Beschreibung der Kontrolltasten TASTE BESCHREIBUNG Verlassen...
- Page 8 BEDIENUNGSANLEITUNG Kontrast regeln Video auf Werkseinstellungen zurücksetzen Infrarotlampe einstellen Voreinstellung aufrufen/ Voreinstellungen speichern* Benutzen Funktion Voreinstellungen Ihre Kamera- Positionseinstellungen zu speichern. Kamera auf die gewünschte Richtung einstellen Klick Voreinstellung > Voreinstellungen speichern > Nummer auswählen um die Richtung zu speichern (zum Beispiel 2). Kamera auf eine andere Richtung drehen.
- Page 9 BEDIENUNGSANLEITUNG • DDNS Einstellungen; • Alias Einstellungen; • Zeit-Einstellungen: Gerätezeit, Zeitzone, Mobiltelefon-Kalibrierung; 5. BENUTZEN (PC): Vor dem Benutzen bitte sicherstellen: Die IP Kamera ist an Stromversorgung und Netzwerk angeschlossen. Ihr Router unterstützt DHCP (Dynamische IP Zuteilung). Um die Kamera zu bedienen: Öffnen Sie das Geräte-Programm auf Ihrem Computer.
- Page 10 BEDIENUNGSANLEITUNG 6. BROWSERZUGRIFF Echtzeit Kamera-Bildbetrachtung ist auch über den Web Browser möglich Um diese Funktion zu benutzen: Öffnen Sie den Web-Browser auf Ihrem Gerät. Geben Sie die IP-Nummer der Kamera in das URL-Eingabefeld (z.B. 192.168.1.4, Kamera IP-Adresse können Sie bei Ihrer Router- Konfiguration vor Ort erhalten, vorausgesetzt, die Kamera ist erfolgreich mit dem Router verbunden) oder vom Suchwerkzeug (Geräteliste) im Client-Gerät.
- Page 11 BEDIENUNGSANLEITUNG Einstellungen Klicken Sie auf die Werkzeugtaste, um Parameterverwaltung aufzurufen. Parameter-Management-Seite bietet Zugriff auf: Grundeinstellungen, Alarm-Einstellungen, Netzwerk-Einstellung, Einstellungen Benutzereinstellungen. Mithilfe dieser Seite können Sie die IP-Kamera Einstellungen entsprechend Ihrer Bedürfnisse konfigurieren. 7. DRAHTLOSE VERBINDUNG ZWISCHEN IP KAMERA UND ROUTER Sie können diese IP-Kamera drahtlos an den Router angeschlossen ist. Um die Kamera einzustellen: Browser aufrufen um auf die Kamera zuzugreifen (Kamera IP in das URL- Feld des Browsers eingeben).
- Page 12 BEDIENUNGSANLEITUNG 8. FERNSTEUERUNG DER IP KAMERA Im Netzbetrieb, wird eine Software-Installation durch den IE-Browser des Betriebssystems selbst durchgeführt, das einfach und praktisch ist. Der DVR unterstützt LAN- und WAN-Zugang sowie IP und Domain Name-Zugang. HINWEIS: Die Kamera erlaubt Fernbedienung und Management mit dem Einsatz von Smartphone, Tablett oder Computer mit Internet Explorer- Browser.
- Page 13 BEDIENUNGSANLEITUNG Danach gehen Sie zu INTERNET OPTIONEN > SICHERHEIT > VERTRAUENSWÜRDIGE SITES > SITES . Geben die Kamera IP Adresse in das Feld DIESE ZONE ZUR WEBSITE HINZUFÜGEN ein. Stellen Sie sicher dass “Für diese Zone ist eine Serverprüfung ...
-
Page 14: Auf Werkseinstellungen Zurücksetzen
BEDIENUNGSANLEITUNG 9. AUF WERKSEINSTELLUNGEN ZURÜCKSETZEN Die Reset-Taste befindet sich in der Lochblende versteckt am unteren Teil des Geräte-Gehäuse. Um die Werkseinstellungen wiederherzustellen, führen Sie einen dünnen Gegenstand (z.B. Büroklammer) in das Reset-Stiftloch und drücken und halten Sie die Reset-Taste für mindestens 5 Sekunden gedrückt. Die Kamera wird die werkseitigen Standardeinstellungen wiederherstellen. -
Page 15: Technische Daten
BEDIENUNGSANLEITUNG 10. TECHNISCHE DATEN • Sensor: CMOS, 1/4” Farbsensor • Auflösung: 640x480 (VGA), 320x240 (QVGA) • Linsen: 3,6 mm • Bildfrequenz: 30 fps (QVGA), 30 fps (VGA) • Videoformat: MJPEG • IR LED: 12 • Minimale Beleuchtung: 0,1 LUX • PTZ Kontrollwinkel: horizontal: 270°... - Page 16 BEDIENUNGSANLEITUNG Die Spezifikationen können ohne Ankündigung geändert werden. “Hiermit erklär die Firma Lechpol dass sich das Gerät URZ0112 im Einklang mit den grundlegenden Anforderungen und anderen relevanten. Bestimmungen der Richtlinie 1999/5/EG befindet. Konformitätserklärung zum Download auf www.lechpol.eu” Deutsch Korrekte Entsorgung dieses Produkts (Elektromüll)
-
Page 17: Safety Instructions
OWNER’S MANUAL I. SAFETY INSTRUCTIONS Read the instruction manual carefully before first use and keep it for future reference. 1. Protect this product from moisture, humidity, water and other liquids. Avoid using/storing it in extreme temperatures. Do not expose it to direct sunlight and sources of heat. -
Page 18: Product Description
OWNER’S MANUAL II. PRODUCT DESCRIPTION 1. IR sensor 2. IR lights 3. Camera lens 4. Indicator (video recording) 5. Speaker 6. Wi-Fi antenna 7. Microphone 8. Mount screw 9. RESET button 10. Audio output jack 11. LAN port 12. SD card slot 13. -
Page 19: Device Handling
OWNER’S MANUAL III. DEVICE HANDLING 1. MOUNTING Use the handle provided to mount the camera. Make sure the device is mounted properly and securely. Connect the power adapter to the power socket at the back of the device. Connect the other plug of the power adapter into power socket. Connect the camera to router via Ethernet cable. - Page 20 OWNER’S MANUAL 4. USE (SMARTPHONE) When the installation is complete, the app icon will appear on the app list. Run the app. When using the app for the first time, click ADD DEVICE. The screen will display configuration interface. Press SCAN ID to scan the bar code on the device or SEARCH to search the camera through network.
- Page 21 OWNER’S MANUAL Control buttons description BUTTON DESCRIPTION Wyjście Mirror the image vertically Mirror the image horizontally Right/left cruising function Up/down cruising function Screen rotate Voice monitoring Capture pictures Video recording Resolution settings Brightness adjustments Contrast adjustment Restore video settings to default Infrared lamps setting Preset a call/preset a set*...
- Page 22 OWNER’S MANUAL * Use preset function to save your camera position settings. Set the camera to the desired direction. Click “Preset > preset a set > select a number to replace this direction (for example 2). Turn the camera to a different direction. Click “preset >...
-
Page 23: Browser Access
OWNER’S MANUAL 5. USE (PC): Before the use, make sure: The IP camera is connected to power supply and network. Your router supports DHCP (dynamic IP allocation). To operate the camera: Open the Device Client program on your computer. Go to System > Device list > Open search tools > Search The list will display available devices. - Page 24 OWNER’S MANUAL Please note, if the HTTP port is not as default, you may need to input camera IP address followed by HTTP port number (e.g. 192.168.1.4:81). HTTP port number of the device can be obtained from search tool (device list) in Client Device. Enter login and password of the IP camera (default: login “admin”, password none;...
- Page 25 OWNER’S MANUAL Click tool button to enter Settings. Go to Network Set > Wireless LAN settings > input your router data (make sure the SSID and shared-key of the router are entered correctly) and click “Submit”. The IP camera will need to reboot. Wait for the process to complete and disconnect the network cable from IP camera.
- Page 26 OWNER’S MANUAL Next, go to INTERNET CONNECTION > SECURITY > TRUSTED SITES > SITES. Input camera’s IP address into “Add this website to the zone” space. Make sure the “Require server verification (https:) for all sites in this zone” is checked. Press ADD, then CLOSE.
-
Page 27: Factory Setting Reset
OWNER’S MANUAL Next, go to “Internet” > “Custom level” and enable options in “ActiveX controls and plug-ins” (as shown below). Click “OK” to confirm, and then again “OK” in Internet options” window. 9. FACTORY SETTING RESET The reset button is hidden in the pinhole at the bottom casing of the device. To restore the factory settings, insert a thin tool (e.g. -
Page 28: Specifications
OWNER’S MANUAL 10. SPECIFICATIONS • Sensor: CMOS, 1/4” color • Resolution: 640x480 (VGA), 320x240 (QVGA) • Lens: 3.6 mm • Frames quantity: 30 fps (QVGA), 30 fps (VGA) • Video format: MJPEG • IR LEDs: 12 • Minimum illumination: 0.1 LUX •... - Page 29 OWNER’S MANUAL Specifications are subject to change without prior notice. “The Lechpol company declares that product URZ0112 is consistent with the essential requirements and other relevant provisions of directive 1999/5/EC. The proper declaration for download from www.lechpol.eu” English Correct Disposal of This Product (Waste Electrical &...
- Page 30 INSTRUKCJA OBSŁUGI I. KWESTIE BEZPIECZEŃSTWA Przed użyciem należy dokładnie zapoznać się z treścią instrukcji obsługi, oraz zachować ją w celu późniejszego wykorzystania. 1. Urządzenie należy chronić przed wilgocią, wodą oraz innymi płynami. Nie należy używać ani przechowywać urządzenia w zbyt wysokich / zbyt niskich temperaturach.
-
Page 31: Opis Produktu
INSTRUKCJA OBSŁUGI II. OPIS PRODUKTU 1. Czujnik IR 2. Diody podczerwieni 3. Obiektyw 4. Kontrolka nagrywania video 5. Głośnik 6. Antena Wi-Fi 7. Mikrofon 8. Gwint do uchwytu 9. Przycisk RESET 10. Wyjście audio 11. Port LAN 12. Czytnik kart microSD 13. -
Page 32: Obsługa Urządzenia
3. INSTALACJA OPROGRAMOWANIA UŻYTKOWEGO 1. Aby pobrać aplikację, należy wejść na stronę http://www.lechpol.eu Aplikacja do pobrania znajduje się w zakładce „Pliki” produktu URZ0112. 2. Wybrać odpowiedni plik instalacyjny zgodnie z urządzeniem na którym instalowana będzie aplikacja (Android, iOS, PC). 3. Pobrać plik instalacyjny. - Page 33 INSTRUKCJA OBSŁUGI Po zakończonej instalacji otworzyć aplikację. 4. OBSŁUGA APLIKACJI 4.1. SMARTFON: Po zakończonej instalacji, ikona aplikacji pojawi się na liście zainstalowanych aplikacji. Należy uruchomić aplikację poprzez kliknięcie na ikonie. Podczas pierwszego użycia, należy nacisnąć przycisk „ADD DEVICE” (Dodaj nową kamerę). Na ekranie wyświetli się...
- Page 34 INSTRUKCJA OBSŁUGI znajdujący się na obudowie kamery lub „SEARCH” (Wyszukaj) aby wyszukać kamery połączone do Wi-Fi. Zaznaczyć wybraną kamerę, dodać ją, wprowadzić nazwę, nazwę użytkownika, hasło i nacisnąć przycisk „DONE” (Gotowe) aby przejść dalej. 4.1.1. PODGLĄD NA ŻYWO Aby przejść do funkcji podglądu na żywo, należy kliknąć na nazwę wybranej kamerę...
- Page 35 INSTRUKCJA OBSŁUGI Ustawienia rozdzielczości Regulacja jasności Regulacja kontrastu Przywróca domyślne ustawienia video Ustawienia podczerwieni Predefiniowane ustawienia* *Funkcja predefiniowanych ustawień służy do zapisania konkretnych ustawień kamery wg. preferencji użytkownika. Aby skorzystać z tej funkcji, należy: Ustawić kamerę w wybranej pozycji. Nacisnąć PRESET (predefiniowane ustawienia) > PRESET A SET (ustaw) > SELECT A NUMBER TO REPLACE THIS DIRECTION (wybierz numer), np.
- Page 36 INSTRUKCJA OBSŁUGI User setting Ustawienia ustawienia administratora i operatora, użytkownika konfiguracja ustawień hasła Alarm setting Ustawienia alarmu konfiguracja alarmu, wykrywania ruchu itp. Mail setting Ustawienia mail konfiguracja mail SD setting Ustawienia SD ustawienia karty microSD, zmiana parametrów, łączna pojemność karty, formatowanie.
- Page 37 INSTRUKCJA OBSŁUGI lewej stronie okna (więcej szczegółów na temat przycisków w paragrafie Przyciski Kontrolne). 4.3. DOSTĘP PRZEZ PRZEGLĄDARKĘ Podgląd na żywo dostępny jest również przez przeglądarkę. Aby skorzystać z tej funkcji, należy: Uruchomić przeglądarkę na komputerze / smartfonie. Wpisać adres kamery pasek adresu...
- Page 38 INSTRUKCJA OBSŁUGI Po przejściu do strony konfiguracyjnej, użytkownik może skonfigurować Basic Settings Alarm odpowiednio: (Ustawienia podstawowe), (Ustawienia alarmu), Network Set (Ustawienia sieci), PTZ Set (Ustawienia PTZ) oraz User Set (Ustawienia użytkownika). 4.4. BEZPRZEWODOWE POŁĄCZENIE KAMERY Z ROUTEREM Aby umożliwić bezprzewodową komunikację pomiędzy routerem a kamerą, należy: Uruchomić...
- Page 39 INSTRUKCJA OBSŁUGI UWAGA: Kamera umożliwia zarządzanie zdalne z pozycji smartfona, tabletu lub komputera z przeglądarką Internet Explorer. Należy pamiętać, że wymaga to wiedzy i dodatkowej konfiguracji urządzenia. 4.5.2. Ustawienia przeglądarki Internet Explorer Aby dostęp przez przeglądarkę Internet Explorer był możliwy, należy skonfigurować...
- Page 40 INSTRUKCJA OBSŁUGI IP kamery. Następnie należy upewnić się, że opcja Żądaj weryfikacji serwera(...) jest zaznaczona (jesli nie, trzeba ją zaznaczyć). Następnie należy nacisnąć przycisk DODAJ. Przyciskiem ZAMKNIJ potwierdzamy wszytsko co do tej pory zostało ustawione i zamykamy okno Zaufane witryny.
-
Page 41: Przywracanie Ustawień Fabrycznych
INSTRUKCJA OBSŁUGI W opcji NARZĘDZIA, przechodzimy do zakładki Internet i wybieramy Poziom niestandardowy. W grupie Kontrolki ActiveX i wtyczki zaznaczamy opcje po czym nalezy zatwierdzić przyciskiem OK w oknie Ustawienia zabezpieczeń i ponownie OK w oknie OPCJE INTERNETOWE. 5. PRZYWRACANIE USTAWIEŃ FABRYCZNYCH Przycisk RESET znajduje się... - Page 42 Środowisko użytkowania: Temperatura: 0~50ºC, wilgotność: 20%~80% • Zasilanie: DC 5 V Specyfikacja produktu może ulec zmianie bez powiadomienia. „Niniejszym firma Lechpol oświadcza, że urządzenie URZ0112 jest zgodne z zasadniczymi wymaganiami oraz innymi stosownymi postanowieniami dyrektywy 1999/5/WE. Właściwa deklaracja do pobrania na stronie www.lechpol.eu” Poland Prawidłowe usuwanie produktu...
-
Page 43: Instructiuni Privind Siguranta
MANUAL DE UTILIZARE I. INSTRUCTIUNI PRIVIND SIGURANTA 1. Inainte de instalarea si utilizarea camerei cititi cu atentie manualul si pastrati-l pentru referinte ulterioare. 2. Nu depozitati aparatul in zone cu umiditate ridicata, cum ar fi baia sau piscina. Feriti aparatul de temperaturi extreme si lumina directa a razelor soarelui. -
Page 44: Descriere Produs
MANUAL DE UTILIZARE II. DESCRIERE PRODUS 1. IR sensor 2. IR lights 3. Lentile camera 4. Indicator (inregistrare video) 5. Difuzor 6. Antena Wi-Fi 7. Microfon 8. Surub montare 9. Buton RESET 10. Audio output jack 11. Port LAN 12. SD card slot 13. - Page 45 MANUAL DE UTILIZARE III. DEVICE HANDLING 1. INSTRUCTIUNI DE MONTARE Utilizați mânerul furnizat pentru a monta camera. Asigurați-vă că dispozitivul este montat corect și sigur. Conectați adaptorul de alimentare la mufa de alimentare din partea din spate a aparatului si alimentati adaptorul. Conectați camera la router prin cablu Ethernet.
- Page 46 MANUAL DE UTILIZARE 4. UTILIZARE (SMARTPHONE) Cand instalarea este gata, pictograma aplicatie apare pe lista aplicatiilor. Porniti aplicatia. La prima utilizare, dati click pe ADD DEVICE. Ecranul va afișa interfața de configurare. Apasati SCAN ID pentru a scana dispozitivul sau SEARCH/CAUTARE pentru a căuta camera prin intermediul rețelei.
- Page 47 MANUAL DE UTILIZARE Descriere butoane control BUTTON DESCRIPTION Iesire Asezare imagine vertical Asezare imagine orizontal Functia dreapta/stanga croaziera Functia sus/jos croaziera Rotire ecran Monitorizare voce Captura foto Inregistrare video Setari rezolutie Reglare luminozitate Reglare constrast Revenirea la setările implicite pentru video Setari lumina infrarosu Presetare apel /presetare...
- Page 48 MANUAL DE UTILIZARE * Utilizati functiile presetatae pentru a salva setarile de pozitie pentru camera. Setati camera in directia dorita. Apasati PRESET > PRESETATI SETARILE > alegeti un numar pentru a inlocui aceasta directie (ca exemplu). Intoarceti camera intr-o directie diferita. Apasati PRESET >...
- Page 49 MANUAL DE UTILIZARE 5. USE (PC): Inainte de utilizare, asigurati-va: Camera IP este conectat la sursa de alimentare și de rețea. Router-ul suport DHCP (Alocarea IP dinamică). Pentru a porni camera: Deschideți programul client pentru dispozitiv de pe computer. Mergeti la Sistem > Lista dispozitive > Deschideti instrumente de cautare> Cautare Lista va afișa dispozitivele disponibile.
- Page 50 MANUAL DE UTILIZARE 192.168.1.4; adresa IP a camerei poate fi obținuta de pe site-ul de configurare a router-ului, cu condiția ca aparatul sa fie conectat la router), sau de la instrumentul de căutare (lista dispozitive). Introduceți parola de conectare a camerei IP (implicit: conectare „admin”, parola “none”), informațiile sunt furnizate pe etichetele din partea de jos a camerei.
- Page 51 MANUAL DE UTILIZARE faceți click pe „Submit”. Camera IP va trebui repornita. Așteptați pana la finalizarea procesului și deconectați cablul de rețea de la camera IP. Camera va fi conectata la router prin wireless. NOTE: După configurarea camerei IP pentru a fi conectat wireless la un router, camerei ii este atribuita o nouă...
- Page 52 MANUAL DE UTILIZARE Mergeti la “Internet connection” > “Security” > “Trusted sites” > “Sites”. Introduceti adresa IP camera in campul Add this website. Apasati “Add”, apoi “Close”.
-
Page 53: Revenirea La Setarile Din Fabrica
MANUAL DE UTILIZARE Urmatorul pas, mergeti la “Internet” > “Custom level” si activati optiunile “ActiveX controls & plug-ins”. Faceți click pe „OK” pentru a confirma, și apoi din nou „OK” în fereastra Internet Options. 9. REVENIREA LA SETARILE DIN FABRICA Butonul de resetare este ascuns într-un orificiu in carcasa in partea de jos a aparatului. - Page 54 MANUAL DE UTILIZARE 10. SPECIFICATII • Senzor: CMOS, 1/4” color • Rezolutie: 640×480 (VGA), 320x 240 (QVGA) • Lentile: 3.6 mm • Numar cadre/sec: 30 fps (QVGA), 30 fps (VGA) • Format inregistrare video: MJPEG • Led-uri IR: 12 • Iluminare minima: 0.1 LUX •...
- Page 55 MANUAL DE UTILIZARE Specificatiile sunt supuse schimbarilor fara notificare prealabila. „Compania Lechpol declară că produsul URZ0112 este în conformitate cu cerinţele esenţiale şi alte prevederi relevante ale Directivei 1999/5/CE. Declaraţia pentru descărcare este postata pe site-ul www.lechpol.eu” Romania Reciclarea corecta a acestui produs...
- Page 56 www.cabletech.pl...
Need help?
Do you have a question about the URZ0112 and is the answer not in the manual?
Questions and answers