Chapters
Table of Contents

Summary of Contents for Monobuggy CHES-B2
- Page 1 Golf Scooter Mono Buggy ENGLISH Assembly and operation instructions(page 2) ENGLISH Golf Scooter Mono Buggy SCANDINAVIAN Manual og samlevejledning(page 23) 06725_DE-GB-FR-NL.indb 1 20.01.11 16:55...
-
Page 2: Table Of Contents
ENGLISH Contents Meaning of the Symbols in These Instructions Safety Instructions Warranty Terms What is supplied Overview Before your first ride Unpacking Assembly Raising up the steering rod Finish assembling the handlebar, tacho and headlight Attaching the rear-view mirrors Inserting the battery fuse Attaching the saddle Attaching the score board Attaching the bottle holder... -
Page 3: Meaning Of The Symbols In These Instructions
Dear Customer, We are delighted that you have chosen the Golf Scooter Mono Buggy. This modern and environmentally friendly golf scooter is suitable for all age groups and is ideal for covering short distances, e. g. when playing golf or camping, in your leisure time or in everyday life. The comfortable saddle and excellent suspension mean that it provides great comfort for the rider. - Page 4 ❒ Do not make any additions or alterations to the scooter. ❒ Always ride with the headlight switched on (even during the day). ❒ Use the scooter on public roads only when you have familiarised yourself with its use. ❒ Always check the scooter for signs of damage before putting it into operation. Do not try to repair bent safety-critical parts such as the frame, forks, handlebar, saddle, saddle post, or brake levers;...
- Page 5 ❒ Riding without hands and hanging on to other vehicles is extremely dangerous and further- more forbidden. ❒ Riding two or more abreast hinders the other traffic and should therefore be avoided. ❒ Keep a safe distance from the person in front. ❒...
-
Page 6: Warranty Terms
❒ PLEASE NOTE! Never immerse the battery, charger, mains lead or plug in water or other liquids. ❒ Remove the plug from the mains socket before cleaning the charger. Wipe the outside with a clean and slightly damp cloth. ❒ Do not drop the charger or allow it to be knocked violently. ❒... -
Page 7: Overview
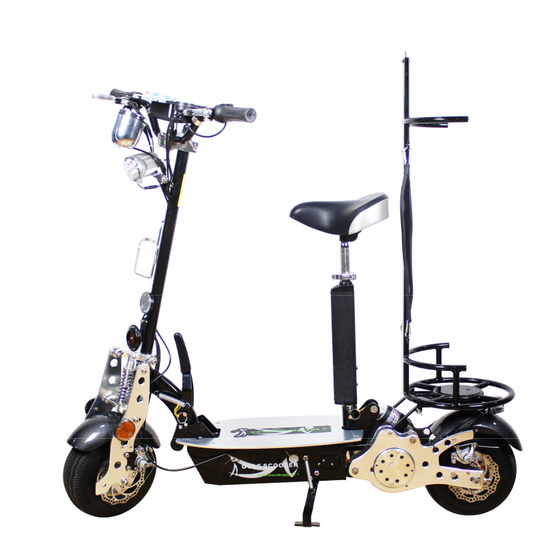
Overview 1 Accelerator throttle 21 Contact switch for stand 2 Score board 22 Stand 3 Rear brake lever 23 Footboard 4 Buttons for headlight and horn 24 Charger socket 5 Handle grip 25 Safe bolt for fold down 6 Ignition key 26 Lever for fold down 7 Saddle 27 Front brake caliper... -
Page 8: Before Your First Ride
Headlight and horn • 1 On/Off button for headlight • 2 Horn button Accelerator throttle • 1 Accelerator throttle to control speed. • 2 Right handle grip. Speedometer • 3 Speedometer display in km/h and mph • 4 Charge status of the battery: 1 (E) Battery must be charged up;... -
Page 9: Assembly
Assembly You will need • an open-jaw wrench, size 10 and 13 • an Allen key, size 5 and 6 If you do not have any tools to hand, you can also use the tool set that is supplied. We recommend that you get help from a second person when assembling the scooter. -
Page 10: Attaching The Rear-View Mirrors
Attaching the rear-view mirrors (Option) 8. If you find a right-hand and left-hand rear-view mirror supplied with the scooter. After assembly, the mirrors must be bent outwards (away from the steering rod). 9. Take one rear-view mirror and undo the lock nut on the end of the mirror bracket so that the thread is revealed. -
Page 11: Attaching The Score Board
20. If necessary, slide the saddle bar into the saddle post (the narrow end must point upwards) and adjust it to the height you want. Tighten up the quick-release lever. 21. Place the saddle on the saddle bar and adjust it to the optimum angle of inclination. -
Page 12: Operating The Golf Rack
29. Take out the golf rack from package, there is a hole on the base of the golf rack. 30. Place the golf rack on the rear rack board of the scooter. Make sure that make the pin from rear rack board into the hole on the base of the golf rack. -
Page 13: Charging The Battery
Charging the battery PLEASE NOTE! ❒ It is essential that you fully charge up the battery before you first use the scooter. ❒ The battery may not be completely discharged because this could damage it. ❒ Only use the charger indoors and in the dry. ❒... -
Page 14: Operation
Operation PLEASE NOTE! • Before each journey you make, check that all the components are securely mounted and working properly. In particular, you should check the brakes, the accelerator throttle and the headlight. Make sure that the battery is charged. •... -
Page 15: Starting And Stopping
• Use the right-hand brake lever to apply the front-wheel brake and the left-hand brake lever to apply the rear-wheel brake. • Please note that the braking distance increases with increasing load. • Please brake gently. Blocked wheels have a poorer braking effect and can also result in skids and accidents. -
Page 16: Information About The Range
Information about the range It is practically impossible to give binding information on the range as a large number of factors play a role here such as: • Charge status of the battery • Headwind • Tyre pressure • Chain tension •... -
Page 17: Lubricating The Chain
Lubricating the chain From time to time, you should oil the chain with bike oil or a suitable lubricant. The scooter will then be quieter and run more easily. Maintenance PLEASE NOTE! ❒ If you are not technically adept, consult an expert. Tyres The scooter is fitted with 10 inch tyres. -
Page 18: Adjusting The Chain
Adjusting the chain The tension of the chain is set by the manufacturer. After a little while, it may need to be readjusted. • If the chain jumps on the sprocket and cuts out, it is too loose. This will result in among other things a shorter range for the scooter and more rapid wear and tear on the chain. -
Page 19: Storage / Folding Up The Scooter
5. Connect the battery cable to the cable in the battery compartment. 6. Close the battery compartment and snap the latches shut. Check whether the latches have closed correctly. Storage / folding up the scooter PLEASE NOTE! ❒ When you fold up the scooter, the side stand must be folded in as otherwise it could become bent. -
Page 20: Troubleshooting
Troubleshooting If the scooter should stop working properly, first check whether you are able to correct the problem yourself. If you are not, contact with local dealer or distributor. Problem Possible cause/solution • Tyre pressure too low: Check the tyre pressure •... -
Page 21: Disposal
Problem Possible cause/solution • Fuse battery compartment blown: Replace the fuse. • Cable connections loose or damaged: Check/secure/ repair cable connections (or have this work carried The motor switches off abruptly. out) • Motor defective: Contact an authorised workshop / our Customer Service department. -
Page 22: Technical Data
Technical data Model: CHES-B2 Device: Golf Scooter Motor: Electric motor, 800W, 36 V DC Force transmission: Chain drive Speed: 25 km/h Range: approx. 20-25 km (depending on terrain and weight load) Gross weight: max. 150 kg Intrinsic weight: 42 kg Dimensions assembled: approx. - Page 23 06725_DE-GB-FR-NL.indb 20.01.11 16:55...
- Page 24 Rengøring af rammen Rengøring af fodplade Vedligeholdelse af kæden Generel vedligeholdelse Dækkene Justering af bremser Justering af kæde Justering af head set (styr) Montering af batteri Hvordan folder jeg monobuggy sammen Fejlsøgning Bortskaffelse Tekniske data Kunde service 06725_DE-GB-FR-NL.indb 20.01.11 16:55...
-
Page 25: Symbolforklaring
Kære kunde, Tak fordi du har valgt en Monobuggy. Denne moderne og miljøvenlige golf scooter er velegnet til alle aldersgrupper og er ideel til at dække korte afstande, f.eks. når man spiller golf. Monobuggy er også velegnet til transport på campingpladser, kort sagt et sjovt og sikkert køretøj, der kan bruges i fritiden eller i hverdagen. - Page 26 ❒ Tænd kun lyset når det er påkrævet (da det forkorter drift tiden at køre med lyset tændt) ❒ Det er en god idé at prøvekøre monobuggy inden man kører på golfbanen første gang. ❒ Kontroller altid scooteren for tegn på skader, før du kører. Forsøg ikke at reparere sikkerhedskritiske dele såsom rammen, gafler, styr, sadel, sadel post eller bremsegreb, få...
- Page 27 ❒ Når du ønsker at fjerne stikket fra stikkontakten, skal du altid trække i stikket og ikke i kablet. Hold oplader og batteriet tørt under opladning. ❒ ❒ Efter opladning, bør man sørge for at skubbe dækslet over lade stikket på siden af Monobuggy. 06725_DE-GB-FR-NL.indb 26 20.01.11 16:55...
-
Page 28: Garantibestemmelser
1 sikkerhedsstift til saddelrør • 1 sikkerhedsstift til foldefunktion • 1 batteri (er monteret) • 1 oplader • 2 sidespejle (ekstra tilbehør se: www.monobuggy.dk) • 2 tændingsnøgler • 1 værktøjssæt inkl. 2 batteri sikringer • 1 instruktionshæfte 06725_DE-GB-FR-NL.indb 27 20.01.11 16:55... -
Page 29: Oversigt
Oversigt 1 Gashåndtag 21 Sikkerhedskontakt for støtteben 2 Score kort holder 22 Støtteben 3 Bremsegreb (bagbremse) 23 Fodstøtte (batteridæksel) 4 Knapper til lys og horn 24 Ladestik 5 Håndtag 25 Sikringsstift for foldefunktion 6 Tændingsnøgle 26 Håndtag for foldefunktion 7 Sadel 27 Bremse kalipre (front) Håndtag til foldefunktion 28 Bremseskive... -
Page 30: Før Man Kører Første Gang
5 Lyser op når lygterne er tændt. Tændingslås • Tændingsnøglen kan stå I følgende positioner: Før du anvender Monobuggy første gang Inden den første køretur bør du: • Pakke alle dele ud og sikre at der ikke mangler noget, •... - Page 31 Unbrakonøgle størrelse 5 og 6mm Hvis du ikke har de nævnte værktøjer kan du anvende det værktøj der medfølger scooteren. Vi anbefaler at du har en hjælper ved hånden når du samler Monobuggy første gang. Fold styret op 3. Fold styret op. Brug den ene hånd til at presse håndtaget nedad og den anden hånd til at løfte styrstammen opad...
-
Page 32: Montering Af Sidespejle
Montering af sidespejle (ekstra tilbehør) 8. På www.monobuggy.dk kan man bestille et sæt sidespejle der kan monteres som følger: 9. Fjern låsemøtrik hvorved der kommer et gevind til syne. 10. Vælg den rigtige side og skru sidespejlet fast ved hjælp af det gevindhul der findes i sidegrebet. -
Page 33: Montering Af Scorekort Holder
20. Monter sadelpinden ved hjælp af den medfølgende kvik-lås. 21. Placer sadlen på sadelpinden og tilpas til den optimale hældningsvinkel. Stram de to møtrikker med en gaffelnøgle (str. 13). Mont. af scorekort holder 22. Scorekort holderen skal monteres med de to skruer fra styrpinden (se illustration) 26. -
Page 34: Sådan Fungerer Holderen For Golfbag
34. Tag holderen ud af emballagen. Der er et hul i bunden af holderen. 35. Placer holderen ovenpå den lille hylde bag på Monobuggy, således at stiften kommer til syne I hullet (ref. til illustration) Holderen låses fast ved at aktivere udløseren i toppen af holderen. -
Page 35: Opladning Af Batteri
0 ° C eller over 40 ° C Monobuggy er udstyret med et tørcelle batteri som ikke behøver at være fuldt opladet og afladet (ingen memory-effekt). Det holder strøm i lang tid, efter det er opladet. Der er ikke risiko for at overlade batteriet da opladeren automatisk afbryder opladningen når... -
Page 36: Drift
• Vælg en stille vej eller en parkeringsplads til din første tur. Prøv bremsning med bag- og forhjulsbremserne for at vænne dig til hvordan Monobuggy reagerer. • Når tændingen er aktiveret reagerer scooteren omgående på enhver bevægelse af gashåndtaget. -
Page 37: Hvordan Man Starter Og Stopper
7. Oplad batteriet (se "Opladning af batteri"). 8. Parker Monobuggy et tørt sted, hvor der er mulighed for opladning og hvor små børn ikke har adgang til den. 06725_DE-GB-FR-NL.indb 35... -
Page 38: Hvor Langt Kan Man Køre
Informationer om rækkevidde. Det er praktisk taget umuligt at give bindende oplysninger om området som en lang række faktorer spiller en rolle, såsom: • Batteriets lade status • modvind • Dæktryk • Kæde justering • Kørerens vægt • Batteriets alder (normalt kan det oplades ca. 300 gange) •... -
Page 39: Vedligeholdelse Af Kæden
❒ Få en til at hjælpe dig hvis du ikke er så fortrolig med det tekniske. Dæk Monobuggy er udstyret med 10” dæk og dækmønster bør ikke komme under 1,6mm Det optimale dæktryk er ca. 3,5 bar (60 psi). Hvis dæktrykket er for lavt, kan det forøge slidtage af dækket, ligesom scooteren rækkevidde vil blive reduceret. -
Page 40: Justering Af Kæde
Justering af kæden Kæden er justeret af producenten, men efter et stykke tid kan det være en god idé at få den justeret og efterset. • Hvis kæden hopper af eller takker over på tandhjulene er det tegn på at den er for løs Og skal justeres ellers skiftes. -
Page 41: Hvordan Folder Jeg Monobuggy Sammen
11. Slut batterikablet til kablet i batterirummet. 12. Luk batterirummet og kontroller at det er lukket helt (det holdes lukket af velcro). Sammenklapning og opbevaring af Monobuggy BEMÆRK ! ❒ Når du folder scooteren op, skal støttebenet foldes ind da det ellers kan blive bøjet. -
Page 42: Fejlsøgning
Hvis scooteren ikke kører eller fungerer ordentligt, er det en god idé at du først kontroller, om du er i stand til at løse problemet selv. Hvis du ikke er, så ta’ kontakt med den lokale forhandler eller distributør. HUSK AT MONTERE DEN MEDFØLGENDE BATTERI SIKRING FØRSTE GANG DU SAMLER MONOBUGGY. Problem Mulig årsag / løsning •... -
Page 43: Bortskaffelse
Problem Mulig årsag / løsning • Sikring batterirum sprunget: Udskift sikringen. • Kabelforbindelser løse eller beskadigede: Check / reparer kabelforbindelser (eller få dette arbejde udført) Motoren stopper pludseligt • Motor defekt: Kontakt et værksted / kundeservice eller web siden. • Kabelforbindelser løse eller beskadigede: Check / / reparer kabelforbindelser (eller få... -
Page 44: Tekniske Data
Tekniske data Model: CHES-B2 Produkt: Golf Scooter Motor: 800W, 36 V DC Drivmiddel: Kædetræk Hastighed: 0 - 25 km/h Rækkevidde: ca. 20-25 km (afhængig af forholdene) Belastning: max. 150 kg Vægt med batteri: 42 kg Vægt uden batteri 27 kg Mål (samlet):... - Page 45 06725_DE-GB-FR-NL.indb 41 20.01.11 16:55...
Need help?
Do you have a question about the CHES-B2 and is the answer not in the manual?
Questions and answers