
Summary of Contents for Scherrer UHF Tx700Pro
- Page 1 MANUAL Transmitter, Pro & Lite Receivers, Long Range & Normal range Rev 1.0 Rev Date. 09/03/2016...
-
Page 2: Table Of Contents
Foreword TSLRS ..............................3 Foreword Transmitter ............................3 Technical Specs ..............................3 Tx700Pro ................................ 3 Tx700Lite ............................... 4 Inputs/Output connectors Tx700Pro ....................... 4 Tx700Lite ............................... 4 Hardware specifications ............................ 5 Tx700Pro ................................ 5 Tx700Lite ............................... 6 TX BATTERY LIFE ............................6 Physical Dimensions ............................ - Page 3 Compatibility TX-RX ............................9 Compatible RC's ..............................9 Head Tracker..............................10 Tx700Pro ..............................10 Tx700Lite ..............................11 Compatible Head trackers ..........................12 Option Board ..............................12 Tx700 Pro ..............................12 Modem Setup Option Board ........................... 12 Tx700Pro ..............................12 How to get best range ............................. 13 LED indicator ..............................
-
Page 4: Foreword Tslrs
Here you will find the information which is needed to make your transmitter perform at the very best both for Tx700Pro and for the Tx700Lite. Notice if the Pro or the Lite is not listed under a subject, it means that it’s the same for both. -
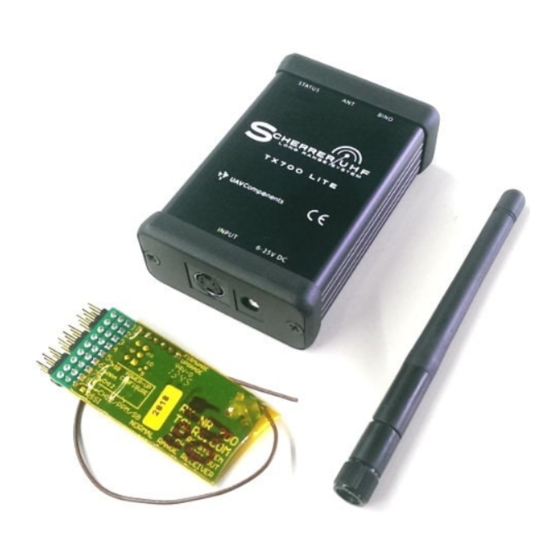
Page 5: Tx700Lite
Note: Graupner call each way a servo travel for a channel, so in Graupner terms a 24 Channel setting handle 12 servos, and is what we call a 12 channel signal. Inputs/Output connectors Tx700Pro DIN 3 pin female screw type for POWER and MAIN-PPM input The female DIN connector seen from outside the TX... -
Page 6: Hardware Specifications
The Ring of the connector is AUDIO input from the wireless video system receiver. Ground is common for both signals. Shielded cables are recommended to avoid cross talk. Hardware specifications Tx700Pro Supply voltage 5-25V for 500mW power Supply voltage 6-25V for 500mW-1000mW-2000mW power Supply power usage is 3 times the transmit power. -
Page 7: Tx700Lite
Supply current at 20V (500mW x 3 = 1.5W / 20V = 0.075 Ampere) Supply current at 10V (500mW x 3 = 1.5W / 10V = 0.15 Ampere) Supply current at 6V (2000mW x 3 = 6W / 6V = 1 Ampere) Tx700Lite Supply voltage 5-25V for 500mW power Supply current at 20V (500mW x 3 = 1.5W / 20V = 0.075 Ampere) -
Page 8: Physical Dimensions
15mS, which means it apply to the 10mW pr average channel regulation in EU and many other areas. This means the 500mW peak setting can be used legally without any radio amateur licence. Note* The Tx700Lite is CE approved and certified. Adapter wiring Futaba JR/Graupner Multiplex Naked (only for Tx700Pro) -
Page 9: Binding In Details
LRS TX, now it will work, the binding mode is only activated when button is held down while power to the LRS TX is applied. Change unique ID code Tx700Pro Remove the top lit, inside the TX unit you find a DIP switch with 8 tiny white buttons, which can be slide up or down. -
Page 10: Output Power Selection Button
ID code. After ID code change, a new bind must be performed. Output Power selection button Tx700Pro The 3 way transmit power switch is located near the antenna connector on the top, where it is most easy to access while in flight. Move the connector close to the antenna connector for low power mode. It is recommend to use as little as possible power, so power-up is possible in case an out of range situation is experienced, this way it is possible to regain control and fly back home. -
Page 11: Head Tracker
RX, in case you need PPM out and use a HT at the same time, you need off course the HT signals to be on ch. 10-11 where normal servo connectors exist. Tx700Pro The head tracker input is integrated in the Tx700Pro... -
Page 12: Tx700Lite
Tx700Lite With the Tx700Lite – the head tracker input is integrated in the cable... -
Page 13: Compatible Head Trackers
THIS SECTION WILL BE UPDATED WHEN THE OPTION BOARD IS RELEASED. Modem Setup Option Board Tx700Pro The Audio signal is 1200 Baud FSK from a video receiver, the level can be from 200mV to 2000mV adjustable on the upgrade board trimmer, adjust trimmer for carrier LED LIT, find the two points where the LED is not lit, and set it in the middle of that for best margin to both sides. -
Page 14: How To Get Best Range
How to get best range Archived range is only the result of the wanted signal to noise ratio. Local noise emitters are the most common way to ruin good receiver’s capabilities to pick up weak signals at long range. The system got a transmitter to receiver calculated line of sight range of over 100km. -
Page 15: Known Limitations
Use at least 1/10 of the distance as height. For example at 3 km/1.8mile, distance stays 300 meters/984 feet up, to get full range. The Tx700Pro with will provide you with a signal to 100km/62 miles range depending on power selection and on which receiver is used. -
Page 16: Foreword Receivers
Foreword Receivers Here you will find the information which is needed to make your receiver perform at the very best. Both the long range receivers and normal range receivers will be listed under each subject. Physical and technical specifications Rx700 Normal Range The receiver board: 26 x 54mm. -
Page 17: Rx700 Long Range
Rx700 Long Range This receiver have improved input filter and makes it now even better attenuation for 900 - 1300 - 2400 video transmitters. This is virtually impossible to jam. The Rx700LR also have improved distance of the servo connector and now all 12 can be mounted at the same time and no bending or problems. The receiver have the following dimensions: Width: 34 mm. -
Page 18: Binding
Binding The binding function stores the Tx signal unique ID code and PPM frame rate and number of servos into the receiver; this must be done every time the number of servos is changed on the RC unit. (or another RC with PPM system). -
Page 19: Ch12/Ppm Options
The procedure is as follows: The radio signal is lost - recall 1, recall 2, recall 3. Radio signal back, - recall 2, recall 1, live. It will run scan mode which means, if a good package is received while it is in recall 2 state, it will go directly to recall 1 and then back live. -
Page 20: Rssi Output
RSSI output The little extra PAD over the CH12 connector is the RSSI output and you the bottom pin row for ground. This is an analogue voltage that reveals how strong the signal is from the TX. Many OSD types can use this voltage to display a calibrated 0-100% readout on the screen display. - Page 21 The data you get are: G: number of Good data packages received B: number of Bad data packages received F: number of Failsafe recalled Values are counted from RX power up and will be zeroed again at next power up, so it is possible to land, connect to a PC via serial port converter and see the values for the flight before you power off the RX.
-
Page 22: Special Features Configurations
Special Features Configurations The receiver can be configured to do a few things other than normal. HOW to configure (if you don’t need to configure, just power it up as normal) POWER OFF connect a 2.54mm 2 pin jumper (a short circuit connection) on servo channel 6-7 (YES between the two signals, they are now shorted together) Power up the RX See LED D1 is lit, this one is closest to same side as ch6... -
Page 23: Channels On Normal Range
Now you stored a permanent setting: servo ch 12 out, if you use 12channels. Power off, Remove jumper, Connect your servos, Test all works. if you use under 12ch, you will off course always get PPM out of the ch12 connector, after a setting change, or PPM timing change or number of channels assigned, you must always perform a bind, and store failsafe, and test all settings works. -
Page 24: Antenna Setup
Antenna setup The ground wire must be separated a bit from the coax. There are no rules of how much of a distance, but 3-5 cm is normally used. RX antennas always have to mount with a 90 degree from each other. With this setup there will be no lost spots. -
Page 25: Bad Antenna Position
Bad antenna position... -
Page 26: Firmware Upgrading
Firmware upgrading Use the 6 pin female connector it is clearly marked with UPGRADE or FIRMWARE UPGRADE, note the arrow to pin 1 and also the upgrade text is also located closest to pin 1. Actually any USB interface with FTDI232 chipset can be used - the Arduino boot loader type or our own called TSLRS-USB. - Page 27 Browse to the HEX file you got via email, using OPEN. Remember the TX hex is for TX unit, and the RX hex is for the RX. File is accepted and loaded, pull down in window so you can see the black status area, click CONNECT...
- Page 28 Mcuboot now instruct you to cycle power supply, they means actually you POWER UP RX or TX unit NOW Now you should be connected to the "secret" boot loader program...
-
Page 29: Option Board For Rx Lr 7.01
Click Program and see on screen and status area checksum bytes After 7 sec your unit is upgraded. The Boot loader will exit and mcuboot will say Programming done, now check firmware is working and new features work as expected. You MUST read about the features of your new software so you know how to use it. -
Page 30: Led Indicators
LED indicators The NR got one LED it simply indicates valid supply voltage. The LR got two LED’s one located near each antenna connector. The normal operation of the LED’s are during flight and installation to show what antenna signal is the strongest, since that is the selected signal. -
Page 31: Abbreviations
Abbreviations Names often used on UHF LRS pages and when talking about radio control and video links and FPV. RC - Radio Control, remote wireless control of something RC unit - The radio control unit you hold in your hand, can be a Futaba, JR, Graupner, Multiplex and so on Servo - when connected to rudders/ailerons/elevator they steer a plane. - Page 32 BNC - is the connector name/type used for the TX and Booster for my LRS, same connector is used on Ethernet systems. Booster - is an amplifier that will take radio signals and boost them up to a more powerful level. LNA - Low Noise Amplifier is used in receivers as the front end stage, they improve the sensitivity and therefore also the range Diversity - is often a double antenna and/or double receiver system with auto switching to the best signal,...
- Page 33 servos SBEC - Switching Battery Eliminator Circuit, is a 5V-6V regulator switch mode type handles more input voltage and have lower loss RC Receiver Battery or Supply, is normally 4 or 5 NIMH cells providing 4.8 or 6V of steady and stable supply, such a battery must be able to handle all servo max currents and still provide sufficient stable voltage, do not use spring loaded battery cassettes or weak current capable cells like normal alkaline types,...
-
Page 34: Fpv General Trouble Shooting Guide
FPV general trouble shooting guide Read this first and try some of this before asking around. Any FPV system car or plane or helicopter or whatever is often a compact system, containing: transmitters, receivers, sensors, hi power pulsed electrical, vibrations, microcontroller electronic boards, video camera, switch mode supply too be able to combine all this into a tiny lightweight platform is a huge challenge and to make all units perform perfectly without interfering each other is often an almost impossible task, even for skilled electronic educated persons. - Page 35 system is often several hundred MHz wide, even if they have a SAW, so 1300 and 1800 can jam it. a 2.4GHz video transmitter have first harmonic at 4.8GHz so it is no big problem with the harmonics, it is a known fact that most 2.4Ghz video transmitters are most likely better with most GPS units. Video stripes is often seen when a power supply is not clean or ground / signal wires are shared with power or other units on the plane, note if the stripes are constant or change with motors or servos or other items moving or operation, try to touch camera or video transmitter, see if any change in the stripes.
-
Page 36: Radio Technical Knowledge
Vibrations is a normal problem for receivers and transmitters, their coils and crystals and filters have microphone behaviour, pack in foam and also avoid loud sound SWR a video transmitter with a badly matched antenna and/or badly grounded will have high frequency currents going on its signal and power cables. - Page 37 A downlink diversity system also solves one other problem, fading and nulling, the most perfect diversity system would have 3 antennas to handle signals from any angle perfect, but the gain from doing this is often minimal and cost and complexity is big, a 2 antenna diversity is the most common compromise. All cellular systems use diversity on the receiver side and brute transmitter power on the Tx side to perfect the link, a cell side Tx is over 26dB more power full over the handset transmitter to obtain an equal quality link, also handset side have a cheaper receiver with less sensitivity, we do not have space for a diversity...
Need help?
Do you have a question about the Tx700Pro and is the answer not in the manual?
Questions and answers