Table of Contents
Advertisement
Advertisement
Table of Contents

Summary of Contents for ROMANTIC ZMA0111A
-
Page 2: Table Of Contents
Contents Page In the box Rotimatic at a glance Before first use Connect to Wi-Fi Let ’s make rotis 1. Prepare ingredients 2 . Make rotis 3. Power off 4. Clean after use Cleaning 1. Regular cleaning 2 . Advanced cleaning Troubleshooting Warrant y... - Page 3 Welcome to #RotimaticLife We hope you enjoy more time with your family while Rotimatic takes care of fresh, healthy meals! Setup and maintenance This Manual has everything you need to know about set-up, maintenance and troubleshooting. For tutorial videos visit: rotimatic.com/tutorials or access them through Rotimatic mobile App.
- Page 4 Before You Begin Unpacking Instructions Carefully unpack the product immediately and check the container to make sure all the parts are in the package and are in good condition. Claims For issues, such as missing components or parts, damage not related to shipping, or concealed damage, email us at moreinfo@zimplistic.com within 7 days of delivery.
- Page 5 Symbols Symbol Meaning Critical installation, configuration, or operation information. Not following these instructions may make the product not work, cause damage to the product, or cause harm to the operator. Important installation or configuration information. The product may not function correctly if this information is not used.
-
Page 6: Important Safeguards
Important Safeguards YOUR SAFETY IS IMPORTANT TO US THESE SAFETY PRECAUTIONS ARE A PART OF YOUR ROTIMATIC, READ THEM CAREFULLY BEFORE USING ROTIMATIC. Basic Precautions 1. Rotimatic is designed to prepare rotis in accordance with the instructions and Important Safeguards included in this User Manual. Do not use your Rotimatic for any purpose other than its intended use. - Page 7 Avoid Risk of Electric Shock and Fire 1. Keep the power cord away from heat, dampness and sharp edges. Contact support@ zimplistic.com for replacement or repair of damaged cord or plug. 2. Plug your Rotimatic into suitable and grounded electrical sockets only. 3.
- Page 8 8. Do not touch hot pans during operation and until at least 25 minutes after use. 9. Use tongs or similar utensil to remove completed rotis to avoid risk of burn injury. Do not insert or place any part of hand underneath or near the press while Rotimatic is in use or powered on to avoid risk of burn injury.
-
Page 9: Product Specifications
Dimensions Voltage and power rating 40 cm x 40 cm x 45 cm Rated Input Voltage: 110 - 120V AC (ZMA0111A model) 16 x 16 x 18 inches 220 - 240V AC (ZMA0111 model) Rated Input Power: 1600 - 1800 Watts... -
Page 10: In The Box
In the box SECTION A 1. Rotimatic 2. User Manual 3. Quick Start Guide 4. Magic Brush 5. Magic Stick 6. Power Cord - 9 -... -
Page 11: B Rotimatic At A Glance
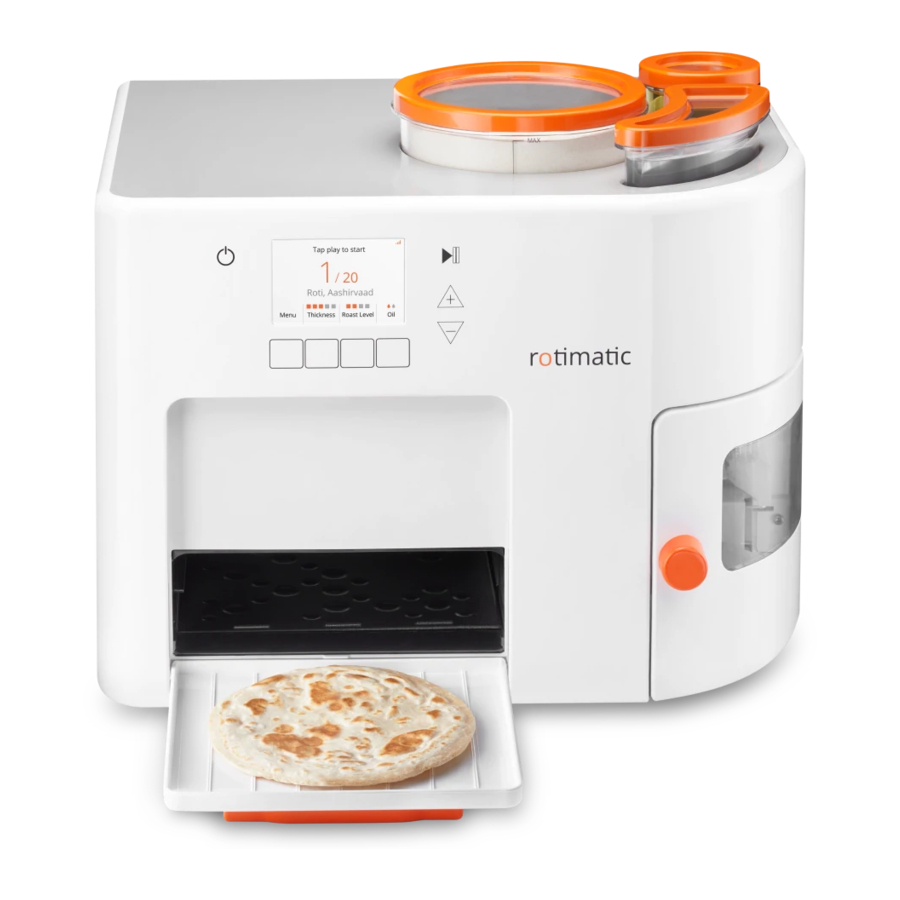
Rotimatic at a glance SECTION B... - Page 12 Rotimatic sections Containers Control screen Kneading section Front door Side door Cooking section Storage Containers Oil container Water container Flour container - 11 -...
- Page 13 Kneading section Stirrer Dough tray Dough cup Sweeper Cooking section Kicker Pans Front door Kicker -12 -...
- Page 14 Control screen 6. Oil level 1. Power button 7. Start/ Stop button 2. Number of rotis made 8. Number of rotis to be made 3. Thickness level 4. Menu (choose flour options) 9. Increase/ decrease roti quantity 5. Roast level 10.
-
Page 15: Before First Use
Before first use SECTION C... - Page 16 Rotimatic Wall 10 cm/ 4 inches After un-boxing Rotimatic, place it on a flat, stable and heat-resistant surface. Rotimatic has two fans located at rear and left side. Keep it at least 10 cm/ 4 inches away from any wall, cabinet or heated oven to prevent overheating.
- Page 17 Install the Rotimatic App - page 18 Follow the instructions in Section D, Connect to Wi-Fi (page 17) to update the Rotimatic software, before first use. Connect Rotimatic to Home Wi-Fi Connect Mobile Phone to Rotimatic - page 21 - page 19 - 16 -...
-
Page 18: Connect To Wi-Fi
Connect to Wi-Fi SECTION D... - Page 19 SECTION D1 Install Rotimatic App Before we start making rotis it is essential that you connect your Rotimatic to your home Wi-Fi with 2.4GHz band network. This is very important to ensure you get all the latest firmware upgrades, remote troubleshooting capabilities, live chat support and many more exciting features.
- Page 20 SECTION D2 Connect Mobile Phone to Rotimatic Once you see the Hello screen, tap the Next button. Power on your Rotimatic. Wait for Rotimatic to complete the Starting up and Final check This screen appears only, when you power on process.
- Page 21 Open the Rotimatic App on your mobile device After signing up successfully, connect your phone and sign up. Please ensure that your mobile data to the Rotimatic Wi-Fi. is turned off and your mobile is connected to the home Wi-Fi with 2.4GHz band to avoid any problems in connecting.
- Page 22 SECTION D3 Connect Rotimatic to Home Wi-Fi The Rotimatic screen displays the Connecting Rotimatic to internet message. In the Rotimatic App, enter the name and password of your home Wi-Fi and click Connect. Your Rotimatic is now connected to Wi-Fi.. - 21 -...
- Page 23 If the connection is successful, your Rotimatic screen will display the Connected message. Whereas the Rotimatic App on your mobile device may take a little longer to show the connected message. In case you see an error message, refer to the troubleshooting section (Section G - page 45) - 22 -...
-
Page 24: Let's Make Rotis
Let's make rotis SECTION E... - Page 25 Important notes Always use Rotimatic Approved Power Cord to reduce the risk of electric shock. Use the power cord provided along with Rotimatic and avoid using long extensions to reduce the chances of entanglement or tripping over a longer cord. If extension cord is used, it must be the Earthed type (3-pin) and compatible with Rotimatic's electrical rating.
-
Page 26: Prepare Ingredients
SECTION E1 Prepare ingredients To add ingredients, remove the lid of all three Ensure the flour container is completely dry. storage containers. Fill up flour to the MAX marking for the best flour flow. DO NOT overfill or compress flour while filling to ensure a steady dispensing flow. -
Page 27: Make Rotis
Fill the water container with fresh, portable and room-temperature water. Place it in the water container slot and press it down. Fill the oil container. Place it in the oil container slot press it all the way down firmly until you hear a clicking sound. - Page 28 Connect the Rotimatic approved Power Cord to your Rotimatic. Plug in the cord to Rotimatic before connecting the plug to a wall socket. DO NOT use any cord other than the Rotimatic Approved Power Cord. Wait for Rotimatic to complete the final checking process.
- Page 29 Adjust the thickness, roast and oil level by Tap Start/ Stop button to start making rotis. tapping the input buttons below the screen. Rotimatic will ask you to confirm the start of After about 6 minutes of warming up, your operation.
-
Page 30: Power Off
Remove each roti with a tong as it slides onto the front door. While the Rotimatic is operating, you can adjust the quantity and preferences. New settings will be activated for the next dough ball. DO NOT use your hands to pick rotis as freshly-made rotis are hot. -
Page 31: Clean After Use
SECTION E4 Clean after use Follow the instructions in Kneading parts - page 33 Section F Cleaning (page 31) to clean various parts after use. Front door - page 40 Pans - page 40 - 30 -... -
Page 32: Cleaning
Cleaning SECTION F... - Page 33 Important notes 1. Rotimatic is designed for easy cleaning. It will take less than 10 minutes to complete the regular/ advanced cleaning steps for the kneading parts and pans after every use. 2. It is not necessary to clean the ingredient containers after every use. In low to medium humidity environment, simply store the ingredients in Rotimatic for the next use.
-
Page 34: Regular Cleaning
SECTION F1 SECTION F1.1 Regular cleaning CLEAN & REINSERT KNEADING PARTS Rotimatic should be powered off for at The regular cleaning includes: cleaning of Dough Tray, Dough Cup, least 25 mins to cool down after use Stirrer and area under VT and flour tunnel. before starting the cleaning process, to The advanced cleaning includes: cleaning of oil/ water tunnel, front prevent burn injury. - Page 35 Press the two tabs at the top of the stirrer. Push the Stirrer inwards to remove it from the Dough Cup. Put aside for washing. Pull the Dough Tray towards you Squeeze the black rubber band and pull it out from the Dough Tray to clean. to remove it.
- Page 36 Insert the stirrer into the Dough Cup by pushing it in Hold the Dough Cup handle, while its tip is facing up. until you hear a clicking sound. Slide the Dough Cup in the slot fully using the guiding taps on top. Gently lift the Dough Cup upwards while rotating it to the right into locked position.
- Page 37 SECTION F1.2 CLEAN FLOUR TUNNEL Use Magic Brush to brush off any flour residue down to the kneading area through the flour dispensing tunnel. Flour dispensing tunnel Use a dry cloth or tissue to remove any flour clog. Ensure the flour slot and flour dispensing tunnel are completely dry before re-inserting the flour container.
- Page 38 SECTION F1.3 CLEAN UNDER VT (VERTICAL TRAY) Ensure the Rotimatic is on. Tap the button below Cleaning to Select VT. VT (under dough tray) Tap the power button. enter cleaning mode. will automatically move up. For slur- ry/ imperfect dough, clean under VT. Open the side door, use Magic Brush Re-select VT.
-
Page 39: Advanced Cleaning
SECTION F2 SECTION F2.1 Advanced cleaning CLEAN INGREDIENT CONTAINERS Wait for at least 25 minutes to allow the pans to cool down and ensure the power is off prior to cleaning. Pull the 3 ingredient containers up and out of the slots. Empty and put aside for washing. - Page 40 Handwash all the three containers and their parts with a mild detergent or wash in the top rack of a dishwasher. Wipe and let dry completely before filling up the ingredients and inserting them back in your Rotimatic. DO NOT fill up flour in a wet container. Any water or dampness inside flour container can affect flour flow during operation.
- Page 41 SECTION F2.3 CLEAN PANS Use Magic Stick to dry wipe both the top & bottom pans. Check if Rotimatic is powered off. Before cleaning, ensure Rotimatic is powered off for at least 25 Outer cloth of the Magic Stick can only be removed for minutes to allow for sufficient cooling.
- Page 42 Reinsert the front door by aligning the left tab of Close the front door when your Rotimatic is not in use the door, then insert the right side tab and let it slide down into locked position. The door can't be inserted at fully opened condition, it can be inserted in almost closed condition.
- Page 43 Sweeper Flap Open the side door. Use Magic Press the tab on the Sweeper flap Clean any residue sticking on the Brush to clear any flour around the down, pull the flap out, remove the Sweeper arm. To clean behind Sweeper.
- Page 44 SECTION F2.6 CLEAN BEHIND KICKER Kicker • The Kicker is the robotic arm of Rotimatic that moves each roti from the back pans to the front pans. • For your safety, Kicker should only be cleaned when pans have completely cooled down. Select KICKER.
- Page 45 Ensure that the pans are cool. Re-select KICKER. The kicker will Remove the Kicker by pulling the Kicker tab to the right. Pull the Kicker out automatically move to the back. from one side. Select Back to return to the roti setting screen.
-
Page 46: Troubleshooting
Troubleshooting SECTION G If you encounter any error message during roti-making: 1. Follow the instructions on the screen. 2. Tap OK to proceed. If the issue persists: 1. Check the kneading section and the cooking section for any unfinished roti, dough or residue. 2. -
Page 47: Warrant Y
Exclusive Limited Warranty SECTION H Zimplistic’s warranty obligations for all products sold by Zimplistic on this site are limited to the terms set forth below: Zimplistic will provide the repair and replacement services described in further detail below for the Rotimatic (excluding software) and associated Zimplistic hardware products against defects in materials design and workmanship under normal use for a period of one year from the date of delivery to the original end-user purchaser (“Warranty Period”). - Page 48 Exclusions from and Limitation to Warranty This Limited Warranty applies only to the hardware Products manufactured by or for Zimplistic. The Limited Warranty does not apply to any non-Zimplistic products or any software, even if packaged or sold with the Rotimatic.
- Page 49 EXCEPT AS PROVIDED IN THIS WARRANTY AND TO THE EXTENT PERMITTED BY LAW, ZIMPLISTIC SHALL NOT BE RESPONSIBLE NOR LIABLE FOR ANY LOSS, DAMAGE, OR INJURY (INCLUDING DEATH) TO ANY PARTY, INDIVIDUAL, OR ENTITY NOR BE RESPONSIBLE FOR OTHER CASUALTY OF ANY KIND, INCLUDING BUT NOT LIMITED TO DIRECT, INDIRECT, SPECIAL, INCIDENTAL OR CONSEQUENTIAL DAMAGES RESULTING FROM ANY BREACH OF WARRANTY OR CONDITION OR ANY OTHER REASON, OR UNDER ANY OTHER LEGAL THEORY, INCLUDING BUT NOT LIMITED TO LOSS OF USE;...
- Page 50 Zimplistic does its best to ensure an uninterrupted and error-free availability of the services. Nevertheless, this cannot be always guaranteed by the nature of internet system, because of technical suspensions or restrictions that may take place, related or not to repairs, maintenance, or new services being carried out. Our company shall do its best to limit the number and the duration of such suspensions or restrictions Thank you for choosing Rotimatic, Restrictions...
-
Page 51: Customer Support
Customer Support If (a) your hardware fails during the warranty period; (b) your hardware fails after the warranty period; (c) you have agreed to enroll in an extended warranty program or special request service; (d) you have other queries, please contact our friendly Customer Care Representatives by following these steps:...
Need help?
Do you have a question about the ZMA0111A and is the answer not in the manual?
Questions and answers