Table of Contents
Advertisement
Advertisement
Table of Contents

Summary of Contents for ICUserver M3GR
- Page 1 Operation MANUAL Camera M3GR / M3GW v6.0...
-
Page 2: Table Of Contents
Content Introduction ........................2 1.1. Fully Functionality Introduction ................2 1.2. Application ......................2 1.3. Power Supply ....................... 2 1.4. SD Card Selection ....................3 1.5. USB Connection ....................3 1.6. Attention ......................3 1.7. Key Features ......................4 1.8. Front View of the Camera .................. -
Page 3: Introduction
Introduction Thank you for choosing one of our easy operation highly qualified products. You now may enjoy the excellences reflected on this series product. This 12MP HD digital camera was totally R&D by our diligent and smart engineers based on feedbacks and requirements from customers globally. -
Page 4: Sd Card Selection
quality of batteries, and using environment, etc; we’re not able to list out exact number of photos and videos that camera can achieve. Power Adaptor—Security Surveillance Purpose This camera can also be powered by an external 12V/ 1~2A DC adapter. Recommend to remove the AA size batteries when power adapter is used. -
Page 5: Key Features
1.7. Key Features 0.4 Second trigger speed; M3GW (Wide lens model): 100° FOV lens; 110° PIR angel M3GR (Regular lens model): 52° FOV lens; 52° PIR angel; Image resolution up to 12MP / Video resolution 1080P@30FPS; Programmable 5/8/12 Megapixel high-quality resolution;... -
Page 6: Front View Of The Camera
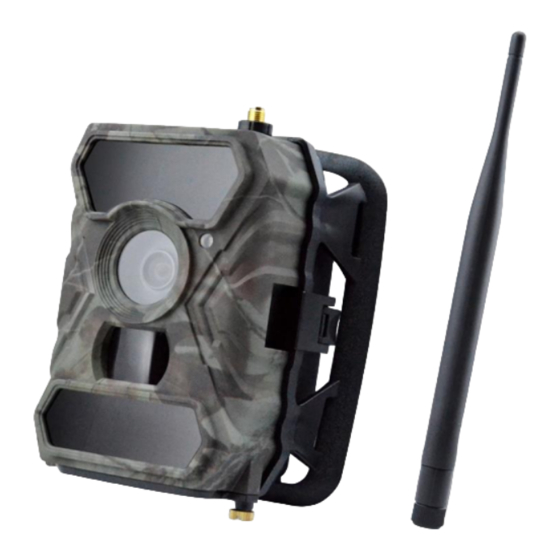
11. Optional small- (640*480) or large-format (1920*1440) photos via email; 1.8. Front View of the Camera 25 IR LEDs Indicator Light Light Sensor Lens (day/night) PIR Sensor 31 IR LEDs Can be Turned off) -
Page 7: Bottom View Of The Camera
1.9. Bottom View of the Camera Push slightly to open this cover 12 V external power supply (+ inside, - outside) SD Card Slot TV Out USB Port Battery Slot... -
Page 8: Internal, Side And Back View Of The Camera
1.10. Internal, Side and Back View of the Camera micro SIM Card Golden Part Face Down Battery Slot Open here... -
Page 9: Function Keys & Other Details
1.11. Function Keys & Other Details A. Switch Buttons Photo/Video Switch GSM Switch Power Switch IR LEDs Group Switch 1) Switch ON to enable camera to work; Note: indicator light flashes 5 times in front of the camera. Camera is activated now in PIR (PIR Auto Mode); Power Switch 2) Switch ON, then press “OK”... -
Page 10: Quick Start
Menu OK / Foto & Video Record / TEST Mode Navigation , , , 1. Quick Start 2.1. How to Start the Camera? Switch ON „Power Switch“ 2.2. How to Set the Functions? Switch ON “Power Switch”, Press “OK” once to enter Test mode; then press button “M” once to enter camera setting menu;;... -
Page 11: Operation List
2. Operation List 3.1. Video/Photo Playback Switch ON the “Power Switch”, Press “OK” once to enter Test mode, press arrow button „”to enter Playback mode; press „” or „” for selection, „OK” to play photo/video. Press button „” again to exit. In Playback Mode, press “M” button to delete files, or format SD card; press “M”... - Page 12 Camera Camera ID Set the switch to „ON“ and select „OK“ to change the Camera ID. Photo, Photo & Video, Video Switch the „Camera/Video Switch" to the Picture Icon to enable Photo Mode or to enable Photo-and Video Mode. Select “Photo & Video”, camera shoots photo(s) first, then video upon Camera mode same trigger event based on Video Length and Multi-shot user configured.
- Page 13 High / Middle / Low Higher sensitivity is more sensitive to movements by smaller subjects; longer detection distance; Sensitivity easier for sensor to detect difference between body heat and outdoor temperature; easier to trigger camera to record In high temperature environment, body heat of subjects and environment temperature is hard to tell by camera, suggested setting High.
- Page 14 Standard: Unlimited; Optional: 1~99 Max. e.g.: when 50 is selected, the camera sends up to 50 photos a day. All other pictures/day photos will be stored on the SD card only. Photo request by SMS command via APP: $03 SMS remote Switched OFF: „PIR only“...
-
Page 15: Technical Specification
Top: 25 LED, Bottom: 31LED Memory SD Card (8MB – 32 GB) Operating Keys Lens (Wide lens model) M3GW F=3.0; FOV=100° Lens (Regular lens model) M3GR F=3.0; FOV=52° LCD Screen 2” TFT, RGB, 262k PIR Sensitivity 3 sensitivity levels: High / Normal / Low... -
Page 16: Trouble Shouting
Stand-by Time 4~6 month (4×AA~8×AA) Auto Power Off auto switch to mode “OFF” in 60s without any operations Low Battery Alert 8.8V (8.8V: alert; 8.6V: power off) Interfaces TV connection/USB/SD card/DC powersupply Mounting Strap, Tripod Operating Temperature -30°C to 60°C Storage Temperature -30 °C to 70°C Operation Humidity... -
Page 17: Camera Stops Taking Images Or Won't Take Images
9) If person/animal moves quickly, it may move out of the camera’s field of view before photo is taken. Move camera further back or redirect camera. 5.2. Camera stops taking images 1) Please make sure that the SD card is not full. If the card is full, camera will stop taking images.
Need help?
Do you have a question about the M3GR and is the answer not in the manual?
Questions and answers