Table of Contents
Advertisement
Advertisement
Table of Contents

Summary of Contents for Labitec CoaDATA 501
- Page 1 Operators Manual CoaDATA 501 For in-vitro diagnostic use only!
- Page 2 Any violation of property rights or copyright or trademark or using conditions may be subject to legal action. LABiTec reserves the rights to modify the software, documentation as well as this operator manual without prior written notice.
-
Page 3: Table Of Contents
Software overview ............... 41 Flow Chart of different application methods ......42 Method Parameters..............43 4 SAFETY ISSUES..............44 Hazard and Precautions .............. 44 Maintenance and Hygiene............46 4.2.1 Disposal of analyzer............46 CoaDATA 501 –Operators Manual 2.1 Page 1... - Page 4 Contents 5 APPENDIX ................47 Disposables .................. 47 Materials Supplied ............... 47 Technical Data................48 Safety Specifications..............49 Mathematics ................. 50 Terminology.................. 52 CoaDATA 501 – Operators Manual 2.1 Page 2...
-
Page 5: Introduction
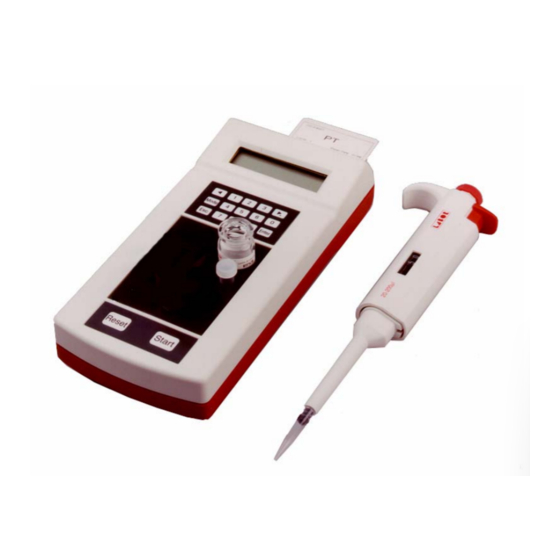
Introduction 1 Introduction Application The instrument type CoaDATA 501 (in the following titled as analyzer) as described in this manual is an opto-mechanical coagulation analyzer which applies the turbodensitometric measuring principle. All routine coagulometric clotting tests such as Prothrombin time, activated and partial Thromboplastin time, Fibrinogen, and single factor assays can be performed with these types of instrument. - Page 6 T = position for temp. adjustment - 1 position for reagent bottle - 1 measuring channel with light protection caps designed for Thrombi-Tips Membrane keypad with keys: Start Reset Reset and Start. Figure 1 Analyzer CoaDATA 501 – Operators Manual 2.1 Page 4...
- Page 7 3. Exit a menu and save entered or modified data. Start-key: manual testing Start - Start sample incubation timer - Sample adjustment - Manual test start - Manual test stop Reset-Key, reset testing, Reset Break of run, adjustment of sample CoaDATA 501 – Operators Manual 2.1 Page 5...
-
Page 8: Installation
ON by connecting to the mains. • Refer to chapter 2.2.8.1 for proper printer setting. Never operate the printer without paper! Read the instructions NOTE manual from the manufacturer of the printer for further details. CoaDATA 501 – Operators Manual 2.1 Page 6... -
Page 9: Measuring Principle
This stirring action combined with the optical measurement constitutes the basic features of the patented "turbodensitometric measuring principle". Test cuvette Detector Lamp perm. magnet Stirrer - Motor ELECTRONIC DISPLAY Figure 4 Measuring Principle CoaDATA 501 – Operators Manual 2.1 Page 7... -
Page 10: Reagents
Perform analytical quality controls on a regular basis. CoaDATA 501 – Operators Manual 2.1 Page 8... -
Page 11: Operation
<- Remove cuv .ette, then press any key. • Remove the existing cuvette from the measuring channel and close the light protection caps. • Press any key (e.g. Enter) for confirmation. CoaDATA 501 – Operators Manual 2.1 Page 9... -
Page 12: Standby
A request for sample incubation will be displayed. cuv in If there is no action the next 10 minutes, automatically the display will change to the STANDBY mode and show the actual temperature. 37.4°C CoaDATA 501 – Operators Manual 2.1 Page 10... -
Page 13: How To Measure
[sec] An acoustic signal indicates the recognition of clotting in a measuring channel and stops the timer. clot recognition in [sec] t = 12.6 s CoaDATA 501 – Operators Manual 2.1 Page 11... - Page 14 <- mean time = 12.2 s Once the second measured value has been obtained, the mean from the measured values will be determined and converted into %, ratio, and INR via the entered calibration curve. CoaDATA 501 – Operators Manual 2.1 Page 12...
-
Page 15: How To Change Methods
> < 3 Fib. 1 > < 4 Fib. 2 > mg/dl < 5 Thrmb > < 6 Intr. > < 7 Extr. > Can be overwritten by ChipCARD! < UTILIT > CoaDATA 501 – Operators Manual 2.1 Page 13... - Page 16 • Press Enter to confirm the method selection. The new method has been initialized. Incubation of the first samples can begin. cuv in 1 Continue as described for PT in chapter 2.1.3 CoaDATA 501 – Operators Manual 2.1 Page 14...
-
Page 17: How To Change Methods With A Chipcard
The menu Utilities is a group of menus in which instrument settings can be performed after a "Secret no." (code number) has been entered. The submenus are as follows: <printer>, <computer>, <beeper>, <clock> <calibrate temp>, <secret number>, and <cuvette detect.>. Refer to chapter 2.2.8 Utilities. CoaDATA 501 – Operators Manual 2.1 Page 15... -
Page 18: Method Parameterization
<measurement> start reagent volume, reagent lot. no. and sample incubation time. <cuv remove detect.> refer to chapter 3 Software <ON> activates the automatic cuvette detection <OFF> deactivates the automatic cuvette detection. (default) CoaDATA 501 – Operators Manual 2.1 Page 16... - Page 19 The following display appears once the last calibration curve point has been confirmed: <- select: ESC. = work ENTER= more parameters • Press Esc to access the measuring mode or Enter to add or verify additional parameters. CoaDATA 501 – Operators Manual 2.1 Page 17...
- Page 20 ATTENTION: If <none> was selected under 1st conversion the 100 % sec value, e.g. 100 % = 12,6 sec. will be requested. • Enter the ISI-value provided on the reagent package insert. • Press Enter to confirm the entry. CoaDATA 501 – Operators Manual 2.1 Page 18...
- Page 21 • Enter the coefficient of variation • Press Enter to confirm the entry. <- select: ESC. = work ENTER= more parameters • Press Esc to access the measuring mode or Enter to add or verify additional parameters. CoaDATA 501 – Operators Manual 2.1 Page 19...
- Page 22 • Press Esc to access the measuring mode or Enter to add or verify additional parameters. cuvette remove detect. < cuvdet > • Press Enter-key to get the cuvette detection on the display. < OFF > CoaDATA 501 – Operators Manual 2.1 Page 20...
- Page 23 • Select the desired cuvette detection. • Press Enter-key to confirm entry. <- select: ESC. = work ENTER= more parameters • Press Esc to access the measuring mode or Enter to add or verify additional parameters. CoaDATA 501 – Operators Manual 2.1 Page 21...
-
Page 24: Aptt - Parameterization
(default) 2nd conversion <2.conv> Selection Conversion • Press Enter to confirm the selection. ratio < ratio > • Press Enter to confirm the selection. 100% = Example! CoaDATA 501 – Operators Manual 2.1 Page 22... - Page 25 =120 s • Enter the correct sample incubation time. • Press Enter to confirm the selection. A dialog will request the entry of start reagent volume and reagent lot no.: <-Start Reagent CoaDATA 501 – Operators Manual 2.1 Page 23...
- Page 26 • Select the desired cuvette detection. • Press Enter-key to confirm entry. <- select: ESC. = work ENTER= more parameters • Press Esc to access the measuring mode or Enter to add or verify additional parameters. CoaDATA 501 – Operators Manual 2.1 Page 24...
-
Page 27: Fibrinogen 1 [G/L] - Parameterization
Once an entry has been made, all additional calibration curve points must be retrieved and verified. < curve > • Press Enter to enter the calibration curve. 1.point: Definition as: CoaDATA 501 – Operators Manual 2.1 Page 25... - Page 28 If this value is exceeded the message "mean error" will appear in the display and print-out. <- coef. variat ion> Possible entry: 1% - 20% • Enter the coefficient of variation • Press Enter to confirm the entry CoaDATA 501 – Operators Manual 2.1 Page 26...
- Page 29 • Press Enter-key to get the cuvette detection on the display. < OFF > By selecting: <ON> Cuvette detection occurs as soon as a cuvette is placed in the measuring channel or removed from the measuring channel. CoaDATA 501 – Operators Manual 2.1 Page 27...
-
Page 30: Fibrinogen 2 [Mg/Dl] - Parameterization
<measurement> (CV 1-20%). start reagent volume, reagent lot. no. <cuv remove detect.> and sample incubation time. <ON> <OFF> refer to chapter 3 Software activates the automatic cuvette detection CoaDATA 501 – Operators Manual 2.1 Page 28... -
Page 31: Utilities
A selection between <AUTO>, <MANUAL>, <Par Pro>, and OFF for the optional printer EPSON P40 can be made from this menu. A print-out includes: Test results, method parameters, complete parameter list, and error messages. CoaDATA 501 – Operators Manual 2.1 Page 29... -
Page 32: Menu Computer
• Press Enter to confirm selection. You can enter the current date and time with this menu. Once a selection has been made the following dialog will appear: 18.05.99 Day, Month, Year CoaDATA 501 – Operators Manual 2.1 Page 30... -
Page 33: Menu Calibrate Temp
• Next enter the temperature displayed by the digital thermometer via the numerical keypad. The entry will be displayed under extern. • Press Enter to confirm the entry. • Wait until the temperature has stabilized at 37.4 °C on the display intern. CoaDATA 501 – Operators Manual 2.1 Page 31... -
Page 34: Menu Secret Number
Once you have entered the secret number, you can - perform calibration of tests - perform settings and controls under UTILITIES and all its submenus. 2.2.8.7 Menu cuvette test < cuvet. > • Press Enter to confirm selection. CoaDATA 501 – Operators Manual 2.1 Page 32... -
Page 35: Printer
It is possible to link an external printer (optional) to the analyzer, refer to chapter 1.3.1 Connect an external printer. The connection to the printer shall be done via the RS 232C interface of the analyzer. Ask your local dealer for recommended printer models. CoaDATA 501 – Operators Manual 2.1 Page 33... -
Page 36: Sample Print-Outs Pt And Calibration
60 s start-reagent: reagent = 100 ul 1st convers INTERPOLAT: 2nd convers INR 1.05 100.0 % 11.6 s 50.0 17.7 s 25.0 29.9 s 10.0 66.6 s ---- method store 2 ---- aPTT CoaDATA 501 – Operators Manual 2.1 Page 34... - Page 37 02.12.99, 10:52:55 Date, Time time 1 12.0 s 1st measured time time 2 12.8 s 2nd measured time Mean 12.4 s Mean of measured times Conversion to INR 88.4% Conversion to PT % CoaDATA 501 – Operators Manual 2.1 Page 35...
- Page 38 Date, Time time 1 11.7 s 1st measured time time 2 12.1 s 2nd measured time Mean 11.9 s Mean of measured times 1.01 Conversion to INR quick 98.1% Conversion to PT % CoaDATA 501 – Operators Manual 2.1 Page 36...
-
Page 39: Errors
As a result we recommend running control plasma on a daily basis prior to running routine determinations. Cancel incubation / measurement: By pressing the Reset-key, any process on the measuring channel can be cancelled. CoaDATA 501 – Operators Manual 2.1 Page 37... -
Page 40: Error Messages
RAM: Sxxxx parameter-error! check sum error for parameters in EEPROM contact technical Service press any key ... ERROR/ERROR rekursiv software error contact technical Service All errors will cancel the current measurement. NOTE CoaDATA 501 – Operators Manual 2.1 Page 38... -
Page 41: Errors During Operation
How to change fuses Fuses can not be changed in the external power adapter or inside the analyzer. Contact your distributor if problems occur with the power adapter or the instrument itself. CoaDATA 501 – Operators Manual 2.1 Page 39... -
Page 42: Software
Storing of parameter After a parameterization of an instrument or test-data, short information "write parameter" will be shown on the display. CoaDATA 501 – Operators Manual 2.1 Page 40... -
Page 43: Software Overview
6.9 s < clock > mean time= < calib. > % = 91.0 < sec.no > INR = 1.05 < cuvet. > cuv out, * * then press “Reset” Figure 7 Software Overview CoaDATA 501 – Operators Manual 2.1 Page 41... -
Page 44: Flow Chart Of Different Application Methods
* GO - S2 100 ul 6.9 s mean time= % = 91.0 INR = 1.05 cuv out, * * then press “Reset” Figure 8 Test procedure for single and double determination CoaDATA 501 – Operators Manual 2.1 Page 42... -
Page 45: Method Parameters
Value mg/dl Time 16,5 Thrmb Value Time Intr. Value Time 150,0 Extr. Value 200,0 Time 150,0 curve rezi aPTT Ratio Fib.1 curve 10,0 Fib.2 curve mg/dl 1000 Thrmb Intr. curve Extr. curve CoaDATA 501 – Operators Manual 2.1 Page 43... -
Page 46: Safety Issues
Surfaces (floors, work table) must not be moist when you are working with any electrical device. Carry out only the maintenance work and/or the replacement of parts described in these operating instructions. CoaDATA 501 – Operators Manual 2.1 Page 44... - Page 47 In order to ensure a flawless operation of the analyzer measure control samples and watch the function of the instrument closely. Faulty measurement results may result in an incorrect diagnosis or range danger for patient. Caution! CoaDATA 501 – Operators Manual 2.1 Page 45...
-
Page 48: Maintenance And Hygiene
- Mechanical parts are mostly made of aluminium and precious metals. - Electronic parts must be disposed off in accordance with the guidelines for the disposal of electronic parts - Make sure that the analyzer has been decontaminated before disposal. CoaDATA 501 – Operators Manual 2.1 Page 46... -
Page 49: Appendix
1 x Operator Manual (English) 1 x Thrombi-Pette 20 - 200 µl adjustable (optional) 1 x 10 Thrombi-Tips (Only if Thrombi-Pette is supplied) 1 x Packaging 1 x Styropor inserts (set) Analytical Protocol (copy) CoaDATA 501 – Operators Manual 2.1 Page 47... -
Page 50: Technical Data
Eppendorf Reagent vials for 1 position, diameter 23.0 mm Cuvette positions Disposables cuvettes, paper for thermal printer, tips Measuring timer max. 600 sec Interfaces RS 232 C ChipCARD reader (optional printer) CoaDATA 501 – Operators Manual 2.1 Page 48... -
Page 51: Safety Specifications
B. The use of screened data cables is a precondition for PRODUCT SERVICE compliance with the relevant regulations. The user is responsible for ensuring that screened data cables are used. CoaDATA 501 – Operators Manual 2.1 Page 49... -
Page 52: Mathematics
Extrapolation PT >100 % linear extrapolation over the last two higher points. PT <10 % linear extrapolation over the last two lower points. Fibrinogen: linear extrapolation respectively over the last two points. CoaDATA 501 – Operators Manual 2.1 Page 50... - Page 53 Intr. Factor log/log Conversion to ratio and INR: ratio = measured clotting time / normal value INR = RATIO ISI (International Normalized Ratio) ISI = International Sensitivity Index according to package insert CoaDATA 501 – Operators Manual 2.1 Page 51...
-
Page 54: Terminology
Lo/IN = menu lot number / incubation Lot = lot number lrn = learn meas = measuring motor = refer to chapter 2.4.2 mg/dl <2.0 = refer to chapter 2.4.2 mg/dl <200.0 = refer to chapter 2.4.2 CoaDATA 501 – Operators Manual 2.1 Page 52... - Page 55 THROMBIN T = Thrombin time TIME = hour:minute:second Temperat. warning = refer to chapter 2.4.4 SYSTEM FAILURE ..= refer to chapter 2.4.2 V, W writing parameter to internal = parameter storage CoaDATA 501 – Operators Manual 2.1 Page 53...
- Page 56 Appendix CoaDATA 501 – Operators Manual 2.1 Page 54...