
Subscribe to Our Youtube Channel
Related Manuals for Rac 205


Summary of Contents for Rac 205
- Page 1 RAC 205 Full HD Dash Cam Designed and tested by experts INSTRUCTION MANUAL Full...
- Page 2 Congratulations on choosing the RAC 205 Full HD Dash Cam. Please read these instructions carefully before use.
-
Page 3: Table Of Contents
Contents Product Features Playing Videos Mode Unpacking Viewing Pictures Identification of Controls Playback Menu Options Preparing for Use Playback Installing the Dash Cam Battery Warning and Installation Notes Connecting to Power Caution Powering the Device On / Off Warranty Set the Date / Time Specification Mode Selection Using the Driving Recorder... -
Page 4: Product Features P01
RAC 205 Full HD Dash Cam Product Features › Full HD 1080p Driving Recorder › 2 Megapixel CMOS Sensor › 2.3” TFT Display › 140˚ Wide Angle Lens › Support up to 32GB Class10 Micro SD Memory Card › G-sensor Collision Recording Protection ›... -
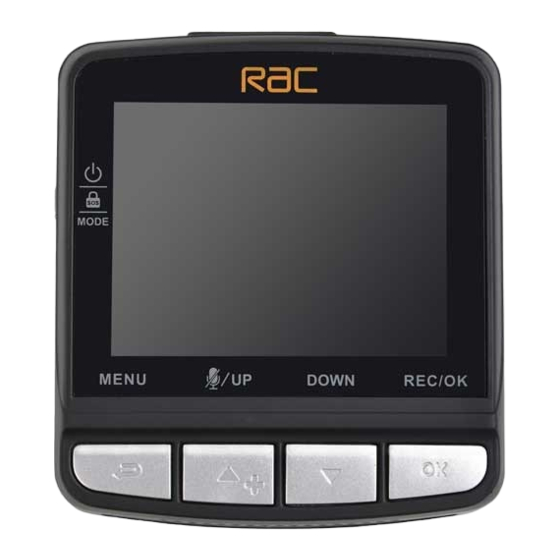
Page 5: Identification Of Controls P02
www.proofcam.com Identification of Controls Controls: 1. Lens 7. Up button 2. Speaker 8. Down button 3. Microphone 9. REC/OK button 4. Power/Mode button 10. USB port 5. MicroSD Card slot 11. HDMI port 6. Menu button 12. Reset button... -
Page 6: Preparing For Use P03
RAC 205 Full HD Dash Cam Preparing for Use Battery Indicator and Charging Inserting the SD Card (included) Follow the direction indicated on the device to insert the memory card, a click sound is heard indicating the card is in position. -
Page 7: Installing The Dash Cam P04
www.proofcam.com Installing the Dash Cam 1. Push the mount into the slot on the top of the device, make sure the mount is securely locked in place. 2. Remove the protective film from the suction cup, with the suction-cup laying flat, position the suction-cap on the windshield, and then press down the clamp to mount the holder to the windshield. -
Page 8: Powering The Device On / Off P05
RAC 205 Full HD Dash Cam Powering the Device On / Off Auto Power On / Off Once the vehicle engine is started, the device automatically turns on and starts recording (must have SD Card installed). After the car engine is stopped, the device will automatically save the last recorded file and shutdown. -
Page 9: Set The Date / Time P06
www.proofcam.com Set the Date / Time To set the correct date and time, press MeNU button to enter the menu setting, then press MOde button to change to General Settings then press buttons to select Clock settings, press ReC/OK button to enter date / time setting, then press buttons to adjust the value, press ReC/OK button to switch to next setting, after finished all the settings, press... -
Page 10: Recording Screen P07
Emergency File Protection Important: The RAC 205 records in segments onto the MicroSD card. The default segment duration is 3 minutes, which can be changed from the menu settings. For example, 1 hour of recording would generate 20 x 3 minute segments. - Page 11 www.proofcam.com Manual remove lock from videos steps: Press MOde button switch to Playback Mode (1), press MeNU button enter Playback menu (2), then press Up/down button to choose Protect(3), press ReC/OK button to enter Protect sub menu, Up/down button select “Unprotect One”, press ReC/OK button to enter Select YeS a file and then press buttons to select the file you want to unprotect, then press ReC/OK button, select YES to confirm unlock.
-
Page 12: Motion Detection P09
RAC 205 Full HD Dash Cam Motion Detection First, enter General Settings to activate the Motion Detection function(the default setting is Off, choose Low / Middle / High to activate the function); second, setting the Power Off to be Never; third, press down button... - Page 13 www.proofcam.com Movie Menu Options...
-
Page 14: Movie Mode P11
RAC 205 Full HD Dash Cam Movie Mode Function List description Available Option Setting for video resolution. 1920×1080 30fps 1280×720 30fps 1280×720 60fps Select the movie quality. Super Fine / Fine Super Fine - The best movie quality. Fine - The standard movie quality. - Page 15 www.proofcam.com Function List description Available Option Setting for the white balance. Changes Auto / Daylight / recording parameters to compensate for Cloudy / Fluoresc. / different light colour “temperatures”. Incandesc. Auto - Allows the driving recorder to automatically detect the light colour temperature and change its parameters to produce optimal picture colour.
-
Page 16: Media Tool Menu Options P13
RAC 205 Full HD Dash Cam Media Tool Menu Options Media Tool Function List description Available Option Formats the inserted micro SD card. YES / NO YES - Selecting this option completes the format process. NO - Select this to end the format and return to the previous menu. -
Page 17: General Settings Menu Options P14
www.proofcam.com General Settings Menu Options... - Page 18 RAC 205 Full HD Dash Cam General Settings Function List description Available Option Setting to enable / disable the beep sound. On / Off On - Select this to enable audible system beeps when setting the menu options. This is the default setting for this option.
- Page 19 www.proofcam.com Function List description Available Option Manage the backlight of the screen. Off / 1min / 3min It is advisable to enable this feature to preserve battery power. Off - Select to disable power saving for the screen. This is the default setting for this option.
- Page 20 RAC 205 Full HD Dash Cam Taking Picture To take a picture make sure the Still Capture Mode is selected. Press the ReC/OK button to take a photo. Photos are saved on the SD Card. Still Capture Screen Still Sd Card...
-
Page 21: Still Capture Menu Options P18
www.proofcam.com Still Capture Menu Options... -
Page 22: Still Capture P19
RAC 205 Full HD Dash Cam Still Capture Function List description Available Option Set the photo resolution. 14M / 12M / 8M / 5M / 3M / 2M / 1.2M / VGA Set the photo quality. Super Fine / Fine Setting for the special picture colour. -
Page 23: Viewing Pictures P20
www.proofcam.com Viewing Pictures Press MOde button switch to picture viewing mode, press buttons select the picture, then press ReC/OK button to view picture, press buttons for viewing pictures one by one, press ReC/OK button again can return back to picture viewing mode. View Picture Screen Picture Picture Name... -
Page 24: Playback Menu Options P21
RAC 205 Full HD Dash Cam Playback Menu Options Playback Function List description Available Option Setting the video playback & beep Volume. 0-10 This option allows for the deletion of Delete One / one or more video/photos from the Delete All memory card. -
Page 25: Battery Warning And Installation Notes P22
WITH THE SUPPLIED DC POWER LEAD AND AC ADAPTER FOR BATTERY CHARGING. To recycle your RAC Dash Cam unit, please take it to your local recycling centre. This product fully satisfies the requirements for CE marking when used in a residential, commercial or light industrial environment. - Page 26 If you have a camera that requires service under warranty, then in the first instance you should return it to the retailer from whom it was purchased. Should you have any general or technical questions on your RAC 205 Dash Cam, please email us at customer@proofcam.com. We will endeavour to answer your mail within 24 hours.
- Page 27 www.proofcam.com Specification LCD Display 2.3 inch TFT LCD monitor Image sensor 2MP, 1/2.7” CMOS View angle 140° Video Resolution 1920*1080 30fps / 1280*720 30fps /1280*720 60fps Picture resolution 14M Interpolate Video format Picture format Memory Support Class 10 or higher rating Micro SD card, maximum up to 32GB Microphone Built-in...
- Page 28 Important: It is your responsibility to make sure that you use the RAC Dash Cam in a safe and responsible manner. Do not access functions or change settings whilst you are driving, and the location and positioning of your RAC Dash Cam should not interfere with the driver’s field of vision.
Need help?
Do you have a question about the 205 and is the answer not in the manual?
Questions and answers