Table of Contents
Advertisement
Advertisement
Table of Contents
Troubleshooting

Related Manuals for Watchguard hifi microphone

Summary of Contents for Watchguard hifi microphone
- Page 1 Document Revision: F...
- Page 2 Send us your suggestions We want to hear from you. Tell us about your experience and how you are using the HiFi Microphone. We will do our best to accommodate any suggestions you may have in future revisions. For U.S. customers, call Customer Service at 1-800-605-6734 or email us at customerservice@watchguardvideo.com...
- Page 3 This equipment complies with Part 15 of the FCC rules and Industry Canada licence-exempt RSS standard(s). This equipment should only be used with the antenna supplied by WatchGuard Video. Any changes or modifications not expressly approved by the manufacturer could void the user's authority to operate the equipment.
- Page 4 Antenna type (radio transmitter): WatchGuard Video part number WGP01589 unity gain (0dBi), 50 Ohm impedance Antenna type (base): WatchGuard Video part number WGP01573 unity gain (0 dBi), 50 ohm impedance Cet émetteur radio IC:9073A-TRN400 et la base IC:9073A-CHG410 ont été...
-
Page 5: Table Of Contents
Contents Contents Introduction Welcome About this Document Related documents and information About the HiFi Microphone Technical specifications Warranty Information HiFi Microphone Overview Using the HiFi Microphone Beginning a shift During a shift Ending a shift Base Status LEDs DVR cable connection... - Page 6 Contents Contacts for charging and synchronizing External microphone jack Display Status icons Mode icons Synchronizing the Transmitter and the Base Charging the Transmitter Charging in a vehicle with the ignition off Using Two HiFi Microphones Best Practices and Troubleshooting Best Practices Installation best practices Usage best practices Troubleshooting...
-
Page 7: Introduction
Introduction Introduction In this section... Welcome (page About this document (page Related documents and information (page About the HiFi Microphone (HiFi Mic) (page Technical specifications (page Warranty information (page WGD00091 Revision F... -
Page 8: Welcome
Microphones (HiFi Mics) to help your WatchGuard Video 4RE DVRs collect quality audio evidence. About this Document The HiFi Microphone User Guide covers the basic parts of the HiFi Mic as well as its most common functions including: Synchronizing the transmitter (mic) and the base so the DVR can record... -
Page 9: About The Hifi Microphone
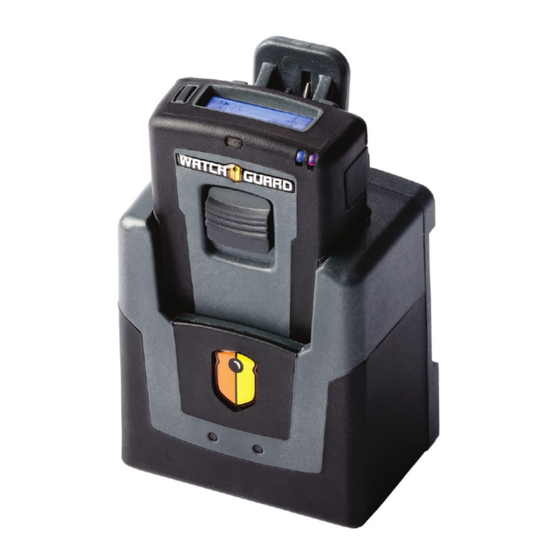
About the HiFi Microphone About the HiFi Microphone The HiFi Microphone (HiFi Mic) is one of the WatchGuard Video components for transmitting audio to the 4RE DVR (digital video recorder) during the video recording process. The HiFi Mic consists of two parts: Base: The base is the part of the HiFi Mic that is mounted in the vehicle and physically connects to the DVR and the antenna. -
Page 10: Technical Specifications
Note: Performance can degrade as the battery ages. Warranty Information WatchGuard Video, in recognition of its responsibility to provide quality systems, components, and workmanship, warrants each system, part, and component it manufactures first sold to an end user to be free from defects in material and workmanship for a period of one-year from the date of purchase. - Page 11 Video will not be liable for any direct, indirect, consequential, or incidental damages arising out of the use of or inability to use the system even if the unit proved to be defective. WatchGuard Video will not be responsible for any removal or re-installation cost of the unit or for damages caused by improper installation.
- Page 12 Video prepaid shipping label in the first ninety days (90) on the return shipment will result in the end user being responsible for shipping costs to WatchGuard Video. After the first ninety (90) days, the end user will be responsible for any shipping charges to WatchGuard Video.
- Page 13 Warranty Information hour of labor) plus the standard costs associated with any required repairs. Should you have any further questions regarding the WatchGuard Video limited warranty, please direct them to: WatchGuard Video Attn: Customer Service Department 415 Century Parkway Allen, Texas 75013 1-800-605-6734 customerservice@watchguardvideo.com...
- Page 14 Introduction This page intentionally left blank. WGD00091 Revision F...
-
Page 15: Hifi Microphone
HiFi Microphone HiFi Microphone In this section... HiFi Microphone (HiFi Mic) overview (page Using the HiFi Mic (page Base features (page Transmitter features (page Display icons (page Synchronizing the base and the transmitter (page Charging the transmitter (page Using two HiFi Mics in the same vehicle... -
Page 16: Overview
For information on triggering a recorded event from the HiFi Mic, see Talk/Mute slide button on page Using the HiFi Microphone You use the HiFi Mic throughout your shift to help your 4RE DVR collect quality audio evidence. -
Page 17: Beginning A Shift
8. Power off the transmitter (mic) (see Power switch on page 25). Note: WatchGuard Video recommends that you power off the mic before you put it in the base to charge, but this step is not required. 9. Place the mic in the base to charge (see Charging the Transmitter on page 30). -
Page 18: Base
HiFi Microphone Base The base is the part of the HiFi Microphone (HiFi Mic) that is mounted in the vehicle and physically connects to the 4RE DVR and the antenna. The base: Synchronizes with the transmitter (mic) so the DVR can record the audio... -
Page 19: Status Leds
HiFi Mic. On the base, the status LEDs are on the front, just under the WatchGuard Video shield symbol. The LEDs on the base can help indicate the status of certain functions... -
Page 20: Dvr Cable Connection
Using hand tools can damage the connector. Note: You should only use the 900 MHz antenna that you received from WatchGuard Video with the HiFi Mic. Using a different antenna can compromise wireless performance and audio quality. WGD00091... -
Page 21: Contacts For Charging And Synchronizing
Note: This graphic shows the base from above, looking down into it. Transmitter The transmitter (mic) is the part of the HiFi Microphone (HiFi Mic) that you attach to your apparel or duty belt. The mic: Transmits audio through the base for the DVR to record... -
Page 22: Talk/Mute Slide Button
HiFi Microphone Features on the mic include: Talk/Mute slide button (below) Display (page Display Backlight button (page Mode button (page Status LEDs (page Power switch (page External microphone jack (page Talk/Mute slide button The Talk/Mute slide button is on the front of the transmitter (mic). Once... -
Page 23: Display
Display Mutes the audio being transmitted to the DVR If the DVR is recording, slide the Talk/Mute button down and hold it to mute any audio being transmitted to the DVR; no audio is recorded while you hold the Talk/Mute button down. The mic indicates that its audio is muted using both an icon on the display (Mute icon) and the status LEDs (green LED flashes). -
Page 24: Status Leds
HiFi Microphone Vibrate and beep No notification Vibrate only Beep only Press the Mode button twice within two seconds to change the notification mode. (Pressing it once turns the display backlight on.) As you continue to press the Mode button within two seconds, the notification mode cycles through the four options. -
Page 25: Power Switch
Slide this switch to power the mic on or off. Note: WatchGuard Video recommends that you power off the mic before you put it in the base to charge. Contacts for charging and synchronizing The contacts for charging the transmitter (mic) and synchronizing the mic with the base are on the bottom of the mic. -
Page 26: External Microphone Jack
Note: The optional lapel microphone can be less susceptible to wind noise and help provide better quality audio. For information about the accessory lapel microphone that WatchGuard Video offers, contact your WatchGuard Video representative. Display The display is on the top of the transmitter (mic). The display shows icons that indicate the current mic status and mode. -
Page 27: Status Icons
Status icons Status icons The status icons on the display indicate the battery, connection, and signal states. Battery level: The Battery Level icon is on the top left of the display and looks like a battery on its side. This icon indicates the charged level of the transmitter (mic) battery. -
Page 28: Mode Icons
HiFi Microphone When the antenna and diagonal bars blink together, the mic and the base have lost their connection. Warning! When the mic and the base lose their connection, no audio is transmitted to the DVR. Signal strength: The Signal Strength icon appears just to the right of the Connection icon and looks like a set of stair-stepped bars. -
Page 29: Synchronizing The Transmitter And The Base
Note: A version of the base exists that only serves as a charger for the HiFi Microphone (HiFi Mic). This version of the base is not used in the vehicle. For information about the charge-only base, contact your WatchGuard Video representative. -
Page 30: Charging The Transmitter
Charging the Transmitter The battery in the transmitter (mic) must be charged before you can use the HiFi Microphone (HiFi Mic). The base (either the vehicle base or the charge-only base) serves as the charger for the mic. To charge the mic: 1. -
Page 31: Charging In A Vehicle With The Ignition Off
HiFi Mic is not used in the vehicle. For information about the charge-only base, contact your WatchGuard Video representative. As the mic charges, the red LEDs flash and the bars in the Battery Level icon on the display cycle in series. When the mic is fully charged, the green LEDs turn on and the Battery Level icon shows four bars. - Page 32 HiFi Microphone This page intentionally left blank. WGD00091 Revision F...
-
Page 33: Best Practices And Troubleshooting
Best Practices and Troubleshooting Best Practices and Troubleshooting In this section... Best practices for Installing the HiFi Microphone (HiFi Mic) (page Using the HiFi Mic (page Troubleshooting HiFi Mic issues (page WGD00091 Revision F... -
Page 34: Best Practices
Use a short cable (3-foot) when you connect the HiFi Mic base to the DVR; keeping the cable short helps maintain audio quality Use the 900 MHz antenna that you received from WatchGuard Video with the HiFi Mic; using a different antenna can compromise wireless... -
Page 35: Troubleshooting
Troubleshooting Troubleshooting If your HiFi Microphone (HiFi Mic) is not functioning properly, refer to the sections below for possible remedies. If you have no reception... Check that the power switch on the transmitter (mic) is on (see Power switch on... -
Page 36: If The Transmitter Does Not Respond To Or Synchronize With The Base
(see Synchronizing the Transmitter and the Base on page Tip: If your mic still does not respond to or synchronize with the base after trying all of the above steps, contact WatchGuard Video Customer Service for further help. WGD00091 Revision F... -
Page 37: Index
Index Talk, 22 charge level, 27 Index charging base LEDs, 19 display icon, 27 transmitter, 30 activate Covert mode, 24 transmitter LEDs, 24 alert icons, 29 with ignition off, 31 alert mode, 23 connecting antenna antenna, 20 best practices, 34 DVR, 20 connecting, 20 Connection icon, 27... - Page 38 Index Vibrate, 29 transmitter, 24-25 display, overview, 23, 26 light, display, 23 dual microphone lightbulb icon, 28 configuration, 31 lost connection DVR, connecting, 20, 34 base LEDs, 19 display icon, 27 external mic jack, 26 transmitter LEDs, 25 icons alert, 29 charging, 30 antenna, 27 contacts, 25...
- Page 39 Index notification mode, 23 overview, 29 transmitter contacts, 25 out of range transmitter LEDs, 24 base LEDs, 19 display icon, 27 Talk button, 22 transmitter LEDs, 25 technical specifications, 10 transmitter pairing, 29-30 charging, 30 poor reception, 35 contacts, 25 Power switch, 25 overview, 21 status LEDs, 24-25...
- Page 40 Index This page intentionally left blank. WGD00091 Revision F...
Need help?
Do you have a question about the hifi microphone and is the answer not in the manual?
Questions and answers