Advertisement
Available languages
Available languages
Quick Links
OPERATOR'S MANUAL
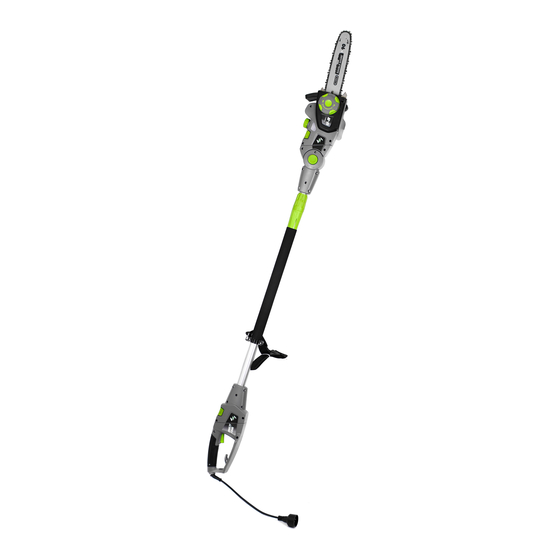
ELECTRIC CONVERTIBLE 4 IN 1 COMBO
CHAIN SAW/ POLE SAW/ HEDGE TRIMMER/ POLE HEDGE TRIMMER
This product is covered by U.S. patents and other international patents
Copyright. All Rights Reserved.
Model CVP41810
This product has been engineered and manufactured to our high standard for dependability, ease of operation, and
operator safety. Properly cared for, it will give you years of rugged, trouble-free performance.
WARNING: To reduce the risk of injury, the user must read and understand the operator's manual before
using this product.
Thank you for your purchase.
DO NOT RETURN THIS PRODUCT TO THE STORE. OPERATING, ASSEMBLY, PARTS, SERVICE QUESTIONS?
CALL 1-800-313-5111 BETWEEN 8:00 AM—5:00 PM EST FOR ASSISTANCE.
SAVE THIS MANUAL FOR FUTURE REFERENCE
Advertisement

Related Manuals for EarthWise CVP41810


Summary of Contents for EarthWise CVP41810
- Page 1 This product is covered by U.S. patents and other international patents Copyright. All Rights Reserved. Model CVP41810 This product has been engineered and manufactured to our high standard for dependability, ease of operation, and operator safety. Properly cared for, it will give you years of rugged, trouble-free performance.
- Page 2 IMPORTANT SAFETY WARNINGS GENERAL POWER TOOL SAFETY WARNINGS WARNING: Read all safety warnings and instructions. Prevent unintentional starting. Ensure the switch is Failure to follow the warnings and instructions may result in in the off-position before connecting to power electric shock, fire and/or serious injury.
- Page 3 GENERAL POWER TOOL SAFETY WARNINGS Service When servicing a power tool, use only identical replacement parts. Follow instructions in the Have your power tool serviced by a qualified repair Maintenance section of this manual. Use of person using only identical replacement parts. This will unauthorized parts or failure to follow Maintenance ensure that the safety of the power tool is maintained.
- Page 4 HEDGE TRIMMER SAFETY WARNINGS DANGER – Keep hands away from blade. Contact with Hold the power tool by insulated gripping surfaces blade will result in serious personal injury. only, because the cutter blade may contact hidden wiring or its own cord. Cutter blades contacting a ―live‖ Use both hands when operating the hedge trimmer.
- Page 5 PRODUCT SPECIFICATIONS CVP41810 Pole/ Chain Saw Pole/ Hedge Trimmer Input….………………………….….……..120V, 60Hz, 7A, AC Only ………………….….…………….…….120V, 60Hz, 4.5A, AC Only Speed ………………………..……………...…………………...12m/s ……………………………………….……….3200 Strokes per Min. Bar Length……………………………...…...……..10 in. Oregon Bar …………………………………………….……………………..18 in. Extended Length…………...………………..………...…………. 8 ft. ……………………………………………….………….……….8.8 ft. Max. Cut …………..………...………………..………...…………………..…………………………………………….………….……….0.7 in.
- Page 6 ASSEMBLY CONVERTING FROM POLE SAW TO CHAIN SAW UNPACKING This product requires assembly. Disconnect rear handle and cutting head from ends of tele- Carefully remove the product and any accessories from the box. scopic pole by lifting the quick release button and pulling straight Make sure that all items listed in the packing list are included.
- Page 7 ASSEMBLY CONVERTING FROM POLE HEDGE TRIMMER TO HEDGE ADJUSTING THE LENGTH OF THE TELESCOPIC POLE (FIG.11) TRIMMER 1. To adjust the telescopic pole, disconnect the product from Disconnect rear handle and cutting head from ends of the power supply. Rotate the collar counterclockwise to telescopic pole by lifting the quick release button and pulling loosen.Extend the pole to the desired length.
- Page 8 INSTALLING/REPLACING THE GUIDE BAR AND CHAIN 10. Fit the bar flush against the mounting surface so that the bar 13. When the tension knob is fully tightened, the chain is the tightest. To minor adjust the chain tension, loosen the tension stud is in the slot of the bar.
- Page 9 CHAIN TENSION AND MAINTENANCE Lift file away from the steel on each return stroke. DEPTH GAUGE CLEARANCE (Fig. 22) Put a few firm strokes on every tooth. File all left hand cutters in one The depth gauge should be maintained at a clearance of .025 in. direction.
- Page 10 OPERATING WARNING: Do Not use the pole saw with any type of accessory or Before you start the unit, make sure the pole/chain saw is not attachment. Such usage might be hazardous. contacting any object. STARTING THE POLE/CHAIN SAW WARNING: Beware of the cord while operating the saw. Keep the cord away from the chain.
- Page 11 OPERATING AND INSTRUCTIONS PROPER CUTTING STANCE WARNING: Check the tree for damaged or dead branches that could fall and hit you during felling. Weight should be balanced with both feet on solid ground. Before any cuts are started, pick your escape route (or routes in case Keep left arm with elbow locked in a ―straight arm‖...
- Page 12 OPERATING CUTTING INSTRUCTIONS OVERBUCKING UNDER-BUCKING As the tree limbs starts to fall, stop the saw and immediately retreat along the cleared path. Watch the action in case something falls your way. Be alert for overhead limbs or branches that may fall and watch your footing.
- Page 13 OPERATING Before you start the unit, make sure the pole/ hedge trimmer is CAUTION: Blade coasts after turned off. not contacting any object. - Do not use under wet condition. - Do not use with damaged extension cord. STARTING THE POLE HEDGE TRIMMER/ HEDGE TRIMMER (Fig. - Do not unplug or store with switch locked on.
- Page 14 TRIMMING INSTRUCTIONS USING THE HEDGE TRIMMER SIDE-TRIMMING HEDGES—Begin at the bottom and sweep up. (Fig. 39) LEVEL HEDGES - To obtain exceptionally level hedges, a piece of string can be stretched along the length of the hedge as a guide. (Fig. FIG.38 FIG.39 CAUTION: Do not use the 18 inch trimmer for cutting stems greater...
- Page 15 ELECTRIC CONVERTIBLE 4 IN 1 COMBO CVP41810 • MODEL NUMBER • SERIAL NUMBER CALL US FIRST !! Call us first with questions about operating or maintaining your product at 1.800.313.5111 between 8:00 a.m. – 5:00 p.m. Eastern Standard Time, or send emails to earthwise@reelin.com.
- Page 16 OPERATOR’S MANUAL ELECTRIC CONVERTIBLE 4 IN 1 COMBO CHAIN SAW/ POLE SAW/ HEDGE TRIMMER/ POLE HEDGE TRIMMER This product is covered by U.S. patents and other international patents Copyright. All Rights Reserved. WARRANTY LIMITED WARRANTY FOR CORDED ELECTRIC MODELS This product is manufactured for The Great States Corporation/American Lawn Mower Company. The Great States Corpora- tion/American Lawn Mower Company, Shelbyville, Indiana, has been making lawn mowers for over 100 years and warrants to the original owner that each new product and service part is free from defects in material and workmanship and agrees to repair or replace under this warranty any defective product or part from the original date of purchase for two (2) years except...
- Page 17 Copyright. Todos los derechos reservados. Modelo CVP41810 Su cortasetos fue diseñado y fabricado de acuerdo con nuestros altos estándares de confiabilidad, facilidad de operación y seguridad para el operario. Si se lo trata con cuidado, le otorgará años de óptimo rendimiento y resistencia.
- Page 18 ADVERTENCIAS DE SEGURIDAD IMPORTANTES ADVERTENCIAS DE SEGURIDAD GENERALES PARA LA HERRAMIENTAS ELÉ CTRICAS ADVERTENCIA: Lea todas las advertencias de seguridad y las Evite que la herramienta se active accidentalmente. instrucciones. La inobservancia de las advertencias e instrucciones Asegú rese de que el interruptor esté en la posició n de puede causar descargas eléctricas, incendios o lesiones graves.
- Page 19 ADVERTENCIAS DE SEGURIDAD GENERALES PARA LA HERRAMIENTAS ELÉ CTRICAS Servicio Al dar servicio a una herramienta eléctrica, só lo utilice Permita que un técnico de reparació n calificado preste piezas de repuesto idénticas. Siga las instrucciones señ aladas en la secció n Mantenimiento de este manual. El servicio a la herramienta eléctrica, y só...
- Page 20 ADVERTENCIAS DE SEGUIRDAD PODADORA DE SETOS PELIGRO — Mantenga las manos alejadas de la hoja. Entrar en Coloque la máquina encendida en superficies firmes y contacto con la hoja puede provocar lesiones corporales serias. aisladas ú nicamente, porque la hoja de corte puede entrar en contacto con cables ocultos.
- Page 21 ESPECIFICACIONES DEL PRODUCTO CVP41810 Motosierra telescó pica / de cadena Cortasetos telescó pico Entrada ….………………………….120V, 60Hz, 7A, CA únicamente ………………….….…………….…120V, 60Hz, 4.5A, CA únicamente Velocidad………………………..……………...…………………..12m/s ……………………………………….…… 3200 carreras por minute Longitud de la barra Barra Oregon………………10 pulg. (25.4 cm)…………………………………………….…………………………..18 in.
- Page 22 MONTAJE CÓ MO TRANSFORMAR UNA MOTOSIERRA TELESCÓ PICA DESEMBALAJE EN UNA MOTOSIERRA Este producto requiere algunas operaciones de montaje. Desconecte el mango trasero y el cabezal de corte de los Extraiga el producto y los accesorios de la caja con cuidado. Asegúrese de que estén incluidos todos los elementos detallados extremos del polo telescópico al levantar el botón de en la lista de embalaje.
- Page 23 MONTAJE CÓ MO TRANSFORMAR EL CORTASETOS TELESCÓ PICO EN AJUSTARLATELESCÓ PICO CORTASETOS DE TUBO 1. Para ajustar el polo telescópico, desconecte el producto del Desconecte el mango trasero y el cabezal de corte de los suministro eléctrico. Para aflojar el collar de fijación, gí relo en el extremos del polo telescópico al levantar el botón de liberación sentido contrario a las agujas del reloj.
- Page 24 INSTALACIÓ N / REEMPLAZO DE LA BARRA GUÍ A Y LA CADENA 13. Cuando la perilla de tensión esté completamente ajustada, la 10. Coloque la placa de la barra sobre la superficie de montaje de cadena está más ajustada. Para reducir el ajuste de tensión de manera que el espárragos quede en la ranura larga de la barra.
- Page 25 TENSIÓ N DE LA CADENA Y MANTENIMIENTO SEPARACIÓ N DEL CALIBRE DE PROFUNDIDAD (Fig. 22) Levante la lima del acero en cada pasada de vuelta. El calibre de profundidad se debe mantener a una distancia de Realice algunas pasadas firmes en cada diente. Lime todas las cuchillas izquierdas en una misma dirección.
- Page 26 OPERACIÓ N ADVERTENCIA: No coloque ningún tipo de accesorio o dispositivo de Antes de encender la unidad, asegú rese de que la motosierra telescó pica/de cadena no esté en contacto con ningú n objeto. sujeción en la motosierra. Dicha práctica podrí a resultar peligrosa. PUESTA EN MARCHA DEL POLO O LA MOTOSIERRA ADVERTENCIA: Mantenga el cable alejado de la cadena mientrasutiliza la motosierra.Tenga cuidado de no tropezar con el...
- Page 27 INSTRUCCIONES DE OPERACIÓ N POSITION CORRECTE POUR LA COUPE ADVERTENCIA: Compruebe que no haya ramas dañadas o muertas que pudieran caer y golpearlo durante el procedimiento de tala. N’utilisez pas la scie à long manche pour couper des arbrisseaux. Utilisez la tronçonneuse sans le manche. Antes de comenzar a cortar, planifique su ruta de escape (o rutas, en caso de que la ruta elegida esté...
- Page 28 INSTRUCCIONES DE OPERACIÓ N INSTRUCCIONES DE CORTE Apenas el árbol comienza a caer, detenga la motosierra y SERRADO SUPERIOR SERRADO INFERIOR deposí tela en el suelo de inmediato. Retí rese por el camino despejado pero observe la escena en caso de que algo le obstruya el paso.
- Page 29 OPERACIÓ N Antes de encender la unidad, asegú rese de que la motosierra PRECAUCIÓ N: La cuchilla se mueve por inercia después de apa- gar el motor. telescó pica/de cadena no esté en contacto con ningú n objeto. No trabaje en condiciones de humedad. PUESTA EN MARCHA DEL CORTASETOS TELESCÓ...
- Page 30 INSTRUCCIONES DE CORTE PODA LATERAL DE LOS SETOS. Comience desde abajo y realice USO DEL CORTASETOS DE TUBO el movimiento de barrido hacia arriba. (Fig. 39) SETOS PAREJOS. Para lograr setos excepcionalmente parejos, se sugiere extender una cuerda a lo largo de los setos a modo de guí...
- Page 31 • NÚMERO DE SERIE LLÁ MENOS PRIMERO !! Llámenos primero si tiene preguntas sobre el funcionamiento o el mantenimiento de este producto al 1.800.313.5111, de 8:00 a 17:00, hora estándar del este, o enví e un correo electrónico a earthwise@reelin.com.
- Page 32 MANUAL DEL OPERARIO MOTOSIERRA ELÉ CTRICA CONVERTIBLE COMBINADA 4 EN 1 / MOTOSIERRA / CORTASETOS / CORTASETOS TELESCÓ PICO Este producto está amparado por patentes de EE. UU. y otras patentes internacionales. Copyright. Todos los derechos reservados. GARANTÍ A GARANTÍ A LIMITADA PARA MODELOS ELÉ CTRICOS CON CABLE Este producto ha sido fabricado para The Great States Corporation/American Lawn Mower Company.
- Page 33 Ce produit est protégé par des brevets américains et d’autres brevets internationaux Droit d’auteur. Tous droits réservés. Modèle CVP41810 Ce produit a été conçu et fabriqué selon notre norme élevée de fiabilité, de facilité d’utilisation et de sécurité de l’utilisateur. Correctement entretenu, il vous procurera des années de service intensif et sans souci.
- Page 34 AVERTISSEMENTS DE SÉ CURITÉ IMPORTANTS AVERTISSEMENTS RÈ GLES DE SÉ CURITÉ GÉ NÉ RALES RELATIVES AUX OUTILS É LECTRIQUES AVERTISSEMENT : Lire tous les avertissements et toutes les Éviter les démarrages accidentels. S’assurer que le instructions. Ne pas suivre l’ensemble des avertissements et des commutateur est en position d’arrêt avant de brancher instructions peut entraîner une électrocution, un incendie ou des l’outil.
- Page 35 AVERTISSEMENTS RÈ GLES DE SÉ CURITÉ GÉ NÉ RALES RELATIVES AUX OUTILS É LECTRIQUES Utiliser exclusivement des pièces identiques à celles Dépannage d’origine pour les réparations. Se conformer aux Les réparat ions doivent être confiées à un technicien qualifié, instructions de la section Entretien de ce manuel.
- Page 36 AVERTISSEMENTS DE SÉ CURITÉ RELATIFS TAILLE-HAIES DANGER — É loigner les mains des lames. Le contact avec les Soutenir l’outil électrique par les prises isolées seulement, lames peut provoquer des blessures graves. car les lames peuvent toucher un fil camouflé. Le contact des lames avec un fil sous tension «...
- Page 37 SPÉ CIFICATIONS DU PRODUIT CVP41810 Tronçonneuse à manche Taille-haie à manche Entrée….…………………………...120 V, 60 Hz, 7 A, c.a. seulement ……………….….…………….…120 V, 60 Hz, 4.5 A, c.a. seulement Vitesse ………………………..……………........12 m/s………………………….……....3200 déplacements par minute Longueur du guide-chaîne…..Guide-chaîne Oregon de 25.4 cm (10 po.) …………………………………………….……..45.72 cm (18 po.) Longueur déployée …………...………………..……..2,44 m (8 pi.) ……………………………………………….…………….2.68m (8,8 pi.)
- Page 38 ASSEMBLAGE DÉ BALLAGE CONVERSION DE LA SCIE À LONG MANCHE À LA TRONÇ ONNEUSE Ce produit ne requiert aucun assemblage. Enlevez avec précaution le produit et les accessoires du carton. 1. Débranchez la poignée arrière et la tête de coupe des extrémités Assurez-vous que tous les éléments figurant dans la liste du du manche télescopique en soulevant le bouton de libération rapide contenu sont inclus.
- Page 39 ASSEMBLAGE CONVERSION DU TAILLE-HAIE À MANCHE À TAILLE-HAIE RÉ GLAGE DE LA LONGUEUR DU MANCHE TÉ LESCOPIQUE (Fig.11) Débranchez la poignée arrière et la tête de coupe des extrémi tés du manche télescopique en soulevant le bouton de libération 1. Débranchez le produit de l'alimentation pour régler le manche rapide et en tirant tout droit.
- Page 40 REMPLACEMENT DU GUIDE-CHAÎ NE ET DE LA CHAÎ NE 10. Placez le guide-chaîne à ras contre la surface de montage afin 13. Lorsque le bouton de tension est complètement serré, la chaî ne est le plus serré qu’il soit. Pour régler légèrement la tension de que son goujon soit dans la fente du guide-chaî...
- Page 41 TENSION ET MAINTENANCE DE LA CHAÎ NE Relevez la lime de l’acier à chaque retour de celle-ci. DÉ GAGEMENT DU LIMITEUR DE PROFONDEUR (Fig. 22) Effectuez quelques coups fermes sur chaque dent. Affûtez toutes les Le limiteur de profondeur doit être maintenu à un dégagement de gouges de gauche dans un sens.
- Page 42 UTILISATION Avant de mettre l’outil en marche, assurez-vous que la scie à long AVERTISSEMENT : n’utilisez pas la tronçonneuse avec n’importe quel manche ne touche pas d’objets. type d’accessoire ou d’outil. Une telle utilisation pourrait être dangereuse. DÉ MARRER LA SCIE À MANCHE/SCIE À LA CHAÎ NE Appuyez sle bouton de sécurité...
- Page 43 INSTRUCTIONS D’UTILISATION POSITION CORRECTE POUR LA COUPE AVERTISSEMENT : vérifiez si l’arbre comporte des branches endommagées ou mortes susceptibles de tomber et de vous heurter Votre poids doit être équilibré, avec les deux pieds sur un sol ferme. pendant l’abattage. Maintenez le bras gauche avec le coude verrouillé...
- Page 44 UTILISATION INSTRUCTIONS DE COUPE Dès que la branche commence à tomber, arrêtez la tronçonneuse et TRONÇ ONNAGE PAR TRONÇ ONNAGE PAR LE HAUT LE BAS éloignez-vous immédiatement par le chemin de retraite. Observez l'action au cas où quelque chose tomberait vers vous. Faites attention aux parties de la couronne ou aux branches qui peuvent tomber et regardez où...
- Page 45 UTILISATION Avant de mettre l’outil en marche, assurez-vous que le taille-haie à ATTENTION : les lames bougent encore après la mise hors tension. - N'utilisez pas l’outil dans des conditions mouillées. long manche ne touche pas d’objets. - N’utilisez pas l’outil avec une rallonge endommagée. DÉ...
- Page 46 INSTRUCTIONS POUR LA COUPE UTILISER LE TAILLE-HAIE — TAILLE LATÉ RALE DES HAIES Commencez par le bas et balayez vers le haut. (Fig. 39) HAIES DE NIVEAU - Pour obtenir des haies exceptionnellement droites, une ficelle peut être tirée le long de la haie et servir de guide. (Fig. 38) FIG.38 FIG.39 ATTENTION : N’utilisez pas le taille-haie de 46 cm (18 po) pour couper...
- Page 47 • NUMÉ RO DE MODÈ LE CVP41810 • NUMÉ RO DE SÉ RIE APPELEZ-NOUS D’ABORD!! Appelez-nous d'abord pour toute question concernant le fonctionnement ou la maintenance de votre tronçonneuse au 1.800.313.5111 entre 8h00 et 17h00, heure normale de l'Est, ou envoyez des courriels à earthwise@reelin.com.
- Page 48 MANUEL DE L’UTILISATEUR TAILLE-HAIE À MANCHE/TAILLE-HAIE/SCIE À MANCHE/TRONÇ ONNEUSE COMBO 4-EN-1 CONVERTIBLE É LECTRIQUE Ce produit est protégé par des brevets américains et d’autres brevets internationaux Droit d’auteur. Tous droits réservés. GARANTIE GARANTIE LIMITÉ E POUR LES MODÈ LES É LECTRIQUES AVEC FIL Ce produit est fabriqué...
Need help?
Do you have a question about the CVP41810 and is the answer not in the manual?
Questions and answers