Advertisement
Table of Contents
- 1 Use and Care Manual
- 2 Table of Contents
- 3 Safety Instructions
- 4 Electrical Specifications
- 5 Function and Technical Specification
- 6 Features and Identification of Parts
- 7 Operation and Settings
- 8 Protection
- 9 Handling and Transportation
- 10 Installation and Adjustment
- 11 Important Notes
- 12 Drainage Instruction
- 13 Maintenance and Service
- 14 End of Season Storage
- 15 Troubleshooting
- 16 Appendix
- Download this manual
Advertisement
Table of Contents

Summary of Contents for Intertek DELLA
-
Page 1: Use And Care Manual
Portable Air-conditioner Use and Care Manual Part Number: 048-GM-48266 Thank you very much for selecting this new model of Portable Air Conditioner, please read this Use and Care Manual carefully before installing and using this appliance. Please keep this Use and Care Manual properly for 1 / 18... -
Page 2: Table Of Contents
future reference. Contents Safety Instructions..…………………… ……… …………………………………………………………………………….…3 Function and Technical Specification….…… ……… ……………………………………………………………………...…. 5 Features and Identification of Parts…………………………… ……… ………………………………………………….……6 Operation and Settings………………………………………… …… …………………………………………………………8 Protection…………………………………… …… …………………………………………………………………..…………12 Handling and Transportation……………… …… …………………………………………………………………………….12 Installation and Adjustment ……………… …… …………………………………………………………..…………………13 Drainage Instruction…………………... -
Page 3: Safety Instructions
Safety Instructions 1. Electrical Specifications 1. All wiring must comply with local and national electrical codes and be installed by a qualified electrician. If you have any questions regarding to the following instructions, please contact a qualified electrician. 2. The unit must be installed in accordance with national wiring regulations. Check available power supply and resolve any wiring problems before installation and operation of this unit. - Page 4 3.Cautions: ※ Keep the unit at least 1 meter away from TV or radios to avoid electromagnetic interference. ※ Do not expose the unit under direct sun light to avoid surface color fading. ※ Do not tilt the unit for more than 35 degrees or upside-down while transporting. ※...
-
Page 5: Function And Technical Specification
Function and Technical Specification This new series of portable air-conditioner is designed with different cooling capacity levels. ※ This unit offers cooling, dry, fan and sleep modes, ideal for home and office use. ※ This unit is with two fan-speed level accessible by panel control and remote control. ※... -
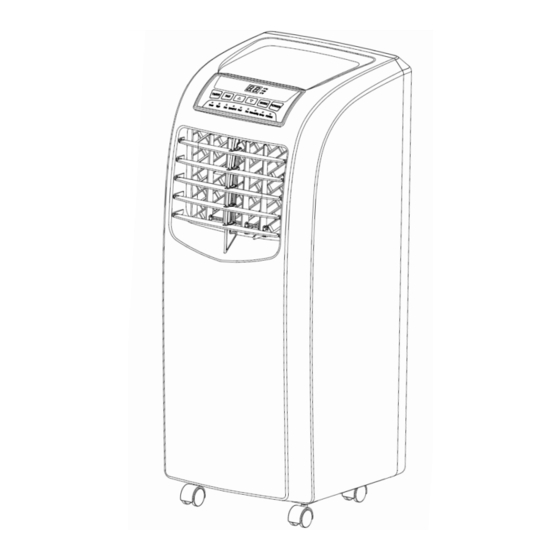
Page 6: Features And Identification Of Parts
Features and Identification of Parts 1. Features New appearance and compact. ※ Both horizontal and vertical louvers can be manually adjusted to enhance cooling performance. ※ Integrated design of humanized handle and remote control compartment. ※ Large LED control panel, more visualized. ※... -
Page 7: Operation And Settings
7. Back shell 17. Drain hole and cover 8. Main vertical louver 18. Filter 9. Horizontal louvers connecting rod 19. Filters 10. Vertical louvers connecting rod 20. Filter 11. Handle (right side for remote control storage) 21. Chassis 12. Protective net of exhaust vent 22. -
Page 8: Protection
Turn on the unit. Plug in and all indicators will light up on control panel and reminding music will be on, display window will show ambient temperature ranging from 10- 35℃, will in red color, unit is standby for operation. Press the button, the unit is on with reminding music sounded, will in green color, and operate in... - Page 9 3. Dehumidify mode: Fan will run at low speed automatically, and the speed can’t be adjusted. Room temperature can’t be adjusted. Room temperature will automatically show on LED display with range 10-35℃ On/Off time can be set. E1, E2 & E4 protection (see Troubleshooting). Water-full warning protection.
- Page 10 Button: press this button to start unit when it is energized or stop the unit when it is in operation. Button: press this button to set unit automatic on and off time Button: press this button to select high speed of fan running (except dry and sleep modes) Button: press this button to select low speed of fan running.
-
Page 11: Handling And Transportation
Remote Control Storage Area If the air conditioner will not be used for an extended period of time, remove the batteries from the remote control. 4. Remote Control Storage Your air conditioner has a special place for remote control storage. Please always put remote control into compartment after use. -
Page 12: Installation And Adjustment
Drain the water in the unit completely to prevent water leakage and wet the floor or carpet before handling or moving the unit. Take away the remote control before handling or moving the unit Handling Position Air outlet Installation & Adjustment 1. - Page 13 Slant Panel A Take two ends of exhaust hose and its adapter assembly (as Photo). Put front end of exhaust hose assembly onto jugged position of exhaust outlet of back panel (as Photo). Remark: Keep the right direction of slant side A of adapter, for ease installation of window seal-plate. Hold the unit by one hand, carry the exhaust hose assembly with another hand and push it into unit gently, for good lock of two parts.
-
Page 14: Important Notes
1.4 Installation of the unit Move the unit together with its exhaust hose assembly in front of the window and keep the unit at least 50cm away from the walls or other objects. (As Photo). Install the rectangle end of exhaust hose adapter into the corresponding rectangle hole in window seal-plate assembly, fix it with screw and close the window (as Photo). -
Page 15: Drainage Instruction
air-conditioner. The exhaust hose must be smooth or it may lead air-conditioner overheat and trip because exhaust hose is obstructed. Drainage Instruction 1. Manual drain: When the water volume reached its alarm level in water tank, warning sounds and unit is automatically stop working, both water-full indicator and “FL”... -
Page 16: Maintenance And Service
Maintenance and Service Remark: Turn off the unit and pull out the plug before maintain or send the unit to service center. 1. Surface cleaning Clean the unit surface with wet and soft cloth, but do not use chemical solvents such as alcohol and gasoline to avoid any damage to unit. -
Page 17: End Of Season Storage
End of Season Storage 1. Screw off the drain cover, and then pull out the stopper to drain water completely. Note: the tilt angle of the unit must be≦ 30 2. Keep the unit running in fan mode half day to dry inside of unit completely to prevent from going mouldy. 3. -
Page 18: Appendix
The batteries have no electricity Replace the batteries LED displays error code Check the tube temperature sensor and Tube temperature sensor failure “E1” related circuits LED displays error code Check the room temperature sensor and Room temperature sensor failure “E2” related circuits LED displays error code Restore the functions automatically...
Need help?
Do you have a question about the DELLA and is the answer not in the manual?
Questions and answers
I'm getting E1, Tube temperature sensor failure. Where would I find this sensor?