
Summary of Contents for Humongous Fan 51512
- Page 1 Humongous Fan Installation Guide Do not discard these instructions, save for further use 51512, Oct. 2014 23103 Miles Road (216) 663-8830 Cleveland, OH 44128 www.humongousfan.com...
-
Page 2: Table Of Contents
Table of Contents 1. Safety Precautions 2. Parts List 3. Mounting Scenarios 4. Electrical Installation 5. Blade Installation 6. Operating Instructions 7. Periodic Maintenance 8. Troubleshooting 9. Warranty 23103 Miles Road (216) 663-8830 Cleveland, OH 44128 www.humongousfan.com... -
Page 3: Safety Precautions
7. The fan and any supplemental devices must be installed by qualified personnel. The Humongous Fan Company will not be responsible for personal injuries or damage to property or equipment caused by improper installation. -
Page 4: Parts List
Consult a structural engineer if there is any question relating to the integrity of the structure. PARTS LIST BEFORE ATTEMPTING TO INSTALL YOUR HUMONGOUS FAN, PLEASE VERIFY THAT YOU HAVE THE FOLLOWING: 1. Motor/Hub Assembly 2. Blade Mounting Hardware Kit, containing: a. -
Page 5: Mounting Scenarios
MOUNTING SCENARIOS The Humongous Fan is designed to be mounted to either a series of braces spanning two joists or, directly to an I-beam. The mounting must be sufficiently secure to absorb up to 250 ft-lbs (340 N-M) of torque, plus an appropriate safety factor. All bolts must be torqued... - Page 6 Below is a typical installation mounting across joists. Figure 1 As the span between joists is increased, heavier material must be used. The chart below indicates the minimum material cross sections for various spans. Please note the acceptable materials listed require the use of two sections spaced on 14”...
- Page 7 Table 2 Joist Spans and Suggested Support Materials Span Acceptable Materials 2 1/2" x2 1/2"x1/4" Angle Iron 6' or less PowerStrut PS 210 or Equivalent 8' or less 3"x3"x1/4" Angle Iron 3 1/2x3 1/2x1/4" Angle Iron 10' or less PowerStrut PS 200-2T3 or Equivalent 12' or less 3"x3"x1/4"...
-
Page 8: Electrical Installation
Figure 2 Remove this plug. Replace with the breather element. Once the fan motor/hub assembly is installed, electrical installation can proceed. Do not attempt to install fan blades until the electrical installation is complete and the system is tested. ELECTRICAL INSTALLATION For electrical installation, please refer to the manual provided with the control cabinet. - Page 9 For the High Voltage Connection, see Motor Junction Box Figure below: 23103 Miles Road (216) 663-8830 Cleveland, OH 44128 www.humongousfan.com...
-
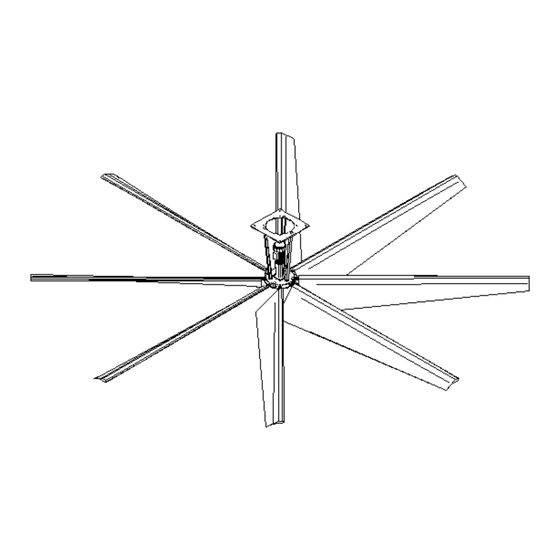
Page 10: Blade Installation
BLADE INSTALLATION Once the electrical installation is completed and tested, the blades can be installed. The blades have a solid spar which is tapped to accept two ¼-20 bolts. The spars have a sliding fit into the spar tubes and may require some light lubrication to assemble. Do not hammer the blade into the spar tube as you could damage the blade or the gearmotor bearings. -
Page 11: Operating Instructions
the values in Table 1. The blades have tapped holes to accept the bolts. Once the blades are installed, the fan should be checked for interference with nearby objects by rotating it slowly by hand. The fan should then be run at the lowest speed possible (generally around 10 Hertz) for a few minutes. -
Page 12: Periodic Maintenance
PERIODIC MAINTENANCE WARNING: Before attempting any maintenance, deenergize the fan and lock out the power to ensure that no one energizes the fan while maintenance is being performed. Annual Maintenance: 1. Inspect blades for damage. Any noticeably bent blades must be replaced before reenergizing the fan. -
Page 13: Warranty
The warranty period shall commence 14 days after date of shipment unless the customer can prove that the fan was installed at a later date. In those cases, the customer must inform the Humongous Fan Company in writing of the delay in warranty commencement prior to fan installation. - Page 14 For the first year of the warranty period, the Humongous Fan Company will reimburse the customer reasonable expenses for an outside contractor to complete any necessary repairs for the fan to operate as designed. The Humongous Fan Company warranty is limited to repair and replacement of failed components during the warranty period.
- Page 15 In the case of some purchased components, particularly electrical components, the manufacturer of the component may determine the cause of failure. In those cases, the Humongous Fan Company will defer to the expertise of the component supplier. If the component...
Need help?
Do you have a question about the 51512 and is the answer not in the manual?
Questions and answers