Table of Contents
Advertisement
Advertisement
Table of Contents

Summary of Contents for Chris Lord Alge CLA MixDown
- Page 1 CLA MixDown User Guide...
-
Page 2: Table Of Contents
Waves CLA MixDown Contents Introduction ........................ 3 A Word from Chris Lord Alge ..................... 3 Getting Started ........................ 4 Components and Interface .................... 5 Mono Component ..........................6 Stereo Component ........................... 7 Controls and Indicators ..................... 8 Input Section ............................ 8 Processor Controls ........................... 9 Main Meters ..........................11 Output Section ..........................12 CLA MixDown / User Guide... -
Page 3: Introduction
Introduction CLA MixDown glues together and brings life to a mix. Insert it on your mix buss and mix through the plugin or open it on a mix in progress to add depth and impact. Four faders provide control over the color, dynamics, and drive of the mix. -
Page 4: Getting Started
Getting Started The CLA MixDown is simple and intuitive to use. It can be inserted on any buss, but it shines most brightly when inserted between the buss master and the mix master. That’s what we’ll do in this quick start guide. -
Page 5: Components And Interface
9. Use the MixDown input and output faders to compensate the output level as you adjust parameters. This quick start was about using CLA MixDown between the main buss and the master buss. You can insert the plugin on other busses, but make sure that the insert is pre-fader. Just follow these steps, listen to what the plugin is doing, and keep in mind what you want to accomplish. -
Page 6: Mono Component
Mono Component CLA MixDown / User Guide... -
Page 7: Stereo Component
Stereo Component CLA MixDown / User Guide... -
Page 8: Controls And Indicators
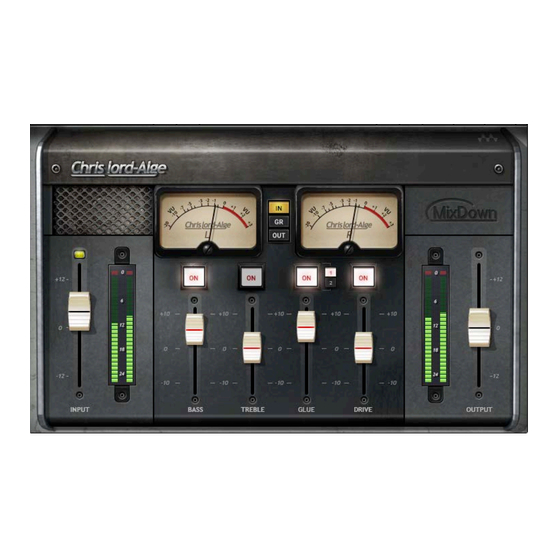
Controls and Indicators Input Section Input fader Range -12 to +12 Sensitivity LED Indicates input level. Adjust input fader to achieve correct LED color. Green = input level too low Yellow = optimal input level Red = input level too high CLA MixDown / User Guide... -
Page 9: Processor Controls
Input meter Indicates peak input level Range -24 dBFS to 0 dBFS Input over-level indicator Red LED indicates input level over 0 dBFS. If the indicator is red, the input level is too high, even if the Input LED is not red. - Page 10 Bass Controls the level of a low-shelf filter and adds warmth to the mix. Range: -10 to +10 Switch: Off or On Treble Controls a high-frequency bell EQ band and can add sparkle and clarity. Range: -10 to +10 Switch: Off or On Glue Controls the amount of compression applied to the signal.
-
Page 11: Main Meters
Main Meters There are two VU meters with three modes. In the stereo component, meters are labeled “L” and “R.” The mono component has two meters labeled “M.” There are three metering modes: Shows input level OUT Shows plugin output level Shows gain reduction A calibration screw enables you to align the VU meter to the digital reference level. -
Page 12: Output Section
Output Section Output fader Used to adjust plugin output Range -12 dB to +12 dB Output meter Indicates peak output level Range -24 dBFS to 0 dBFS Output Over-level indicator Red LED indicates when level exceeds 0 dBFS. Click on the indicator to clear overs. CLA MixDown / User Guide...
Need help?
Do you have a question about the CLA MixDown and is the answer not in the manual?
Questions and answers